I had a contact through my blog from a gentleman who had inherited a Burgess Bandsaw. I have published various support details for the BK3 so he was curious about the model in his possession and he sent me some pictures as shown below.
I have never seen this model before. The BK1 through BK3 all have a belt drive from the motor but this one has a chain drive. The shape of the housing is much more curved and both the blade wheels look to be cast and perforated rather than being plastic. It is clearly a very early model, probably before the design went through a manufacturing cost reduction.
The manufacturers plate suggests this is Serial #225.
If anyone knows the likely history of this version I would be interested to know more details.
Links to similar or related post are listed below : –
I have had issues when opening Fusion 360 files downloaded from third party fellow users. I never really got to the bottom of this. Sometimes they would send me an assembly file and I could open the separate items in the structure but not the overall structure itself.
Things then got worse after a visit to France when I created some straight single item models on the machine out there. On return to the UK I could not open these files getting a message “Try again when update completes”. What updates ?? Both the Fusion install in UK and France were running the same version of Fusion so what was the problem ?
I happened upon a thread in the Fusion forum that suggested uninstalling Fusion and re-loading from scratch. This solved the problem. The files all now open on all machines.
Be warned – trying to find a simple click to download button on the Fusion site without going through lots of marketing click boxes is not simple. I was expecting to just log into the Fusion site with my account details and find a hassle free download. It doesn’t seem that simple. I got there in the end though and all is running well.
As the months (and years !) have passed while authoring this site, my favourite YouTube sites have morphed and changed as my skill level and interests have become more focussed. The other aspect is that many of my early favourites have just faded away and now rarely post if at all. I guess it takes a great deal of commitment to create regular footage over a long period of time so it is understandable that people come and go.
At the risk of everyone clicking and leaving, here is a share of the sites I now look forward to visiting and viewing : –
Top of the list is Clough42 for his highly professional, regular posts on home workshop activity but key for me is his use of Fusion 360 for all his engineering modelling.
I met Jimmy Diresta at NYC CNC in 2016 and I love to watch his almost ‘off the cuff’ creations in metal and wood.
For TIG welding I have watched many sources but Pacific Arc TIG Welding is my current favourite and Dusty does some amazing stainless TIG welding artworks.
I need to mention This Old Tony even though he has been absent from the scene for a long period. He is now back and on top form.
Then of course for serious CNC activity there is John Saunders and John Grimsmo. Both these guys have done incredibly well as they have emerged from their garages and blossomed into YouTube stars.
Finally a less well know site for Fusion 360 is Mechanical Advantage hosted by Kevin who was my instructor on the NYC CNC Fusion 360 course. Really nice guy and always helpful if you have a problem.
So that is my current short list of ‘ones to watch’. If you haven’t discovered any of them then check them out. But don’t forget to come back here every now and then just in case I get up to something interesting.
Burgess BK3 Final Modification – Lower Blade Guide
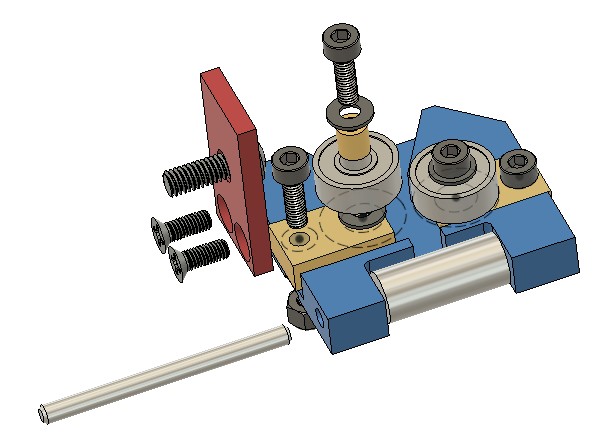
This is the final piece in my Burgess BK3 bandsaw upgrade jigsaw. Having successfully replaced the top guide with a double bearing assembly my attention turned to the lower guide. Using the same principle as the upper guide I came up with the following assembly.
Stylised Fusion 360 image of the replacement lower guide assembly on my Burgess BK3 bandsaw
This seems to work well and is straightforward to implement. The bearings are standard 1/2″ size parts from Bearing Boys. These need a small brass bush to mount them on the sliding brass blocks. The blocks need a single M3 washer to space the bearing from the block and the body.
The blade pressure roller is made from silver steel and can be heat treated to improve wear from the blade edge.
The mounting bracket arm picks up on the original M5 mounting screw concept. The bracket could be milled onto the main body as a CNC operation but the two part assembly works fine and is very rigid in operation.
The link below is a complete set of notes and drawings pulled into one ZIP file to cover all the modifications I have done and separately document in my blog and other author’s notes that I have come across. I hope that helps.
When I bought my Tormach PCNC440 in 2016 I included the enclosure kit in my order. On receipt I thought that fitting the enclosure would dominate the size of the workshop so I never got round to fitting it. It has sat in its shipping box since then. I have consequently shared quite a bit of my swarf (chips) with long suffering family.
After a recent (particularly heavy) CNC run I had a serious covering of swarf in the machine tray and because I had no enclosure round the mill, I had quite a lot distributed further afield (i.e. into the house). Domestic peace was becoming an issue. Time to do something about it.
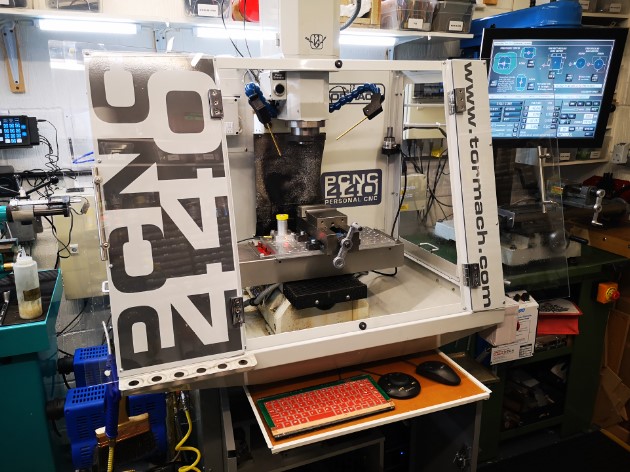
Out came the enclosure kit, cobwebs dusted off and around three hours later I had the enclosure fitted. I have to say it looks good and does not overpower the workshop as I thought it would. My wife is impressed and says it looks a more professional machine and ‘if you had it why didn’t you fit it before now’ ?
The picture above shows the enclosure mounted on my PCNC440 with the monitor in the original position before fitting the extension arm to the ISO bracket. The keyboard tray uses a domestic drawer rail mounted on the top of the standard Tormach cabinet. My recently fitted dual fogbuster system and my Hall Effect based tool height setter (yellow top) are visible.
The fitting did however create some follow up problems.
My control monitor had up to now been mounted on the side of the 440 on a standard ISO TV mount. With the enclosure fitted this meant it was ’round the side’ and difficult to get to. I debated a new long reach ISO but they are expensive. Plan B was to make something. I rummaged around in my aluminium stock and with the help of Fusion 360 came up with a seriously overengineered extension arm to add to the existing ISO mount. This would allow the monitor to move forward to be in reach at the front of the mill.
My seriously over engineered extension bracket to move the ISO mounting of the monitor more to the front of the 440
This bracket became the first CNC job to run after fitting the enclosure. I am pleased to say it was the cleanest my workshop floor had ever been after running a job.
Having fitted the new bracket and mounted the monitor, all the cables needed extending. Fortunately I had had the foresight on my original order to include the extension cable kit. As a result I only had to extend the power supply lead from the monitor 12V ‘brick’ supply.
The second issue was where to mount my ITTP probe as this had formerly mounted on the side of the 440. With help of some more Fusion design I modelled a corner mount that picked up on the enclosure fastenings.
After that first heavy machining run I noticed for the first time the slight smell of the mist coolant when opening the enclosure doors. Before the enclosure was fitted the smell must have dispersed into the general workshop air. With the enclosure fitted the air was concentrated inside the mill and I only got the smell when sticking my head inside. While it had never been a problem (as far as I can tell …) I thought I should do something about it.
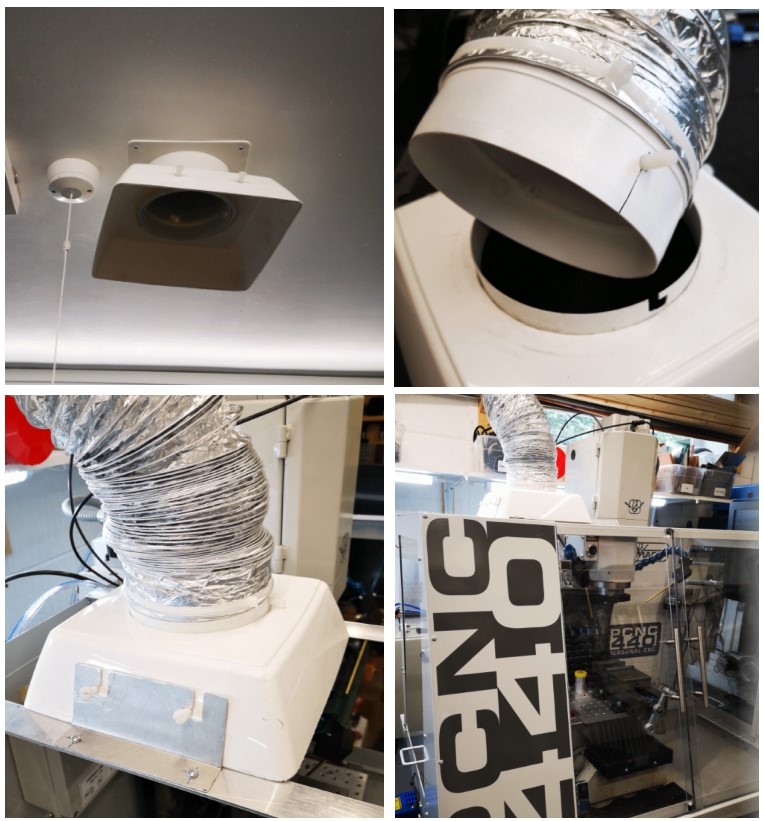
Sometime ago I installed a ceiling extract duct in the workshop. This vents to the outside world via a custom roof tile. Normally the system sits with a flared cowling (made from a cut down flower pot) on the ceiling entry duct. The system normally acts as a background trickle extract. The cunning plan in the design was to use various pipe components to provide bayonet style connection pins (Nylon screws) to allow extension trunking to be used. A bit like a BNC RF connector if this is familiar to you. This would allow me to use an add-on length of expanding flexi trunking to bring the extract nearer to any heavy fumy activity such as welding or oil bath hardening.
With the use of further scrap odds and ends of aluminium, I mounted a pair of support bars across the top of the new 440 enclosure. These would fix the ducting over the enclosure during heaving CNC sessions. Not a total solution but certainly one that will reduce the general smell of XtremeCut 250C when I stick my head in the enclosure.
Extract system showing ceiling mounting intake, trunking adapter and mounting on my Tormach PCNC440. Note the two Nylon screw protrusions are for a bench mounting clamp when used for welding extraction etc and now used on this new use of the system on the mill.
A good day’s activity with all the issues addressed and domestic bliss hopefully restored.