I had been using Hall Effect devices to modify my William Smith Gearless Gravity Arm clock and had been surprised by their ease of use and repeatable trip points. (More about this to follow in a separate post).
I had also been frustrated with my inability to set tool heights reliably in PathPilot despite using various methods all of which didn’t want to agree with each other.
This resulted in the construction of a Hall Effect based Tool Height Setter that appears to solve the problem. The write up is lengthy so I have committed it to PDF for download but here are a couple of images to give you an idea of the result.
A simple cross section sketch of the tool height setter concept using a Hall Effect sensor
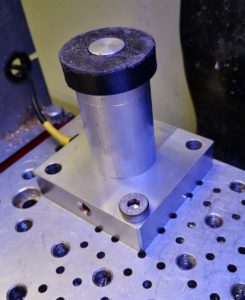
Finished tool height sensor mounted on the PCNC440 milling table
I have my Tormach PCNC440 wired into the workshop network and as a result if a new version of PathPilot is issued my PathPilot controller warns me. This is quite nice as there is no formal emailing warnings of new issues by Tormach. Anyone whose machine is not Internet connected would need to check periodically with the Tormach site to see if an update was needed.
To continue the story … last week I got a warning of a new version of PathPilot (2.4.0) was available and I duly downloaded. One of the immediately obvious changes in the new firmware was a G37 tool measurement routine which works in conjunction with a simple Normally Closed tool setter. From my previous ramblings you will see that I had done a combiner box to allow both probing and toolsetting to share a common input to the Tormach. In theory I was therefore ready to go ….
From my many years in industry I should know that all that glitters etc … the new routine did not work. I thought it must be me but in the end I logged a support call with Tormach and sent them my log file. I also logged the problem on the NYC CNC forum to see if anyone else was having the same issue. I did get one response saying that he was not having an issue. The plot thickened and nothing back from Tormach.
A couple of days later the same responder said there was a fix update available from the Tormach site. It seems the software worked well in G20 Imperial mode but not in G21 Metric mode. He was running Imperial and I was trying to run in Metric Software update downloaded and all is well. It is rather nice. You tell PathPilot where the tool setter is located and then to run the auto tool measurement you put a G37 command in the GCode after a tool change. Away the spindle goes to the tool setter location, dunks the tool and updates the Tool Table. Magic.
Still waiting for Tormach to close off my enquiry and let me know they had fixed the problem and as a result there was a new firmware available. But it is Christmas and maybe they had other pressing matters.
I recently bought a special offer price tool height setter from Banggood. On arrival this seemed nicely made and robust and looked like a worthy addition to the armoury.
The Tormach PathPilot control software has facilities for tool height setting using such a probe. I also have a Wildhorse Innovations probing tool for edge and centre setting. Both these devices can be connected to the Tormach PCNC440 external input accessories connector which is a 5 pin 180 degree DIN.
The input to the Tormach accessory socket is a 2 wire connection. Sensing and operation of external tools like the probe and tool setter depends on the device having a normally closed connection that goes open circuit when activated (i.e. the probe tip moved or the tool setter pushed down). The probes are in essence a single pole normally closed switch.
Frustration Sets In
After spending time having to keep swapping these two devices in and out of the accessory connector I figured there must be a better way.
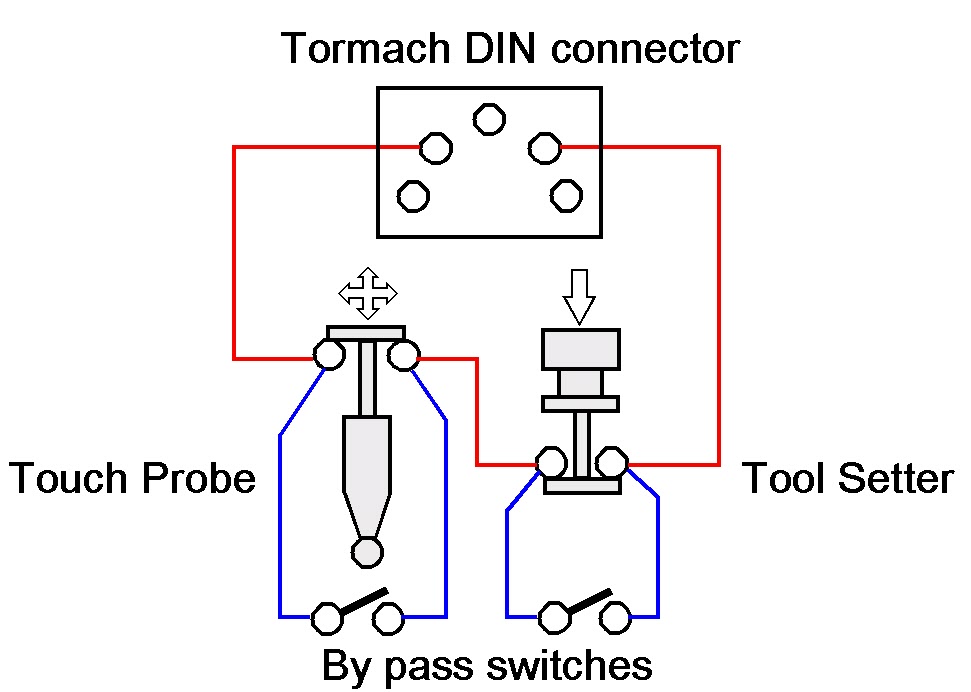
The Tormach does not care if you connect multiple probes at the same time provided they are all in series on an electrical loop to and from the two pins on the interface connector. Any device when activated will break the loop and create an interrupt to the PathPilot software. Because you will be in the area of PathPilot software that relates to the function you are measuring, the relevant probe will be the one you are intending to use.
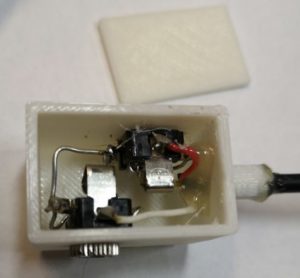
The Solution
What was needed was a simple interface box that allowed the two probes to be connected in electrical series back to the two pins on the DIN connector. I also wanted flexibility to be able to unplug either of the two probes and not affect the operation of the other. This meant that on removal of either probe it would need an electrical short circuit across the pins of the connector from which the tool had been removed.
This could be done with a small by-pass switch, that is normally open circuit, connected across the connector. You would manually close this switch if the probe is removed.
This is fine so long as you remember to activate the switch when you remove the probe otherwise the sensing loop will see an open circuit and the software will get confused.
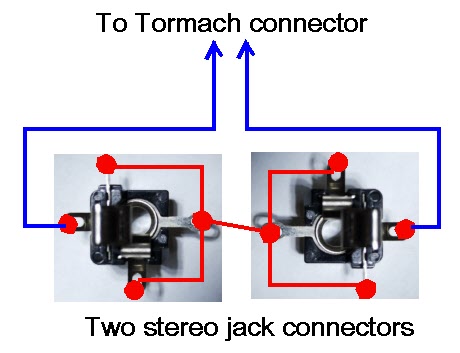
My solution was to use sockets for the connections that would automatically provide a short across their contacts when their mating plug is removed. A good example is an audio style jack plug socket. These come in various sizes (2.5mm, 3.5mm, 1/4″ etc). Usually on these sockets the tip of the connector gets shorted to another contact when there is no mating plug in place.
I had some 3.5mm stereo jack plug and sockets to hand (either mono or stereo can be used as it is only a two wire connection) and these were simple to wire for this application.
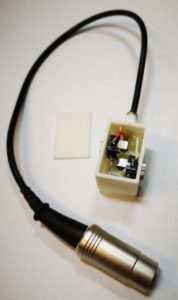
I also ran a modified version of one of my standard 3D printed enclosures to mount them in and fitted a flying lead to a 5 pin DIN to plug into the Tormach interface. A hot glued magnet onto the bottom of the enclosure allowed flexible mounting of the box somewhere on the Tormach body. The only fiddly bit was replacing the existing connectors on the two probes with a 3.5mm jack plug. (Don’t forget to the put the connector shell on the cable before you solder the wires in place ….. ).
A neat solution and the problem solved. Both devices plug into the box to perform their various probing functions into PathPilot. Unplug one of the probes and its mating socket will automatically short out the probe connections when the plug is removed. The remaining probe plugged into the other socket will continue to function.
Back from after a few weeks in France and back in the workshop.
Every now and then there is a project that is on the go and you can’t sit down and focus on it. It is a sort of mechanical procrastination. A reluctance to put the first pencil mark on the paper. You then suddenly find all sorts of other things that you kid yourself are more important / higher priority and you get distracted. You know that job will still be there but maybe tomorrow, not today. You suddenly develop a clear conscience about doing something else while you do some background thinking ….
This particular day started off by cleaning down the accumulated swarf (chips) in the 440 tray. Really important job. This led to a check behind the various 440 slideway bellows to see that all was well with the oiling mechanism on the slideways and the ballscrews. X and Y were fine but Z was dry. Not good news.
The 440 is supplied with a manual oiler as standard. This is a reservoir of oil and a pump/plunger which you pull out and release to initiate a slow pressure to the oil distribution pipes.
View of the manual oiler mounted on the Tormach 440
I checked the plunger and it didn’t feel like it was applying much pressure. This is not the first time I have experienced this problem. If I pumped a few times it felt better so something should have been happening at the oiling points on the Z. I disconnected each of these where I could and sure enough if I pumped hard enough some oil dribbled out but not with much pressure. Something probably not right with the plunger ?
Squeezing round the back of the mill I removed the top of the reservoir (4 retaining screws), disconnected the oil pipe union and lifted the plunger clear. The reservoir can be left in place sitting on the mounting bracket.
There is a large end cap at the union end of the plunger cylinder which I removed and sure enough I could see a mangled O ring. To get the plunger out you have to be a bit brutal. You pull the T handle plunger back out of its housing against its spring using the handle as shown above and then grip the shaft with pliers so you can then twist the handle off. What you don’t do then is suddenly release the pliers grip or the plunger will go into low Earth orbit under the pressure of its spring …
Having disassembled the plunger it was obvious that the O ring had failed quite badly. Tormach support do not offer spares as the oiler is a third party item. They do not know what size the O ring should be. Checking in my box of miscellaneous O rings it looked like a 9mm ID, 3mm thickness part would do the trick. Smearing the O ring with DC4 silicon grease allowed easy re-assembly into the piston bore and then back onto the 440. I now had lots of pressure and oil was apparent trickling down the Z slideways and ball screws. Job done. No pumping needed, just one pull out of the piston handle was generating a slow release of oil to the key areas.
The job I should have been doing was still sat on the bench glaring at me but psychologically I was doing something more important.
Next problem was the Fogbuster air activation valve. Under CNC control this reliably switched on but sometimes would not switch off when commanded to. There are various forum discussions on this problem and many contributors just replace the solenoid valve with a different version. Forum chat also recommended that electrical transient snubbers are fitted across various inductive loads in the Tormach control unit. I had some of these in my stock box (Tormach offer a kit for this). They are simply a series resistor and capacitor in an epoxy block. They are fitted across any inductive device to suppress switching transients. I dived into the control box and fitted one across the controller relay coil that switches the Fogbuster ON and OFF and another one across the outlet from the control box feeding the Fogbuster solenoid coil. See picture below.
Snubber across Fogbuster activation relay coil. There is a second snubber fitted to the lower LHS contact which activates the air solenoid. The other end of this snubber goes to the any ‘100’ connection which is mains neutral.
The problem seemed to be improved but still occasionally the solenoid did not switch OFF.
The Fogbuster solenoid has a clear housing over the activation coil connections and there is a LED inside this that comes on when the Fogbuster is switched on.
Fogbuster solenoid assembly showing the connection clear housing which plugs into the solenoid coil which in turn sits over the activating plunger assembly. There is a screw in the LHS to release the electrical connection and the nut on the top releases the coil to reveal the plunger housing.
This connection housing plugs into the coil and the mechanics of the solenoid body and is released with a screw in the end. Toggling the coolant ON and OFF via the PathPilot user interface I could see the LED responding correctly to the ON and OFF commands but occasionally the solenoid was not closing. It was therefore not an electrical problem but mechanical.
On top of the solenoid housing is a single large nut which when released allows the solenoid coil to be lifted off. This leaves two countersink screws which hold the mechanical plunger housing in place and if these are removed the plunger can be gently removed. Inside the valve is very simple. A central hole allows the air to pass through and when the solenoid is de-energised a spring forces the solenoid plunger to seal this hole. I gave everything a thorough blast with compressed air and re-assembled it. Care is needed re-assembling as there is a tiny O ring seal on the plunger cover. The solenoid now responds correctly to the PathPilot commands.
Another tick. Job done. Warm glow.
That other job is still sat on the bench glaring at me ….
Tormach’s PathPilot CNC control software offers a Tool Table facility that will accept up to 1000 different tool entries. This is more than enough tools for the small machine shop and if fully populated would represent a small fortune in tools and collet investment.
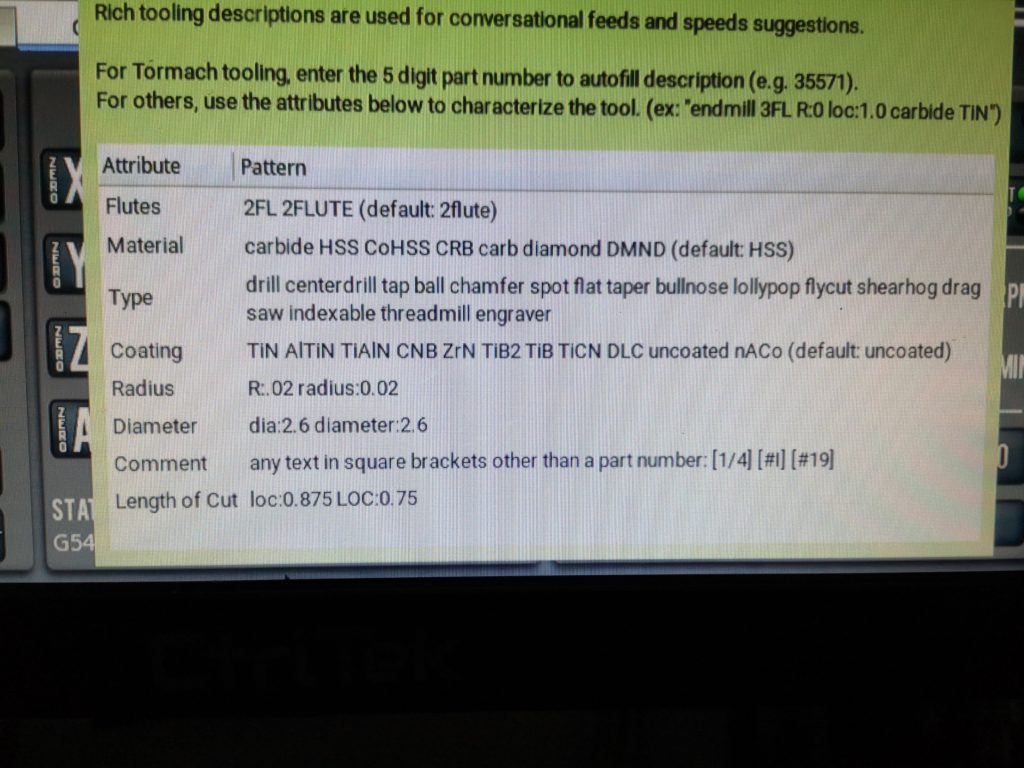
In PathPilot when you go to the Offsets tab to edit a tool, the following dialogue box comes up (sorry about the quality of the image ..) suggesting that you can be quite clever with the descriptions of your tools.
How you describe the tool helps local machining settings such as Conversational routines. It has no impact if you are loading an externally created GCode from CAD/CAM packages such as Fusion 360.
When I first started using PathPilot I had never bothered to add this intelligence when I described the tool. I simply wrote something that meant something to me. As time has passed and I have added more and more tools, the prospect of going back into the Tool Table and making edits to conform to these intelligent descriptions did not seem like a glamorous prospect, even for a rainy day job.
Tormach Changes
What has changed is that in the latest versions of PathPilot, Tormach has added a search routine for the tool table. This depends for its success in finding what you are searching for on the consistency of entries in each line description.
There is now an incentive to have a ‘rainy day’ session and clean up the table entries.
See Mill-tool-table-editor to download a folder containing the description of how to do this and also the Excel file used to manipulate the data.