Rotating Baseplate for BK3 Bandsaw

Lazy Susan Does Something Useful

I was watching a YouTube video of the renovation of a BK2 bandsaw which appeared to have a rotating baseplate. (I have to say I was not sure if it was a fixture on the BK2 or just a video accessory to allow easy rotational viewing). That aside the idea struck home as my BK3 Bandsaw is squeezed in on a bench and often I have to physically rotate it to accommodate the size and shape of the material being cut.

The hot weather we are currently experiencing meant the barbeque and patio furniture were both getting well used. Our circular patio table has a central hole for the parasol and round this hole is a Lazy Susan ball race. This has a glass ring that rests on top which allows the various delicacies my wife provides (to mask my charcoal blackened offerings) to be easily rotated and accessed by all sitting round the table. The Lazy Susan ball race ring looked like a good candidate for the BK3 rotating base.

Checking on Amazon you can buy the rings in various diameters and from various sources. The 8″ version sits neatly inside the BK3 flanged baseplate but some careful thought was needed as to how this could be mounted on a wooden baseplate. The solution was to use M5 countersink screws to mount the inner ring to the underside of the baseplate and to use M6 screws to mount the outer ring to the wooden baseplate.

Here is a brief run down of how to implement this idea.

Remove the white bungs that come fitted to the rings and mark, drill and tap (M5) the inner ring holes into the BK3 baseplate. I mounted the ring centrally within the cavity. If you are worried about your accuracy then once the baseplate is marked and drilled, you can open up the inner ring holes to say 5.5mm.
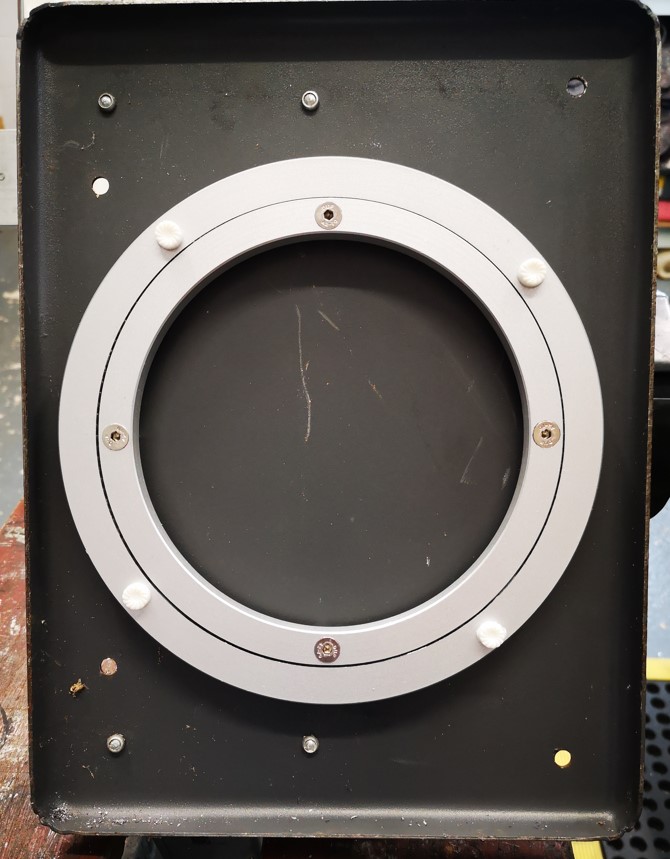
Bottom View with the Lazy Susan ring in place

Tap the holes in the outer ring M6. These are already 5mm clearance so they can be tapped without drilling out.

Cut the baseboard to size. This can be rectangular or circular and from whatever material you have to hand. Offer the ring to the baseboard so it sits centrally and spot through the four M6 tapped holes. Drill these through at 6.5mm and countersink the lower side. Note that in theory you could do away with the wooden baseboard but the BK3 then tends to tip forward when you press on the BK3 cutting table.

Assembly is a juggling act. The two rings need to be spaced off from the BK3 baseplate and from the new baseboard. I used M6 nuts over the M5 screws as the spacers for the inner ring. I used a single M6 washer on each screw to space off outer ring on the baseboard. Fitting these washer is the main juggling act. To make life easier I dab glued the washers in place on the inside face of the baseboard. Here is a simple sketch of the construction.

That completes what is a simple modification using a Lazy Susan ring and from my point of view it dramatically adds to the usability of the BK3.
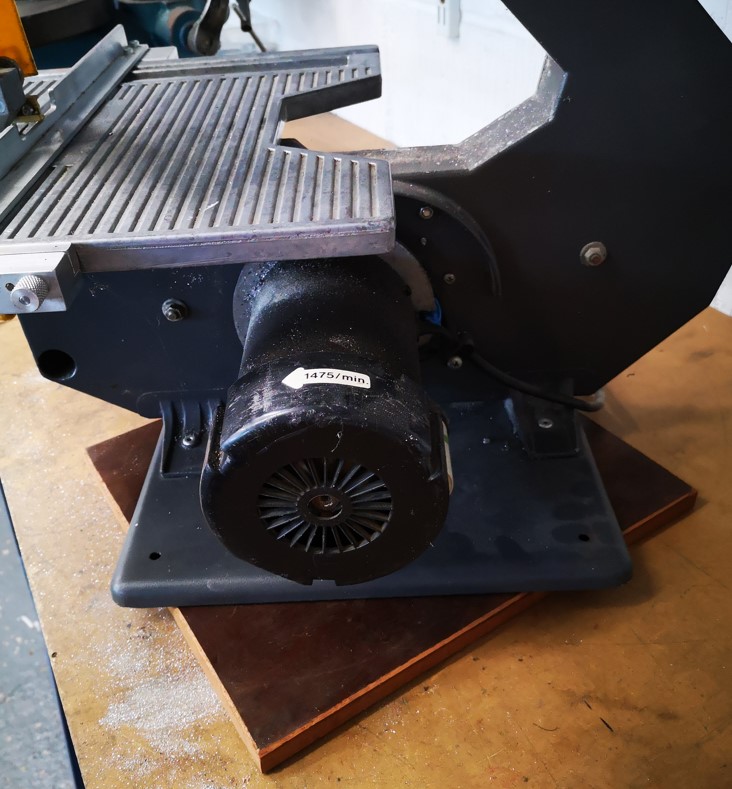
BK3 with rotating baseplate

I have added this modification to my compendium write up of my BK3 modifications. The new version 3 can be downloaded on this link.

Links to similar or related post are listed below : –

3D Printed Knob Variations

How I Create Robust 3D Printed Knobs

First of all an apology … colour has arrived as I have finally migrated to the WordPress Guttenberg editor from the Classic Editor. The Classic is due to be phased out in the near future so I thought I had better jump before I was pushed. I can see the advantages this offers but I am still getting to understand the different way of working.

That aside, onto the post …

The problem with creating 3D knobs is that they can lack robustness unless they are made less dependent on the printed material. There are various ways round this but the easiest method I have found is to embed a conventional metal thread or nut combination. This allows you to be as stylish as you want with the shape of the knob while knowing that the core locking material is resilient to twisting.

A couple of good examples that I have produced recently are a replacement knob for holding the cover of my BK3 bandsaw in place and one to allow hand tightening of a U bolt clamp to a pipe.

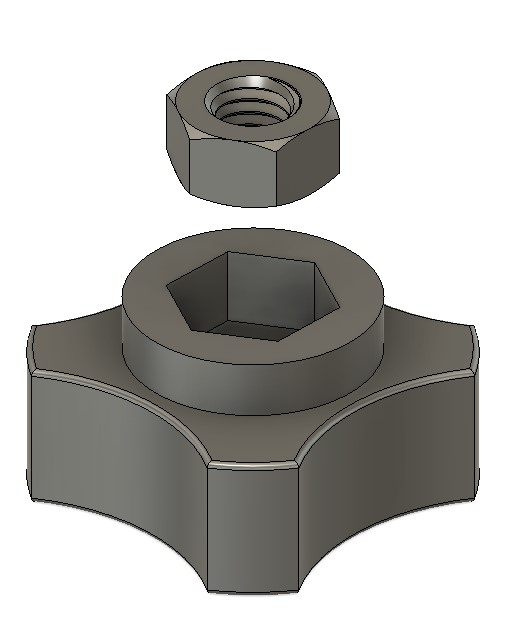
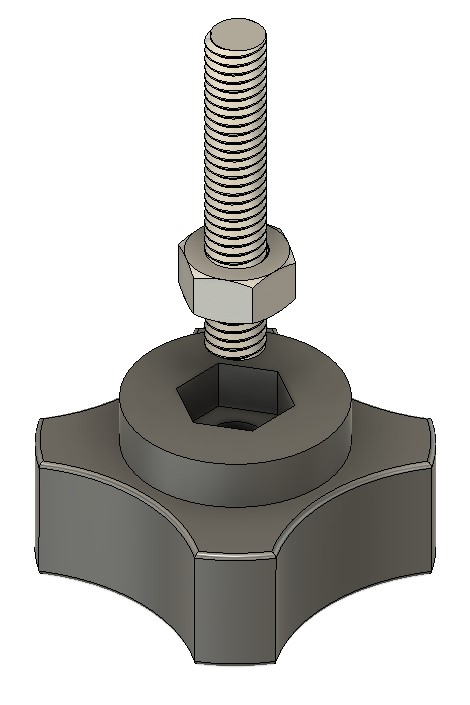
The BK3 clamp required a protruding thread (male) while the U bolt clamp needed a female style. Both were designed in Fusion 360 and embed either a nut or a thread and nut combination as the following images will show. The basic form of the knob is similar in that is has a cavity for the chosen nut size and for the female form may or may not have a through hole. The 3D printed body can be as fancy as you want to make it. I have been pleased with the basic shape shown below as it allows a firm grip to be applied.

Depending on how tight you can make the fit of the nut, the female form may need a dab of SuperGlue to hold the nut in place in the printed body and the male form will need Locktite on the thread and nut.

Female format
Male format

While both of the versions shown above have a boss for the nut cavity, this could equally be inset into the main body of the knob so it finishes flush. Next time you shorten a screw, save the thread offcut for future use on a knob.

Links to similar or related post are listed below : –

Some French Connections and Contemplations

Apologies that it has been quiet on the blog.   We took a couple of weeks down in France.   This coincided with some very hot temperatures (>40C) both in France and at home in the UK.   We had a number of outside jobs to catch up on down there and the only way to get these done was to get up very very early and do what we could before getting back inside to shelter from the sun.

The jobs and the temperature aside it was a good visit with some excellent community meals and celebrations.   We also met and compared notes with a UK couple who also own a second home in the village.

The French are very formal about saying hello, shaking hands etc and do get offended if you don’t indulge, something that Brits abroad don’t always understand.   I saw this on a blog site which sums it up in an amusing way.

The other reality incident was a close model engineering friend contacted me to say he had had a heart attack but was thankfully recovering in hospital.   Having just notched up my 70th birthday it was a sobering thought.

The other news during our stay in France was John Saunders posted about the loss of his dog Judd who often featured in John’s YouTube posts.   John was clearly quite emotional and I fondly remember Judd from my week long training course at NYC CNC.

Anyway back in the workshop today and trying to remember where I got to on various projects.   I’ve also got a few catch up blog related requests for Fusion files and further help with some of my post content.   It’s only when someone looks at your text with fresh eyes and comments that you realise how badly you described something … Please be patient as I respond to these messages.

Similar or related subjects : –

Bad day steaming with my 5″ Polly V live steam locomotive

Last Sunday was a members steaming day at the model club.   I told all the family I would be there and to bring the grandchildren along for a ride.

I arrived early with a view to getting steam up and be ready to go … in theory.

First problem was that the connecting rods had stopped in a position that was blocking fitting the fire tray holding pin.  This immediately got worse in that the cylinders had seized since my last run.  The more experienced members told me not to worry and if I could move the wheels enough then fit the fire tray and get things warmed up.   After some rocking I managed this slight movement …. but forgot I hadn’t filled the boiler and the fire was burning very brightly.   Mad panic to get some water in quickly.

Steam pressure up to 90psi but no joy on the cylinders.   Gentle tapping on the con rods lead to heavy tapping on the con rods and lots of slide dragging back and forth on the steaming bay.   Still no joy.  Cylinders locked.

Now running out of water in the boiler.   Grandchildren arrived.  “Why can’t we have a ride grandddad ?”.   Grabbed the handpump leaver and rapidly pumped away to get water into the boiler …. too rapidly in fact and broke my hand pump leaver.   Still had a few PSI of pressure and thankfully the injector kicked in … for a short while until the pressure dropped.

How bad can this get ?

Some slight movement on the cylinders now.   Grabbed some blocks of wood and got the engine airborne so the axle pump could be used … if I could just get the wheels to fully turn.   More tapping/thrashing at the con rods and suddenly the wheels jumped into motion.   Phew.   Water now flowing into the boiler, fire good, pressure good.   Get out on the track quick and keep the grandchildren quiet.

Back home in the workshop  I made a new hand pump handle and fitted new oil port plugs on the top of each cylinder each with a M3 feed hole.   This means I can syringe oil into the valve and cylinders a lot more easily after future steamings.

It is a hobby after all but this was one of the most stressful steamings I have ever experienced – all because I was in a rush last time out and did not do the end of day drain down processes correctly because it was tipping down with rain.  Lesson learned.  Thankfully no long term damage to the cylinders.

Similar or related subjects : –

Verified by ExactMetrics