Tormach Costing Sheet Update

Tormach changed their prices last year so I have updated the costing spreadsheet I created to reflect these changes. Note that the sheet now has the new M Series prices for the 770 and 1100.

Note that I believe I have interpreted their prices correctly but you can check this once you have placed a request for quotation and compare. Let me know if you spot any errors.


Similar or related subjects : –


Tormach Purchase Costing Sheet

I haven’t been completely idle while on holiday …

After I decided to buy a Tormach milling machine I had debate whether to go for the 440 or the 770.   This confusion was based on available workshop space and to a lesser extent on cost.  I also did not have a feel for the total cost of not just the items I needed to buy but also what the total package would cost when it landed on my driveway.  In the UK we pay VAT on not just the goods but also the delivery cost.

To help my thinking I put together a spreadsheet on Excel that split out the basic machine parts and then had a common section showing all the accessories I would need.  This totaled everything up in USD and I then did a conversion to GBP at spot rate and then added VAT and duty factors for UK import.

This sheet helped my enormously and once I had all the key prices loaded from the Tormach site I could do ‘what if’ calculations to fit my budget.

I was recently contacted by another potential buyer of a Tormach and I sent him the sheet to help his thinking process.  For anyone else thinking of buying either in the US or an overseas country I thought the sheet might help so I have spent some time cleaning it up and and I attach the new version below.

Simply put a quantity of each item in the column associated and see the impact of your shopping list at the bottom, either as a 440 or a 770.   Clearly the sheet could be extended to a 1100 if that takes your fancy.  (Don’t forget to check the current pricing from the Tormach site by searching on the product code shown on the sheet).

Excel – Tormach mill costing

Don’t forget you will always need one more TTS collet than you have ordered …..

Similar or related subjects : –

Mill Turning on the Tormach PCNC440

I just dared to hit run on my first attempt at Mill Turning.  I need to qualify this in that the first run I was cutting air above the set up.   It looked OK so I put the real material in the spindle and I got a turned part as designed in Fusion 360.   I didn’t part it off and you can see the result below.

Mill Turning set up for first trial run

Mill Turning is where you place the material you want to shape (usually a rod of some kind) in the mill spindle instead of a milling tool.   The tools are mounted on the milling table (see above in the vice) and are completely stationary but move via the actions of the table in the X axis and the spindle in Z.   The software is conned into thinking the material is really a milling tool and that the tools are the material.

It has taken me the best part of a week to work out how to model this in Fusion 360 and I have been helped enormously by watching Jason Hughes on YouTube.  It involves allocating a different Work Coordinate for the location of each tool.

If I can get this more streamlined and get some better lathe tooling in place to support it, then I will be able to turn clock pillars.   This was the last stumbling block in moving to CNC assisted clockmaking.

Tonight I am a very happy bunny.  A glass or two of Merlot with dinner perhaps ?

Update – For a full write up on the process and how I got there go to my mill turning page and download the pdf.

Similar or related subjects : –

Tormach Tooling System and a Spanner in the Works

Tormach provide a rather nice tooling system for their milling machines.   This is known as the TTS.   There is a master collet permanently fitted in the spindle.  If you have the automatic tool changer option fitted this collet is depressed by a compressed air driven ram.   This opens its jaws to allow grabbing of individual sub collets holding the tool of choice.

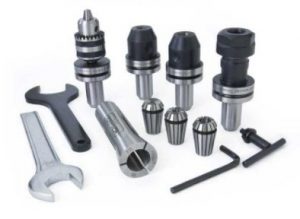
The great bonus of this system is that you can have all your regular (and not so regular) tools permanently mounted in collets ready to go.  Press the button driving the ram and push the next tool home.   This also means you can populate the tool table in the PathPilot CNC driver program with all the tool length offsets without having to measure each time you do a setup.

It does mean quite an investment in the sub collets.   These are available for all manner of capacities both metric and imperial either with fixed diameter grips or standard ER ranges.  There are also custom tools such as the Super Fly and Shear Hog plus fittings to take a Haimer shank.

What was always a fiddly job was mounting a new tool in a collet and trying to contra-rotate the collet tightening nut while holding the body.   This is now no more ….. I have just taken delivery of Tormach’s simple but elegant solution to this.

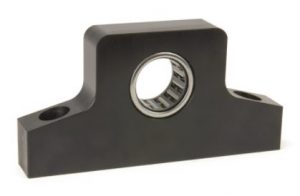
It is a ball race mounted in a block but a ball race that only rotates in one direction.   You simply push the collet shank into the ball race and it is gripped tight.  To loosen the collet you simply put it in from the other side.  Magic !

Now you have probably realised I am a bit OCD and like things in their place and ordered.   Having got the tool gripping sorted I would now need two spanners to fit the collets of my most popular ER16 and ER20 nuts.  That was one too many spanners for my liking and was tying up standard shop spanners (which also have their allocated place in the shop …. oh dear how sad is that).

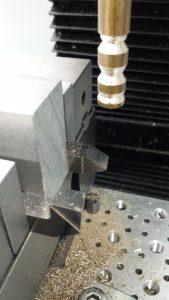
Now I happened to have a strip of 50mm wide Ground Flat Stock sat idle and Fusion 360 was calling.  A quick drawing on Fusion delivered a customised spanner sized to suit the two most popular sizes of collet I use.    I ran the CAM and off to the 440.

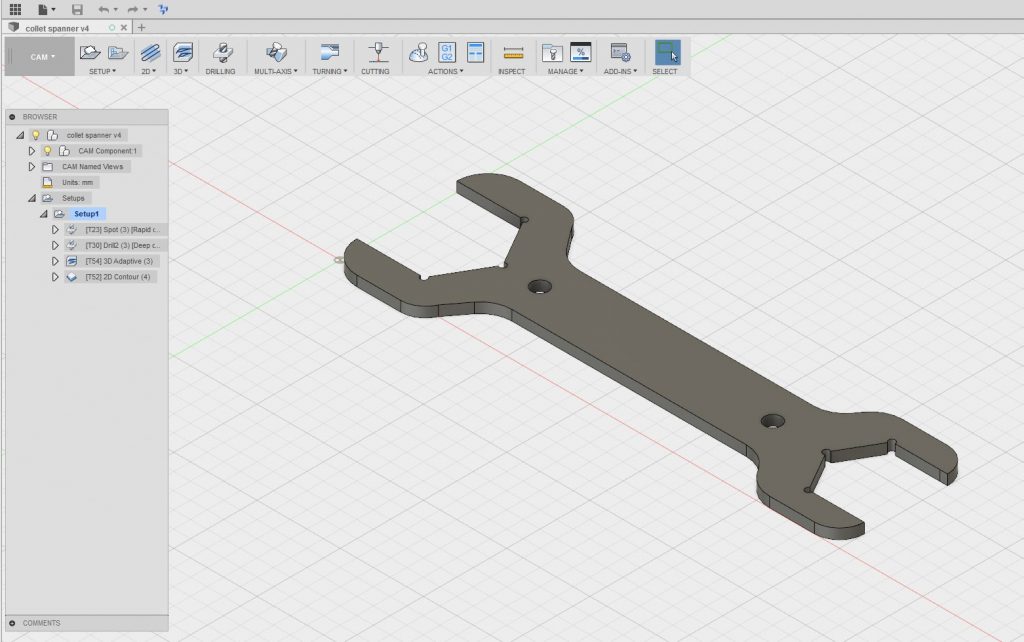
I put a piece 6mm hardboard on top of my tooling plate and put a couple of M8 holes at 75mm spacing on the centre line of the stock and fastened it down through the hardboard into the tooling plate on the 440 bed.   I made sure the Z clearance was OK for the screw heads (important !) and hit go.

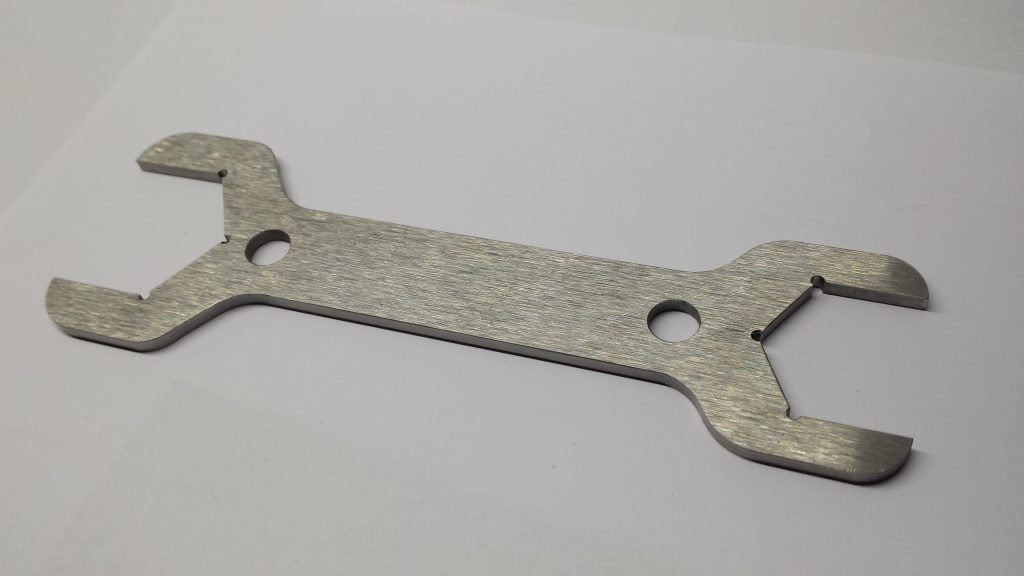
It was the first time I had machined GFS and the 440 handled it well.  I now have a nice customised spanner hanging on the wall above that fancy bearing block.

Disclaimer : –  This post and many others on my website feature references to Tormach and its products.  I have no connection to Tormach Inc financially, commercially or otherwise.  I acknowledge that Tormach®, Tormach Tooling System®, TTS® and PathPilot® are all registered trade marks of Tormach Inc.

Similar or related subjects : –

Another Haimer tip bites the dust or at least the mill bed

When I was at NYC CNC I saw that John was selling posters as shown below.

I didn’t realise the significance until I started doing CNC …..

I had been doing OK on breakages of late then like buses, two came along at once.  One was excusable (to my conscience) but the second was a disaster always likely to happen.

I had the Haimer held in a collet in the Myford VMB manual mill.  This means you need both hands occupied to contra rotate the collet and spindle when locking and unlocking.   I just overdid the realise pressure and the Haimer dropped out onto the mill bed.  Crunch, expletives, gloom, expense.  The tips are not cheap at GBP20+ each but Amazon do sell them.

There is the same issue to a lesser extent on the Tormach when releasing the power drawbar even though you are holding the Haimer the sudden momentum of the drop from the collet can sometimes catch you out if the mill table is close.

While discussing my gloom with a friend he suggested putting some sort of protection around the tip when loading and unloading from the spindle.   The Haimer is not an ideal shape for gripping something along these lines given its curved surfaces.  However after some thought a solution was found.   I drew a simple cylinder in Fusion that was 40mm long, 38mm OD and 32mm ID and 3D printed it.  Note these dimensions are for the Haimer FH 3D Taster version.

The cylinder sits over the probe and rests on the outer rim of the tip mounting.  The 32mm ID is just tight enough to squeeze the Haimer rubber gasket and so hold the tube in place.

Not only is this useful for mounting and dismounting the Haimer but it also works as a general protect guard when not in use.

Similar or related subjects : –

Verified by ExactMetrics