I love my Qidi ifast but one issue kept cropping up. At the front edge of the chamber there is a gap that seems to be a black hole for small prints. They sometimes ping off the build plate when it is being removed from the chamber and rattle down the slot to be lost underneath the machine. They don’t simple drop out from underneath the machine but instead end up lodged on the cover plate to the power supplies. Lifting the machine to remove this plate is a nightmare job as the machine is so heavy. I usually end up printing a second model. There is a similar gap at the rear of the chamber but this is much less of a problem.
My solution is to use some aluminium ‘expander mesh’ with some 3D printed fixing clips. The mesh is Gauge 10 and is cut as a 70mm wide trapezium shape with the two sides measuring 500mm and 485mm. I sprayed it black to blend in. Here is a picture before and after fitting.
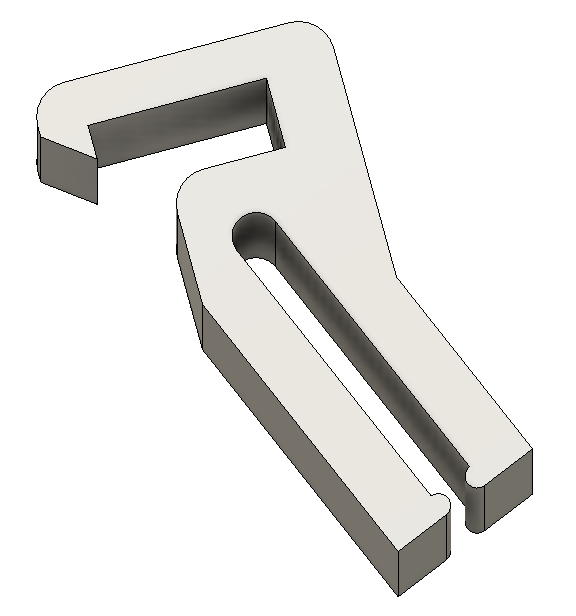
Here is the Fusion 360 graphic of the clip and the download link for the STL file.
For some time I have been subjectively conscious of fumes created by my 3D printers. There has been quite a lot of general comment about this problem in the technical press. I mostly use PLA for my prints using my Qidi ifast and Sindoh 3DWOX. If you believe the press, PLA is the least likely to cause irritation. However, my office is small and the printers are both close to my desk so any fumes are likely to be immediately adjacent to my computer activity. If I do a long print run, I can sense the fumes as a background smell and as an irritation to my throat.
The geography of my office and workshop are such that moving the printers is not an option nor is finding some way to vent to the outside world. The Qidi ifast is a huge machine and finding a new home for it would be difficult. Transferring both machines into the workshop would expose them to a residual albeit low level of moisture (nothing rusts in the workshop so it can’t be so bad).
The concept of the design is to house a complete filter unit inside the printer chamber where it acts as a recirculating air filter (a ‘scrubber’). This only acts on the air circulating within the chamber. This should avoid creating cooling drafts across the print job which might be the case if high volumes of air were being ventilated in and out externally.
The unit is visually shown opposite. It has four sections all stacked one on top of the other. The air in the printer chamber enters the top section which contains a commercially available HEPA filter cartridge. The next section is a carbon filter. This has an inner printed magazine containing carbon pellets. The fan section is next with two fans pulling the air through the two filter sections. The bottom section is the air exhaust duct. The design is rather well conceived with each of the two filter sections clipped together using small magnets. This makes these two sections easily demountable for filter maintenance. The fan tray and exhaust duct are held together with screws and brass inserts that pick up on the fan mounting holes.
Circulating the air into the unit via the top section and exhausting at the bottom is a nice idea. In the Qidi ifast the print head stays at a constant height and the print bed moves down as the print builds. The print head activity remains at a constant height to the filter input. There is a lot of web discussion on fitting the Bento to Bambu Labs units but little about use in other printers so some head scratching was needed on how I might implement the Qidi ifast installation..
Here is a link to ZIP file containing my write up of how I installed the filter in my Qidi ifast together with the STL files for the modified fan tray, exhaust duct and microswitch mounting block.
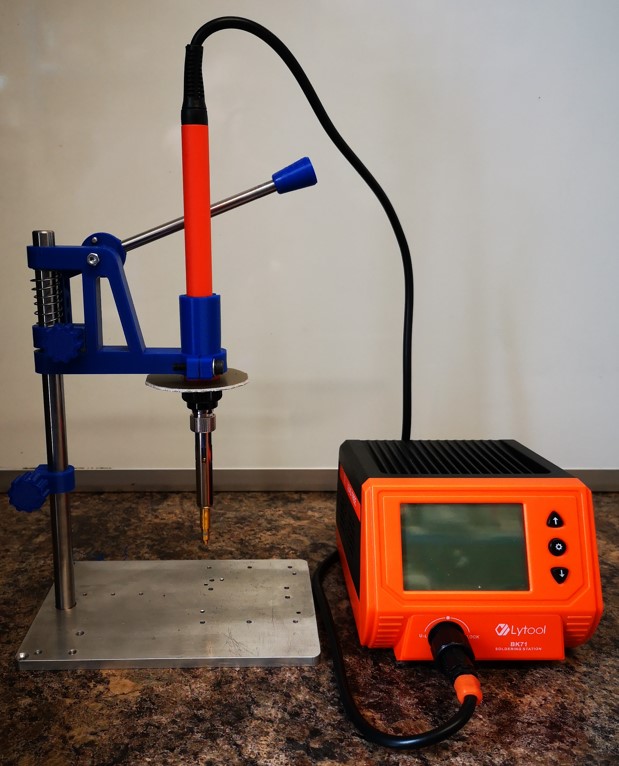
A simple solution for holding a soldering iron when inserting brass threaded inserts into 3D printed items
NOTE – This is a revised posting with a modified write up.
When faced with adding threaded holes into 3D models I am faced with three choices.
The easy option is to model the threads in Fusion 360. This is fine for a ‘fit and forget’ single fastening but for repeated screw insertion and removal the modelled thread will begin to wear.
My preferred solution is to use embedded nuts in the plastic or leave an open hex cavity to fit a nut into after printing. Some jobs do not have enough space to use the embedded nut technique so brass inserts are the next choice. Brass threaded inserts come in a number of sizes and geometries and are available from Amazon and other sources. The inserts are melted into the printed medium with a soldering iron or other such heat source.
Having had mixed success with a handheld iron I pondered for a while with Fusion 360 whether I could make a jig to improve insertion repeatability. This led to some internet searching and finding a couple of solutions. The first one was via Clough42. He showed a heavily engineered solution supplied by Naomi Wu.
Naomi’s product was impressive but seemed to be way over the top. Next up was a site by Valera Perinski. His site is remarkable and oozes all manner of 3D printed objects, one of which was just what I was looking for – a simple insert punch.
Valera’s design, while simple, looked elegantly functional. I downloaded the STLs. Valera offers these free of charge with a comment that he would appreciate any contributions. A contribution was duly made. Thank you Valera !
My modified version of Valera’s design is shown above and is described in the attached ZIP file along with the my versions of the 3D print STLs.
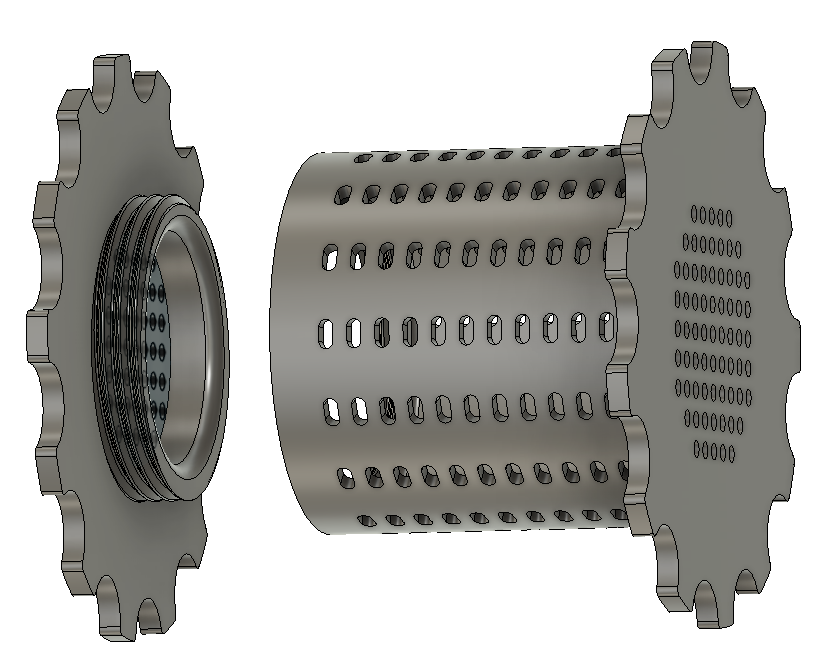
After seeing various ideas for a filament reel desiccant holder, I decided the concept seemed like a good idea.
As mentioned in previous posts, I am now using open source filament in my Sindoh printer and my Qidi. The filament is fed from a ‘hot box’ via a 4mm OD/2mmID PTFE tube into the Sindoh or the Qidi. The ‘hot box’ is not continuously powered but is just switched on occasionally to provide background drying. By adding a desiccant holder fitted into the reel centre hole, the background moisture level can be better controlled between powered heating sessions.
I have settled on using eSUN PLA filament and I modelled my desiccant holder specifically to fit the eSUN reel size. The Fusion 360 model for the silica holder is designed using Fusion Parameters. For those familiar with this Fusion facility, you can use the FX functions to customise the size of the holder to suit other reel sizes.
This finished holder is shown below.
The holder has two parts, the cavity and the end cap. The end cap is screwed and held in place with a print modelled 11tpi BSP thread. Both parts are printed with the large gripping flange face down on the bed. Slicer generated internal support will be needed for the overhanging threaded flange at the top of the cavity. After printing, inspect the two threads and where needed clean off any flash PLA. My prints meshed without any aftercare.
Note that while I have put ventilation slots in the barrel sides, these are probably not so effective once the holder is mounted into the reel centre. This leaves the end holes as the dominant air path. To help the air circulation in the latest download I have added additional holes on the end flanges (not shown in image above).
The desiccant can either be left in its supplied pouches or can be poured directly into the core cavity. Note that if the silica crystals are tipped lose into the cavity, the model will initially act as a sieve with any broken pieces of crystal falling out of the holes. If you are using lose crystals, don’t overfill the cavity. This will allow the natural printing revolution of the reel to cause the crystals to tumble in the cavity. This provides a more even exposure to the air.
You can buy bulk quantities of silica crystals that change colour with moisture absorption content. When dry they appear to be clear or orange and change to green when moist.
UPDATE – Linked below is a ZIP file containing the Fusion 360 file for the desiccant holder and the screw on lid. James at Clough42 gave me some pointers on this. The updated file uses the Fusion parametric functions (Fx) so that the depth of the gel holder can be changed to suit the width of the filament reel. Just change the Barrel_Length value to match the width of the reel in use.
Also in the ZIP are the STL files for a 68mm width holder and associated lid This will suite the width of most 1kg filament reels.