It seems that many user of Mach3 CNC control software love the concept but hate how it is presented as a user interface. I tend to agree as I used to tolerate it on my small CNCEST milling machine. It is certainly not a patch on Tormach’s PathPilot.
While browsing YouTube I came across Physics Anonymous and enjoyed a rant by them about Mach4 and then the joy of seeing their version of a Mach3 GUI which I have to say was a breath of fresh air improvement.
If you hate your Mach3 GUI then have a look at what they are offering as a free download. It isn’t totally bug free but an upgrade is promised.
I have been using a Wildhorse Innovation CNC set up probe for some time now. It works OK but sometimes the results are not consistent. After one frustration session I decided to upgrade it to the Hallmark ITTP probe from Threadexpress in New Zealand.
It arrived today after nearly a month in transit due to the current lock down restrictions. On opening the package I was impressed with the quality of the engineering. It is a nice device. It uses the usual 3 pronged contact mechanism. Supplied with the probe is a tube of grease that helps protect the contact reliability. The interface cable has a 5 pin DIN that plugs into the Tormach expansion socket and the shank is a standard TTS compatible size.
The Hallmark ITTP probe mounted in the Tormach ready for setup and testing. You can also see my angel ring light illuminator and Hall Effect tool height setter.
I ran through the initial preparatory procedure and then loaded it into the Tormach 440 spindle. Pathpilot has a number of excellent set up routines to adjust the probe and make measurements. One of these, the Effective Tip Diameter is quite critical. All this went to plan and very quickly. Some initial probing gave repeatable and accurate results so first impressions are good.
PathPilot probe setup screen and the two probing routine screens.
I’ll give some updates as the probe gets pressed into service but my first impressions are good with repeatable accurate readings.
In the course of checking out the ITTP probe I needed a reference cross check on the various setup measurements. My Haimer Taster seemed a bit erratic and on inspection I discovered the axial shank holding bolt had worked lose. This meant a re-calibration of the eccentricity of the probe point would be needed.
The alignment process involves adjustment of four grub screws in the shank body. These tweak the ’tilt’ of the shank to get a concentric rotation of the probe ball point. As there are four screws I use two hex Allen keys to make the adjustments to each in line pair. This is quicker than with a single hex key being swapped from side to side. It is a bit like the process I use when centring a 4 jaw chuck. The adjustment is done against a dial gauge riding against the probe ball point. Once you get the knack this process doesn’t usually take too long using the two key method.
The frustration is that the Allen keys provided with the Haimer are a bit chocolate based and the ends chew up easily. The result is you tighten a grub screw and the hex key end twists and gets jammed into the hex socket in the grub screw. While trying to waggle the jammed key you mess up your carefully made adjustment. Aaaargh !
I ground back the worn end of the Allen keys to clean up the hex profile but they quickly degraded. In the end I took the grub screws out completely and replaced them with some M4 cap head bolts. Joyful !
How ugly is this ? Replacement screws on my Haimer Taster
Yes I know it doesn’t look pretty but it is now a real pleasure to make the adjustments with a couple of larger T wrenches. It is probably a criminal thing to do to such a lovely instrument but life is too short.
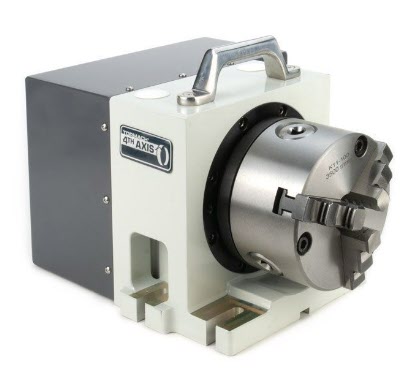
At last a 4th axis drive for the Tormach PCNC440 !
I have waited 4 years for this to be available and did not hesitate to put in my order to Tormach for one of the new MicroArc drives. Probably the best way to get a good idea of this product is to watch John Saunders’ video.
The MicroArc wasn’t a low cost buy and because 4th axis was not around when my 440 was originally shipped, I needed a fitting upgrade kit as part of the order. Having placed my order with Tormach it took exactly 7 days for DHL to arrive on my doorstep with the shipment. Quite amazing considering the difficult times we are experiencing at the moment.
It took me about one hour to fit the new stepper driver and additional wiring. As ever there were good clear instructions from Tormach. I switched on the 440, enabled the 4th axis in PathPilot and I could control the A axis from the PathPilot screen. Very impressed.
I watched John Saunders video on the MicroArc and how to do 4th axis programming in Fusion 360. I drew up a simple model in Fusion but could not get it to produce working GCode. I had some comms with John and he gave me some pointers. The model had a rotational repeat pattern but while I could run a single op code, if I tried to run the rotational pattern the post processor came up with an error message and would not output any code.
I thought at first it was because I was only using a Fusion hobbyist licence and that 4th axis maybe was not possible. A really helpful dialogue with Shannon McGarry at Fusion cleared up that issue so it must be something else.
After some experimenting I discovered that you have to set the axis of rotation in the post processor dialogue options list. All then worked fine.
I had been using Hall Effect devices to modify my William Smith Gearless Gravity Arm clock and had been surprised by their ease of use and repeatable trip points. (More about this to follow in a separate post).
I had also been frustrated with my inability to set tool heights reliably in PathPilot despite using various methods all of which didn’t want to agree with each other.
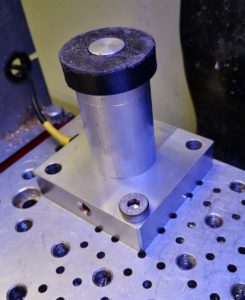
This resulted in the construction of a Hall Effect based Tool Height Setter that appears to solve the problem. The write up is lengthy so I have committed it to PDF for download but here are a couple of images to give you an idea of the result.
A simple cross section sketch of the tool height setter concept using a Hall Effect sensor
Finished tool height sensor mounted on the PCNC440 milling table
I have my Tormach PCNC440 wired into the workshop network and as a result if a new version of PathPilot is issued my PathPilot controller warns me. This is quite nice as there is no formal emailing warnings of new issues by Tormach. Anyone whose machine is not Internet connected would need to check periodically with the Tormach site to see if an update was needed.
To continue the story … last week I got a warning of a new version of PathPilot (2.4.0) was available and I duly downloaded. One of the immediately obvious changes in the new firmware was a G37 tool measurement routine which works in conjunction with a simple Normally Closed tool setter. From my previous ramblings you will see that I had done a combiner box to allow both probing and toolsetting to share a common input to the Tormach. In theory I was therefore ready to go ….
From my many years in industry I should know that all that glitters etc … the new routine did not work. I thought it must be me but in the end I logged a support call with Tormach and sent them my log file. I also logged the problem on the NYC CNC forum to see if anyone else was having the same issue. I did get one response saying that he was not having an issue. The plot thickened and nothing back from Tormach.
A couple of days later the same responder said there was a fix update available from the Tormach site. It seems the software worked well in G20 Imperial mode but not in G21 Metric mode. He was running Imperial and I was trying to run in Metric Software update downloaded and all is well. It is rather nice. You tell PathPilot where the tool setter is located and then to run the auto tool measurement you put a G37 command in the GCode after a tool change. Away the spindle goes to the tool setter location, dunks the tool and updates the Tool Table. Magic.
Still waiting for Tormach to close off my enquiry and let me know they had fixed the problem and as a result there was a new firmware available. But it is Christmas and maybe they had other pressing matters.