Today while in the workshop running a CNC metalwork job and then following this with running a quick PCB artwork, the following came to mind.
These days since I bought the ITTP Hallmark probe I rarely use my Haimer Taster to do my referencing. It still has its uses but less and less so. A good example is when remounting the CNC vice on the tooling table. I use the Haimer to give me a running check on the vice jaw axis tracking. Beyond that the ITTP in conjunction with PathPilot probing routines meet all my referencing needs to a level of accuracy that suits.
The other thing that stuck me is how automated my process for milling printed circuit board prototypes has become. Fusion 360 Electrical module becomes more familiar to me with each passing project. It exports my PCB designs as Gerber files to import into FlatCAM. After a few clicks in FlatCAM I have a GCode file for drilling and routing. The PCB blank is gripped on my small vacuum table ready for milling and the ITTP probe references the spindle. My recent use of kitchen anti-slip material as the sacrificial layer between PCB and vacuum table top surface has made the grip on the vacuum table so much easier to achieve. The overall PCB process, whether single or double sided, has become quick, easy and repeatable. Once the board is milled I can get a reasonable looking tinned finish using a hand soldering iron and copious amounts of flux.
Techniques almost subconsciously evolve and sometimes you need to step back and see how far you have come along the road. The alternative view might be that this ‘lazy man’ has just become even more lazy.
When I bought my Tormach PCNC440 in 2016 I included the enclosure kit in my order. On receipt I thought that fitting the enclosure would dominate the size of the workshop so I never got round to fitting it. It has sat in its shipping box since then. I have consequently shared quite a bit of my swarf (chips) with long suffering family.
After a recent (particularly heavy) CNC run I had a serious covering of swarf in the machine tray and because I had no enclosure round the mill, I had quite a lot distributed further afield (i.e. into the house). Domestic peace was becoming an issue. Time to do something about it.
Out came the enclosure kit, cobwebs dusted off and around three hours later I had the enclosure fitted. I have to say it looks good and does not overpower the workshop as I thought it would. My wife is impressed and says it looks a more professional machine and ‘if you had it why didn’t you fit it before now’ ?
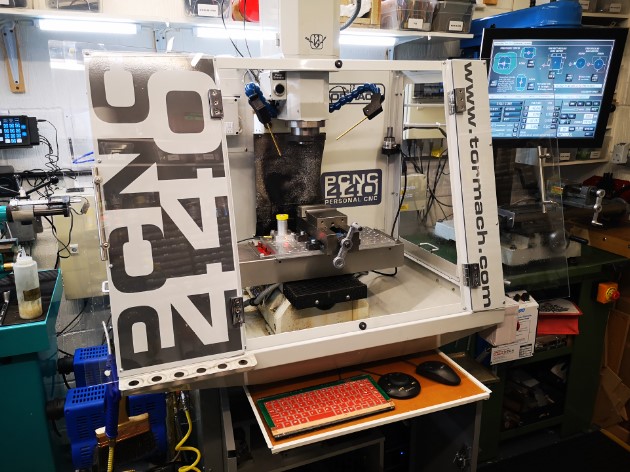
The picture above shows the enclosure mounted on my PCNC440 with the monitor in the original position before fitting the extension arm to the ISO bracket. The keyboard tray uses a domestic drawer rail mounted on the top of the standard Tormach cabinet. My recently fitted dual fogbuster system and my Hall Effect based tool height setter (yellow top) are visible.
The fitting did however create some follow up problems.
My control monitor had up to now been mounted on the side of the 440 on a standard ISO TV mount. With the enclosure fitted this meant it was ’round the side’ and difficult to get to. I debated a new long reach ISO but they are expensive. Plan B was to make something. I rummaged around in my aluminium stock and with the help of Fusion 360 came up with a seriously overengineered extension arm to add to the existing ISO mount. This would allow the monitor to move forward to be in reach at the front of the mill.
My seriously over engineered extension bracket to move the ISO mounting of the monitor more to the front of the 440
This bracket became the first CNC job to run after fitting the enclosure. I am pleased to say it was the cleanest my workshop floor had ever been after running a job.
Having fitted the new bracket and mounted the monitor, all the cables needed extending. Fortunately I had had the foresight on my original order to include the extension cable kit. As a result I only had to extend the power supply lead from the monitor 12V ‘brick’ supply.
The second issue was where to mount my ITTP probe as this had formerly mounted on the side of the 440. With help of some more Fusion design I modelled a corner mount that picked up on the enclosure fastenings.
After that first heavy machining run I noticed for the first time the slight smell of the mist coolant when opening the enclosure doors. Before the enclosure was fitted the smell must have dispersed into the general workshop air. With the enclosure fitted the air was concentrated inside the mill and I only got the smell when sticking my head inside. While it had never been a problem (as far as I can tell …) I thought I should do something about it.
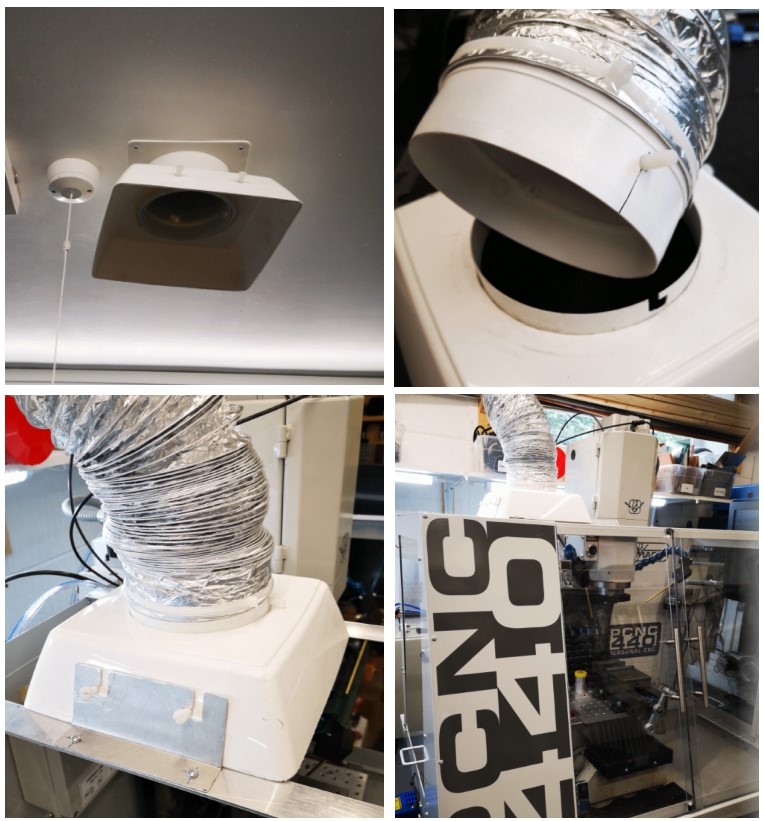
Sometime ago I installed a ceiling extract duct in the workshop. This vents to the outside world via a custom roof tile. Normally the system sits with a flared cowling (made from a cut down flower pot) on the ceiling entry duct. The system normally acts as a background trickle extract. The cunning plan in the design was to use various pipe components to provide bayonet style connection pins (Nylon screws) to allow extension trunking to be used. A bit like a BNC RF connector if this is familiar to you. This would allow me to use an add-on length of expanding flexi trunking to bring the extract nearer to any heavy fumy activity such as welding or oil bath hardening.
With the use of further scrap odds and ends of aluminium, I mounted a pair of support bars across the top of the new 440 enclosure. These would fix the ducting over the enclosure during heaving CNC sessions. Not a total solution but certainly one that will reduce the general smell of XtremeCut 250C when I stick my head in the enclosure.
Extract system showing ceiling mounting intake, trunking adapter and mounting on my Tormach PCNC440. Note the two Nylon screw protrusions are for a bench mounting clamp when used for welding extraction etc and now used on this new use of the system on the mill.
A good day’s activity with all the issues addressed and domestic bliss hopefully restored.
This is probably not original but worth commenting on. I have a tooling plate on the bed of my Tormach PCNC440. This has a matrix of M8 holes on 25mm spacing together with intermediate 3.7mm tooling pin holes.
Quite often I have a need to set up my work CNC coordinate system (WCS) such that it is centred on one of the M8 holes.
If I want to do a quick and dirty centre on one of these holes then I use the Laser Centring tool as mentioned elsewhere on my blog.
If I need to be a bit more precise then I have a mushroom/top hat shaped disc with shank that is a tight fit in the tapped M8 holes. PathPilot has a number of probing routines and these include finding the centre of a circular object. Simply push the top hat into the desired hole and then probe the disc for centre. You can use an active probe such as the Hallmark ITTP.
If you haven’t got an active probe you can use a Haimer. Simply align the Haimer tip somewhere close to a maximum point on the disc circumference and advance the axis to show a reading on the Haimer. Rock the opposite axis back and forth and watch the Haimer reading to find the high point on the circumference. Zero the axis. Go to the opposite side of the disc and repeat this process and divide the measured diameter by 2 for the disc centre. Repeat on the opposite axis.
(You can use this Haimer rocking back and forth method to find the diameter high point when cross drilling a circular item to fit grub screws etc).
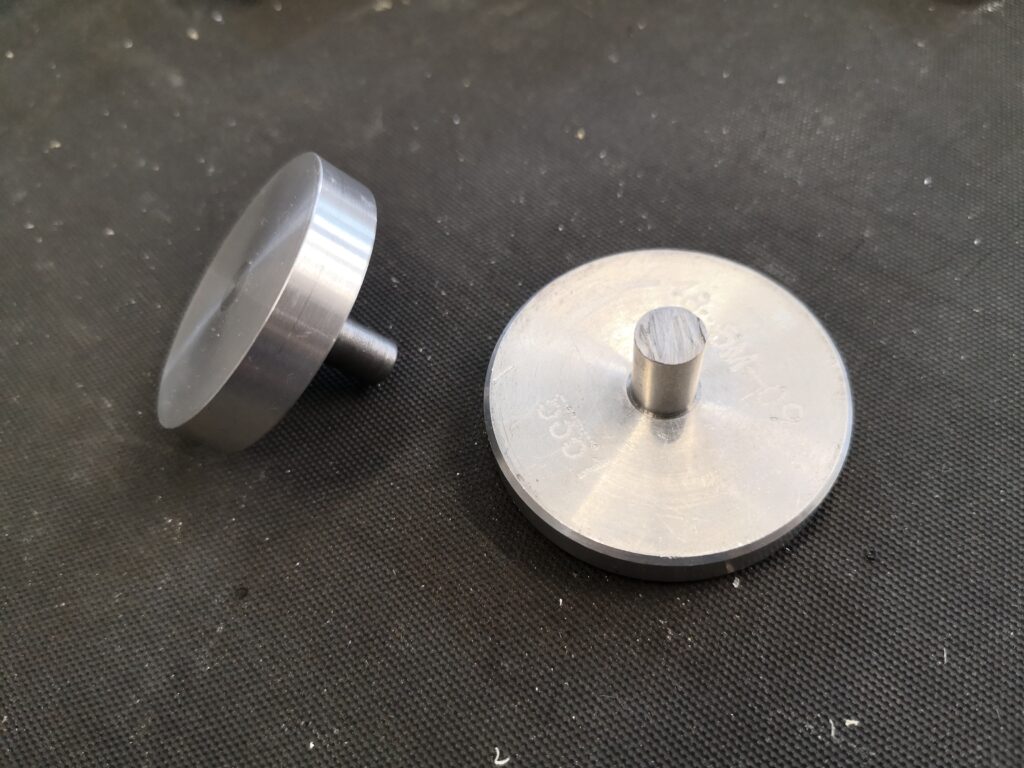
Two examples from my ‘mushroom farm’
The mushrooms are made with a silver steel shank that is skimmed to be a non wobble (how technical is that ..) fit in M8 (~6.8mm) and an aluminium top hat that is superglued in place on the shank. Once the glue has set the top hat is squared up while held in a collet in the lathe. This ensures concentricity with the shank. The disc will now sit flat to the tooling table when the shank is pressed home and perpendicular in the hole.
Clearly the larger the disc diameter the less centring error there will be.
I now have a ‘mushroom farm’ of discs for all manner of hole sizes. It’s not rocket science but as you well know, I am all for a simple (aka lazy) approach. Apologies to all the Grannies out there.
I have been using a Wildhorse Innovation CNC set up probe for some time now. It works OK but sometimes the results are not consistent. After one frustration session I decided to upgrade it to the Hallmark ITTP probe from Threadexpress in New Zealand.
It arrived today after nearly a month in transit due to the current lock down restrictions. On opening the package I was impressed with the quality of the engineering. It is a nice device. It uses the usual 3 pronged contact mechanism. Supplied with the probe is a tube of grease that helps protect the contact reliability. The interface cable has a 5 pin DIN that plugs into the Tormach expansion socket and the shank is a standard TTS compatible size.
The Hallmark ITTP probe mounted in the Tormach ready for setup and testing. You can also see my angel ring light illuminator and Hall Effect tool height setter.
I ran through the initial preparatory procedure and then loaded it into the Tormach 440 spindle. Pathpilot has a number of excellent set up routines to adjust the probe and make measurements. One of these, the Effective Tip Diameter is quite critical. All this went to plan and very quickly. Some initial probing gave repeatable and accurate results so first impressions are good.
PathPilot probe setup screen and the two probing routine screens.
I’ll give some updates as the probe gets pressed into service but my first impressions are good with repeatable accurate readings.
In the course of checking out the ITTP probe I needed a reference cross check on the various setup measurements. My Haimer Taster seemed a bit erratic and on inspection I discovered the axial shank holding bolt had worked lose. This meant a re-calibration of the eccentricity of the probe point would be needed.
The alignment process involves adjustment of four grub screws in the shank body. These tweak the ’tilt’ of the shank to get a concentric rotation of the probe ball point. As there are four screws I use two hex Allen keys to make the adjustments to each in line pair. This is quicker than with a single hex key being swapped from side to side. It is a bit like the process I use when centring a 4 jaw chuck. The adjustment is done against a dial gauge riding against the probe ball point. Once you get the knack this process doesn’t usually take too long using the two key method.
The frustration is that the Allen keys provided with the Haimer are a bit chocolate based and the ends chew up easily. The result is you tighten a grub screw and the hex key end twists and gets jammed into the hex socket in the grub screw. While trying to waggle the jammed key you mess up your carefully made adjustment. Aaaargh !
I ground back the worn end of the Allen keys to clean up the hex profile but they quickly degraded. In the end I took the grub screws out completely and replaced them with some M4 cap head bolts. Joyful !
How ugly is this ? Replacement screws on my Haimer Taster
Yes I know it doesn’t look pretty but it is now a real pleasure to make the adjustments with a couple of larger T wrenches. It is probably a criminal thing to do to such a lovely instrument but life is too short.