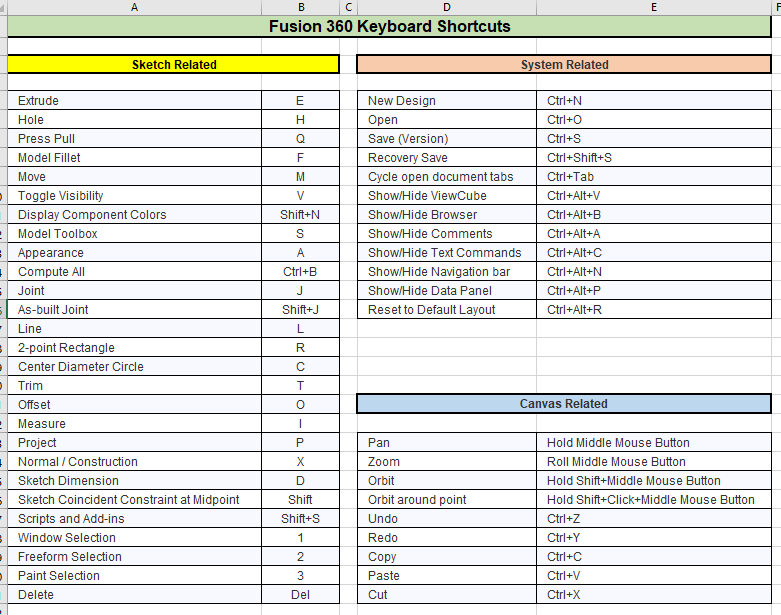
Fusion 360 Shortcuts Lookup table and keyboard overlay
In an idle moment I have updated my collection of spreadsheets to include the Fusion 360 shortcuts listing. The workbook tab also includes an edited version of the Fusion keyboard overlay.
You can download this and other eclectic tabs as part of my Engineering Spreadsheets workbook.
Some while ago I was asked to 3D print the component parts of a 1200mm wingspan glider. The design STL files are available as a paid download from the SoarKraft website.
The first problem this created was that my Sindoh 3DWOX had insufficient Z height for the 200mm high print sections. This was a thinly disguised excuse to upgrade my 3D printer to a Qidi ifast. This has proved to be a good decision and I am very impressed by the Qidi and the quality of the print results that it generally produces.
I now need to qualify that statement because I have struggled (and also learned a lot) trying to print thin wall prints for the glider parts.
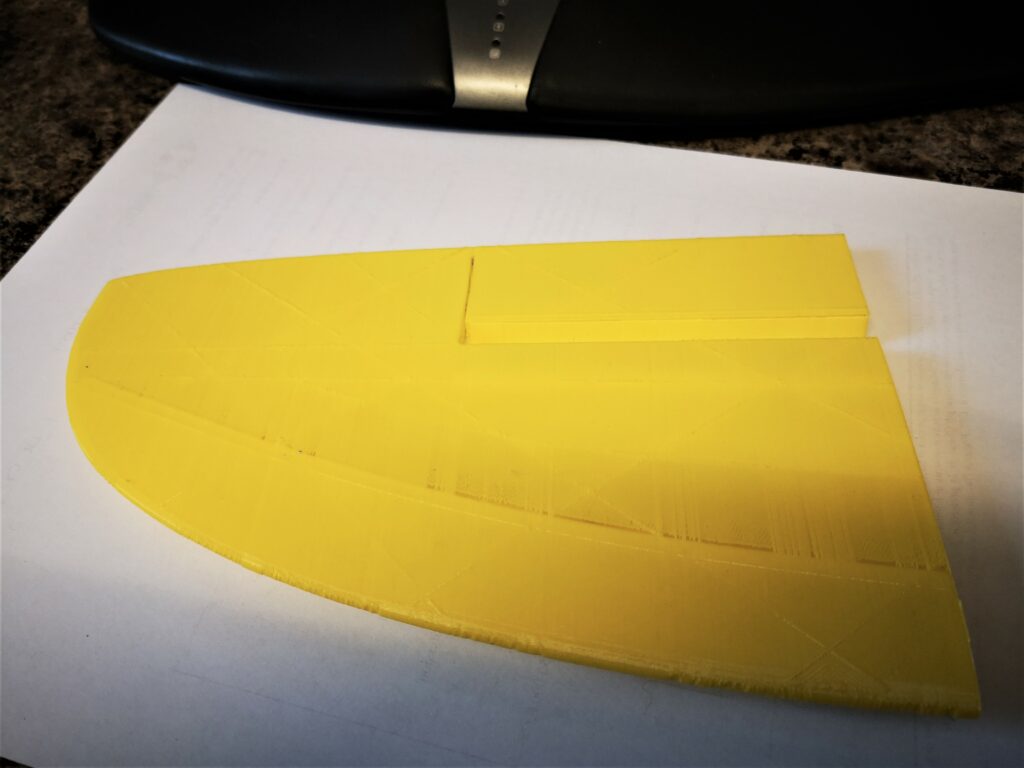
The Qidi comes with a slicer that is a skinned version of Cura. I struggled to get good thin wall results. The main problem being transparency effects in the printed surfaces immediately following internal bulkheads within the wing design. I mentally envisaged this as the extruder being unable to start pumping filament fast enough following the bulkhead transition. You can see this along the inner curved line on the image below. There are very fine threads of PLA bridging the gaps.
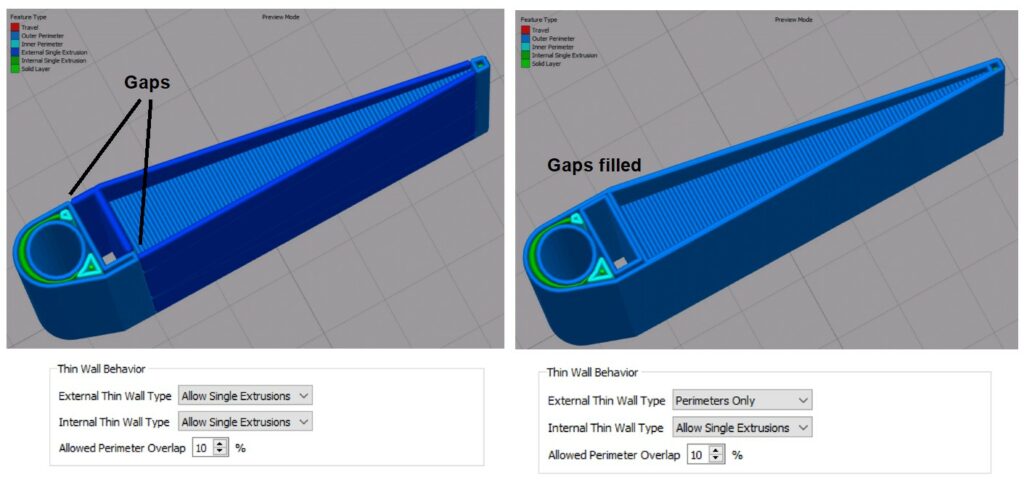
I am also a subscriber to Simplify3D. Their website has a help article on Thin Wall printing and a recommendation that the Thin Wall Behaviour can be improved under the Advanced/Thin Wall Behaviour by selecting Allow Single Wall Extrusions for both internal and external walls. Playing with these options led to good prints that met the SoarKraft recommended weight. I need to do more investigation on the other options in the two Thin Wall drop down boxes but here is an image of two examples.
I asked Qidi if there was a similar fix in their slicer. They sent me a revised config file that did fix the problem but led to a significant increase in weight on the finished print.
The problem has also been beneficial in making me realise how important the slicer simulation was as a tool (as can be seen above). It allows you to see what is likely to happen with each change to the configuration print settings. Obvious but not always investigated.
The other discovery was that neither slicer (Qidi or S3D) are able to import STEP files which does seem a bit strange. STEP files are more accurate than STL files and STEPs are easier to modify in CAD programmes.
Sorry this is not a radical post but does show that 3D printing is not just ‘click and go’. The other comment is that there are so many options to change in a slicer config that I don’t think I will every get to grips with their individual impact on the print.
Links to similar or related post are listed below : –
I have had my WS-2350 Weather Station for a very long time and it has always worked reliably. The batteries recently died in the base station unit (3 x AA) and I replaced them. The unit sits in the kitchen and on entering the kitchen the following evening I noticed a glow coming from the LCD screen backlight LEDs. This was unusual as the LEDs should switch off after a few seconds of a key press. I didn’t think anymore about it and went to bed. Next morning the low battery symbol was showing…. and the LEDs were still dimly showing light.
I took the unit through to the workshop and powered it from a 6V external supply. Sure enough the LEDs were on and the current drawn was around 40mA, far too high for long life battery operation.
I removed the eight screws holding the case rear in place and struggled to remove it. There was a build up of corrosion around the battery contacts making them tight in the back cover moulding slots. Some careful cleaning eventually cleared this and the back cover came off. This revealed more accumulated ‘fur’ corrosion around the PCB lands holding the battery contacts and elsewhere on the board. This was cleaned off but the current drawn still remained high.
I next removed the PCB from inside the case. This needs six screws to be removed. A word of warning. These six screws while holding the board in place are also responsible for applying pressure to the conductive rubber contact strips that connect the LCD screen to the PCB. Be very careful not to disturb these strips. The board is also connected to the VLF rod antenna that receives the off air time code updates and also to the antenna for the radio transceiver that connects to the outdoor sensor module. Be very careful not to disturb these components.
I gently lifted the PCB out and sure enough there was even more corrosive fur on the back side of the PCB around the battery terminals and elsewhere on the board. I thoroughly cleaned all this off and with an abrasive pencil brightened up the the battery contacts.
After fastening the PCB back into the case, I powered it back up from the external supply. To my relief the LCD had re-connected okay and was fully working. More important was the power consumption had dropped to microamps. Problem solved. The corrosion somewhere on the board must have been creating a partial short across the PCB tracks. This must have been sufficient to make the processor think a key was still pressed and therefore the backlight LEDs needed to be held on.
As I had never had leaking batteries in the unit I would guess that there had been soldering flux left on the board when it was assembled and this had absorbed moisture and had ‘grown’ and become conductive over time.
I hope this helps someone who might be having similar problems. When battery powered devices are running with very low current it does not need much contamination between copper tracks to cause all sorts of weird effects.
Links to similar or related post are listed below : –
First of all some background and then the techie bit at the end.
Some years ago while we had extension building work undertaken on our house we opted to install a large underground plastic water storage tank (>3000 litres). This was supplied complete with tank and submersible pump from Rain Water Harvesting. The tank is topped up with water from all the house roof down pipes. The water stored is used for all external water demands such as garden watering and car washing etc. We get a discount on our local authority water rates for having such an installation.
The house is fairly old and some months after the extension work was completed we began work clearing the garden. In the process of this clearance we discovered a cast iron manhole cover buried deep in the vegetation. On lifting the manhole cover we discovered … another underground water storage tank. This was of brick construction with a cement skimmed surface and doing some quick calculations appeared to be a similar volume to our recently installed new tank. The tank appears to have perhaps fed a hand pump or similar but it is unclear where the incoming feed originated. We added some new guttering to an adjacent building and the run off from this roof now tops up the old tank. Here is a view to the murky depths with the new pump and incoming feed installed.
The original pump suppled by RWH eventually began to give problems and started to blow the electrical breaker. RWH were very helpful and a new pump was supplied and installed. After some period of time it also began to become erratic in starting up when it saw demand. A third pump was then bought and installed. I also bought a maintenance kit for the second pump and then installed it in the old brick tank. The maintenance kit was very good and includes a new Hall Effect switch to sense flow demand. RWH support fitting the maintenance kit with some very good instructional videos. The second pump worked for a good period in the old tank but then started to blow the associated electrical breaker.
Rather than buy yet another RWH pump I opted for a more expensive solution from Pump Technology who are a local company servicing industrial pump applications. The new pump (Divertron 1200X) was more expensive but does appear to be of a much more professional build quality. It stands vertically in the tank and has a floating inlet pipe which ensures the water is drawn into the pump at surface water level rather than from the murky depths where all the accumulated silt sits. So far both new pumps are behaving well and have been a boon to keep the veg plot irrigated in the current very hot period.
The important issue that comes to light is the logic of the pump demand sensing logic.
The pumps sit quiescently at the bottom of the tank and look for a flow in the output pipe in order to turn on to meet the demand. They also have protection circuitry that detects against what they interpret as leaks which would lead to the pump hunting and potentially overheating. After a number of hunting starts the pumps go into reset mode and need a power reset. Similarly if the tank runs dry they also switch off. The problem with the logic occurs where you have a dribble irrigation system or a leaking tap union. The dribble irrigation nozzles do not give a full flow so the pump hunts for a number of times to satisfy demand then interpret this intermittent demand as a leak and switches off. Likewise if you have a leaking tap union the pump sees this and eventually switches off. If you are trying to protect your veg plot using timed irrigation both these problems cause the pump to switch off and only work again after a power reset. This doesn’t help when you are out of the country and believe your garden produce is being watered.
Clearly weeping tap unions can be fixed so that clears that problem but a dribble system is more of a problem. My solution is to mask the presence to the pump of the dribble system by having it timed to run in parallel with the main sprinkler system. This seems to fix the problem and no more ‘hard bounces’ are then needed to the pump electrics.
The other method of solving both intermittent demand sources is to fit a pressure vessel in the pump output feed. This acts like a water based ‘capacitor’. The bladder in the pressure vessel fills with water at full pressure and then supports the dribble demands from leaky taps or dribble irrigation systems to mask the effects to the pump sensing logic. I have bought a pressure vessel but not installed it as yet.
My thanks to Rain Water Harvesting for all their support over the years and it will be interesting to see how the new style pump behaves long term. I believe RWH also offer the Divertron 1200 X pump.
Sorry if that was a bit boring but it might help someone somewhere who is having the same issues with erratic pump operation and resulting withered vegetables.
Links to similar or related post are listed below : –
It was Fathers Day last Sunday and apart from spending time watching the very exciting final round of the US Open I had a visit from one of my sons and my granddaughter.
They came bearing gifts … a pair of socks. Not just a pair of socks but a very appropriate pair of socks.
It is a Superpower that we as engineers hold through our hands and our brains.
If we could just get the younger generations to understand the importance of engineering and how it creates wealth for our country and in turn contributes towards our future survival as a race.