Tormach PCNC440 X Axis limit switch repair

A good reason why not to leave a parallel on the way cover

I was running a milling job on my 440 the other day and I had left a parallel on the Y axis front way cover when I had switched off in the evening. Next morning I switched on and homed the axis in the usual order of X axis and then the Y only to hear a crunch as it reached the homing position. The parallel had got jammed under the table front shroud. I reversed the motion, removed the parallel, homed Z and carried on.

Fast forward to the next day. Switched on and homed X which resulted in a very bad end stop stepper chatter. I stopped the motion and moved the X axis back. Something bad had happened. I stripped off my machine vice and my tooling table and removed the table front cover. The limit switch had been crushed, presumably by the parallel the previous day.

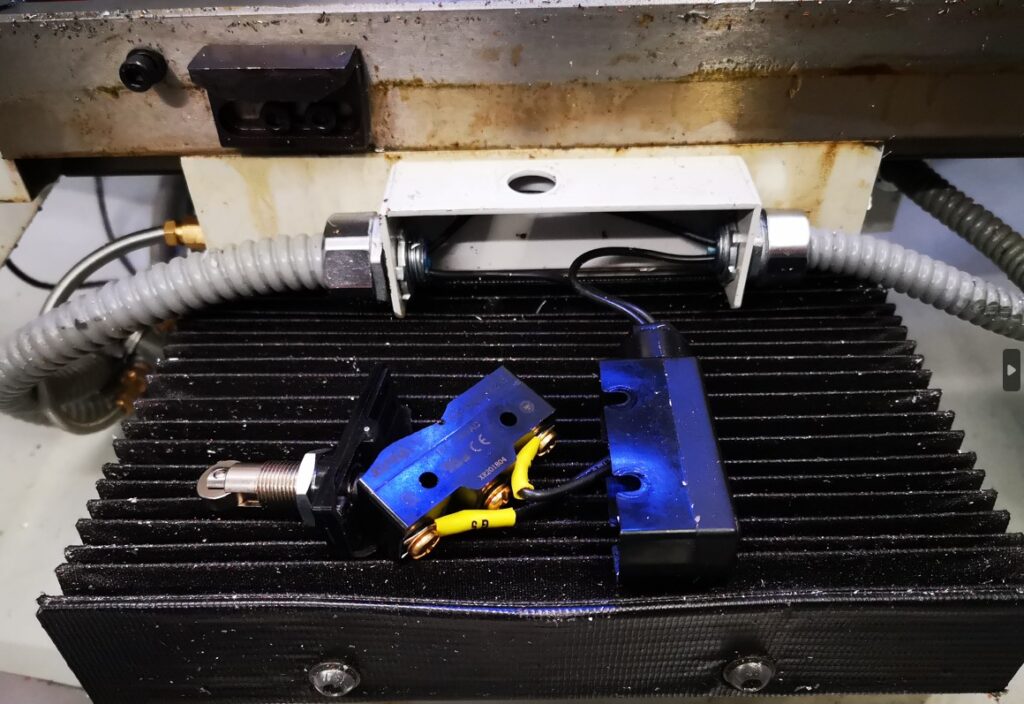
I’d like to say that this is the first time this has happened …. but it isn’t. (Hence the ding in the cover front edge …). A quick check on Amazon revealed quite a few identical looking replacement switches. There was also a twin pack available from China for much the same price but clearly much longer delivery time. A new switch was ordered and all is now up and running again (after re-tramming the tooling plate and then the mill vice etc etc …. what a pain ….)

In passing I do keep pondering the 440 limit switches and wondering if I could replace them with inductive sensors but it all looks a bit difficult having to sort out the additional wiring needed. Maybe another day ? (Sadly such a modification would still not stop me stupidly leaving things on the way cover ….)

Links to similar or related post are listed below : –

BK3 Burgess Bandsaw motor drive shaft pulley replacement

A Potential JSN Job with a Hidden Benefit

Since publishing details of the blade guide modifications on the Burgess BK3 bandsaw I have received a lot of interest and also a request for a replacement motor shaft pulley and a replacement blade drive pulley.

After dismantling my machine to check the dimensional details I discovered that the red plastic motor shaft drive pulley on my BK3 was severely worn to the extent of the teeth looking very distorted.  (See image below). It would appear I need a new pulley also.

For those not familiar with the BK3 genre, the red drive wheel is a sliding fit on the motor shaft and has a helical slot in the end which locates into a cross pin through the motor shaft.   The gear wheel is forced tight into the slot by virtue of the direction of rotation during cutting.   Reading the handbook for the BK3 it seems that this pulley is designed to slide off to allow it to be swopped with an eccentric pulley mechanism when the BK3 is used as a fret saw. 

The drive belt on the BK3 is 9mm wide and 5mm pitch (with 102 teeth).  The red pulley has teeth extending axially over 25mm.   This is to allow the one pulley on the motor shaft to drive two different pulley diameters on the blade drive pulley with only a change in belt length.   This gives two blade speeds of 106m/min and 396m/min.  My BK3 never had the second pulley combination when I bought it second hand.  The BK3 is a well thought out machine and despite its vintage is very popular and commands relatively high prices on EBay etc.

Back to the plot. 

My first instinct was to 3D print a replacement red pulley and this was successfully done using the Fusion 360 gear wheel design script.  Rather than trying to model the helical slot I opted for a simpler solution of a pair of diametrically opposite ‘L’ slots.  This worked well as a concept when trialled on the 3D printed version.

Rather than ship a PLA version to the client I opted to modify a standard off the shelf 14 tooth  x 25mm wide x 5mm pitch pulley.   These are available from Bearing Boys (14-5M-25).   The one slight problem is that the boss on the pulley needs to be drilled out to 9.5mm to match the BK3 motor shaft.   This does not leave a lot of meat on the boss.    To get the best possible strength from such a modification I opted for a steel pulley rather than aluminium.

First operation is to drill out the centre bore of the pulley.   The motor shaft appears to be 3/8″ (0.375″ or 9.5mm ish).   I incrementally drilled the centre bore upwards from 5.5mm to 9.5mm but the pulley was still reluctant to slide onto the motor shaft.  Not having an adjustable reamer I ended up using a letter ‘V’ drill to get a closer fit and then a light skim with a boring bar.  After the shaft had been cleaned this combination gave a nice sliding fit 

The red plastic pulley had a tooth width of 25mm.   The teeth on the bought in steel pulley are wider (~28mm).   The red pulley only has the  single outside belt retaining collar.   On this basis I gripped the boss end of the pulley in a collet and turned back the teeth width by 3mm.  Note there is one slight problem.  The belt retaining collars are not an integral part of the steel pulley casting but a thin dished additional fitment.  The result is that at some point in the turning this fitment starts to rotate independently of the pulley body and I had to use the Dremel to cut this residual ring free before I could continue.

Having reduced the teeth width to 25mm, the ‘L’ slots need to be cut.   I cross drilled the pulley boss with a 3.5mm hole.  I then rotated the pulley in the mill jaws by a few degrees and then cut a diametric 3.5mm slot axially down to the same level as the 3.5mm hole and then hand filed the break through from the slot into the hole to create a retaining notch.   The pulley bore was then cleared of any induced burrs.

The pulley now pushes onto the shaft and with a twist anticlockwise, the shaft cross pin locates into the ‘L’ slot notch.

BK3 motor drive pulley replacement
Top image is a dimensional sketch of modifications to the standard off the shelf pulley. Lower image shows the new black pulley with a ‘L’ locking slot and the original red pulley. Note the wear on the original pulley and the helical locking slot.

So far so good.  Next job is to recreate the large drive wheel pulley.  

Similar or related subjects : –

Verified by ExactMetrics