Sindoh 3DWOX DP200 Raft Printing Problem

My close friend in France also has a Sindoh 3DWOX DP200 3D printer.  We bought them at a similar time.  He has probably been a busier user of the machine.   He has designed and making a very complex camera mount for tracking celestial objects.  He is using an Arduino as the controller and has never written code before.  He is having fun and keeping his brain stimulated.

A few weeks ago he reported that the raft that the machine was laying down before printing objects was not uniform and had ‘holes’ in it.   The result was that the PLA being extruded for the object being printed, would droop down into the void in the raft and spoil the finish of the object while also making it hard to separate from the raft afterwards.

We swapped ideas remotely about what might be the cause and tried various tests and experiments but to no avail.

As it happened a few days ago we were travelling down into France and calling in to see him for lunch so I had a chance to see the problem first hand.   More head scratching until …. I had the printer bed in my hand near the window and the sunlight caught the surface of the plastic laminated to the metal bed.   My eye caught a slight bubble in the plastic surface where the adhesive bonding the plastic to the metal had presumably parted company.   This was the problem !   The air bubble, small though it was, was causing a discontinuity in the bed temperature profile leading to the PLA not flowing from the nozzle correctly.

We ran a print and put the object on a different area of the bed where there was no bubbling or scratches and the raft and the print were good.

New bed plate ordered ….

Similar or related subjects : –

Black Saturday and a Napkin Ring

Had a bad day on Saturday.   I was milling a small tooling plate on the PCNC440 and got distracted.  Result was a coolant puddle migrating into the bottom of the Tormach keyboard followed by a broken Haimer tip.  Doom and and major gloom.  The keyboard was a write off as the fluid had got into the capacitive keyboard laminated sheets.

As it turned out a new keyboard was much cheaper to buy from Amazon than import another one from Tormach being only GBP6 and the Haimer tip while a bit more expensive was imported from Germany via Amazon.

I was in the process of trying to work out why the Z settings appeared to be changing while drilling the matrix of holes on the tooling plate.   The drill bit length was still the same figure as entered in the offset tooling table but the hole depth had reduced.   I think it might be the Tormach Tooling Collet not being fully seated into the spindle and it had jumped home.   Having just installed a new air compressor for the Fog Buster and the tool changer, it could be the air pressure was a bit low and not fully opening the R8 collet. As soon as the new Haimer tip arrives I will get back to it.

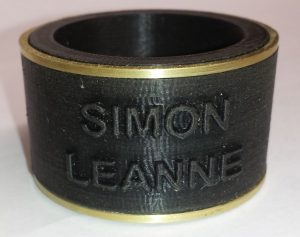
While ‘off-air’ so to speak I have been doing some 3D modelling on Fusion 360 to create some home grown Christmas gifts for the kids.   First one off is a customised napkin ring with a brass ring at each end.   The exercise  taught me how to form text around a circular body (thanks to John at NYC CNC for the demo video).  Not very sexy but functional.

sindoh, Fusion 360, kennedy power hacksaw
3D created napkin ring designed in Fusion 360 and printed using Sindoh 3DWOX and embellished with two brass rings

I struggled with cutting the brass rings and was about to design them out and go to all PLA when I had the idea to use the Kennedy Power Hacksaw like a bacon slicer to cut off thin circular shims of brass from a 2″ tube.   It worked well, was more efficient on waste than parting off in the lathe and gave a consistently wide slice.

Next request is for customised wine bottle stoppers.  Not sure wine bottles stay unfinished long enough in our house to justify this but let’s see what Fusion can deliver for the kids.

Similar or related subjects : –

Delph Gearwheel Designer clock wheel design software

I came upon the Delph site and was excited at the possibility to cut clock wheels on the Tormach PCNC440 as this was one of my prime motivations for the purchase.   Does anyone love crossing out wheels ?

Delph has been feeding me with updates to their code and it is starting to make sense what it is doing and I like it.   Today I have run a wheel on slightly hybrid code (Delph plus my direct G Code hacks) and I am impressed so far.

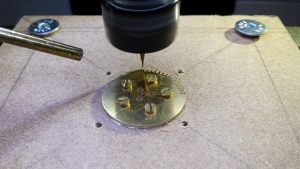
The Delph code lets you design all manner of wheels for clock and other applications.  You can define the style of the teeth, the crossings etc and you can drill or mill arrays of holes.   You can also define the order of the machining processes.   I bolted down a square of brass with corner holes holding it down – you can see the holes in the MDF below.  Next I had the Tormach PCNC440 drill the three sets of holes in the blank, then cut the blank to circular size to match the teeth maximum diameter.  In the picture the mill is cutting a rough cut first pass on the teeth using a 0.7mm carbide cutter.   Next is the tooth fine second cut and then I can cut out the crossings which is what the five screws are for – holding down the petals that will become free once profiled.

It is all in 2.5 D but well worth a look.

http://www.delphelectronics.co.uk

Delphe GearWheel Designer Tormach
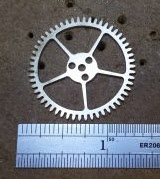
First wheel tooth being cut using the Delphe application.

Update : –

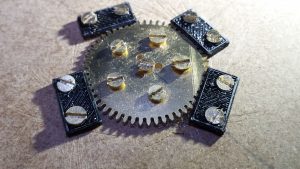
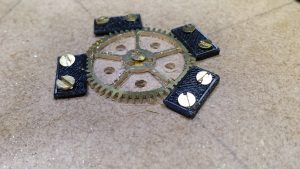
All went well in the first rough pass on the teeth called a Gash Cut in the software.   I was running at 4000 RPM and 5mm per minute and each tooth was taking 4 minutes with a slow 3mm lead in.  The second finishing pass was much quicker and now only leaves the crossing out to run.   As each petal of the crossing out is cut free , the screws shown above will keep the petal segments in place so there is no damage to the tooling.   I have made some small clamps on the 3D printer to put around the outside of the teeth to keep the wheel in place and centre screw to hold once the petals are cut free.

Gearwheel Designer, Tormach PCNC440, Fusion 360
Clamps in place ready to run crossing out
Crossing out completed and milling finished
Finished wheel after a light papering

What a feeling to complete it and thanks to Delph for their support in getting me there.

See some more details and screen shots here.

Similar or related subjects : –

Spindle Illumination Light for the Tormach PCN440

I am a great lover of having enough light to see what I am doing and being of a certain age my optics are not as sensitive as they used to be.   I have fitted Ebay sourced Angel Light ring car clusters as illumination lights on my pillar drill press and on my Myford VMB manual mill.   The arrival of the Tormach PCNC440 got me thinking of doing the same.

As luck would have it I had a 120mm OD ring light left over from the VMB installation and this was just about dead right to fit the Tormach 440 spindle diameter.  All it needed was a mounting boss.

On the drill press and on the VMB I machined up a boss in Acetal which left a mountain of swarf and I was not looking forward to another session vacuuming out the lathe.   Then the thought struck me I have 3D printing so why not print a boss ?   It is quite funny how you get locked into one way of doing things and then you step back and realise there are more ways to skin the cat.  (Is that a non PC thing to say these days ???)

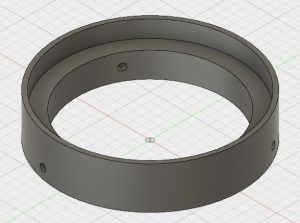
Booted up Fusion 360 and one extrude pull and two extrude cuts plus three clamping screw holes had a design ready to print.  Print time on the Sindoh was just under 4 hours but this would be longer if the central hole for the spindle fit is smaller.  The final product  looked a lot more professional than the Acetal ones I had previously made.

Tormach PCNC440 Fusion 360 Sindoh 3DWOX
3D printed boss for Tormach PCNC440 spindle illumination designed in Fusion 360 and printed on Sindoh 3DWOX DP200 and using 120mm Angel light ring LED cluster

It also fits like a glove and the three M5 nylon screws lock it in place.   I just need  to find a 12V plug top power supply to power it.

Tormach PCNC440 illuminator
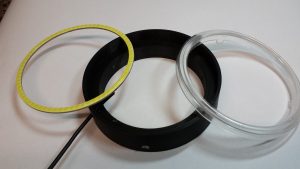
Component parts of the illumination ring
Tormach PCNC440 Fusion 360
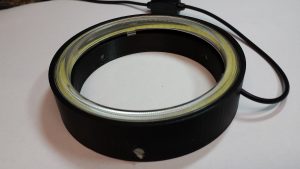
Completed illumination ring for Tormach PCNC440
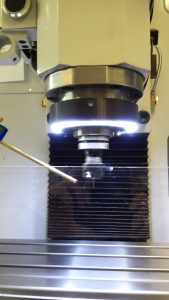
Illuminator in place on Tormach PCNC440
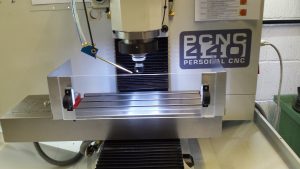
Wider view showing the illuminator and my home made swarf (chip) shield

If you would like the Fusion STL or the link to the Angel Lights on eBay let me know.  I have the STL file for the 3D printed small enclosure to suit the regulator for the Angel Lights from a 12V supply.

I also have the Fusion file for the handles on the magnetically mounted perspex front shield as seen above.   The handle mountings have 45mm centres to match the magnet plates which are standard UK sourced magnetic latches.

Update : –

While producing a ring light for a client I tried mounting the ring without the plastic lens that comes attached to it.   The lens focuses the light forward but does not allow spreading of the light and there is some attenuation associated.   Conclusion is to leave the lens off in future.

The other conclusion is to go for the largest ring light you can tolerate for your machine so the light (without the lens) has the chance to diverge wider and illuminate around the tool in use much better.  On EBay the most common large size is 120mm OD.   They are also available on Amazon.

Similar or related subjects : –

Verified by ExactMetrics