Quorn cutter grinder tool holder support

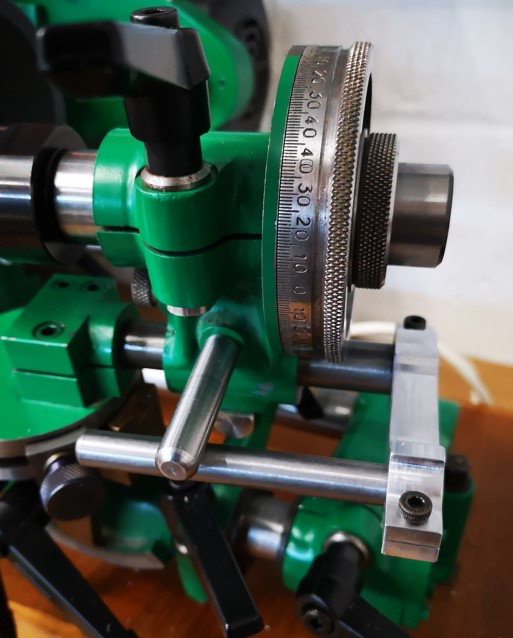
I am slowly getting to understand how to manipulate and use my recently purchased Quorn tool cutter grinder.    One frustration that kept cropping up was the workhead assembly slip rotating on the bed bar. This usually happens when there is a need to slide the tool holder head back after a referencing action.  This messes up the reference setting.

I chanced upon a thread on the MEW forum where a John P had solved this problem with a parallel support bar assembly.   This utilised the 1/4″unused hole in the toolholder side wall.  There are a number of ways to fabricate this fixture but the important aspects are that it should be robust and must ensure a parallel motion along the support rod.

quorn cutter grinder tool head support bar
The cutter grinder tool head support bar mounted on my Quorn

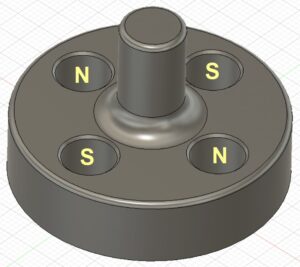
I opted to model the bracket in Fusion 360.  As there will be little stress on the bracket in use I opted to mill it from 15mm cast aluminium to give a 12mm finishing depth.  Here is the pictorial view from the Fusion desktop.

Fusion 360 model of the Quorn cutter grinder tool head bracket
Fusion 360 model of the Quorn cutter grinder tool head bracket.  The bracket measures around 90mm end to end.

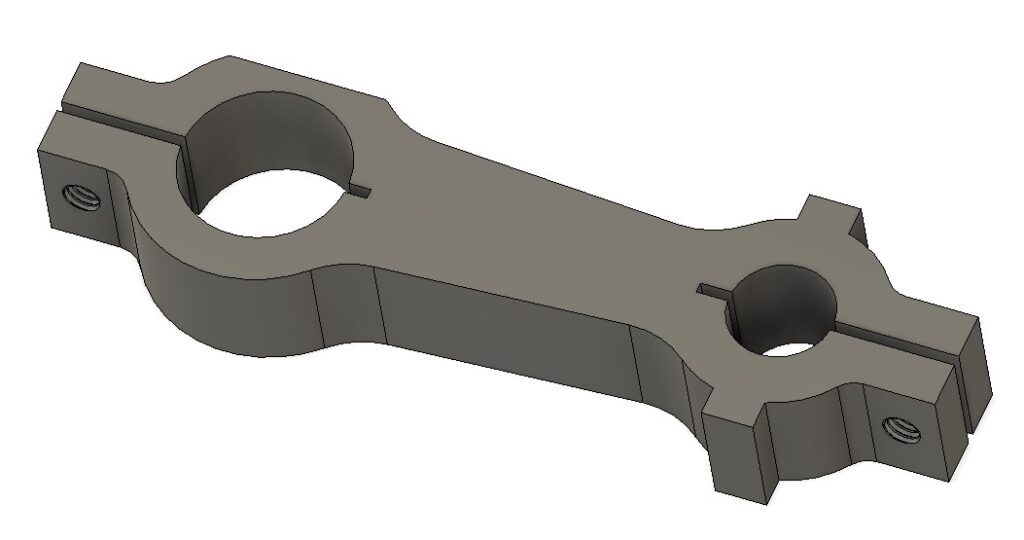
The bracket has a 5/8″ hole to match the Quorn table slider rod and a 10mm hole for the new parallel support rod (sorry about the mixed dimensions but my Quorn is an Imperial model and most of my stock is metric).   

Side #1 CAM operations are to clean up skim the stock top surface followed by profiling the two holes and the outside shape.  Side #2 is to invert the model and deck the excess material.   The clamping slots, the flat adjacent to the 5/8″ hole and the M4 tapped holes are all supressed in the CAM and manually cut post CNC operations.

The model has two tabs adjacent to the 10mm hole.  These have no relevance to the use of the bracket but are there to make the width of the model equal.  This negates the need to use soft jaws to hold the model when undertaking side 2 operations to deck off the excess stock material. The decking brings the model to 10mm finishing depth.   These two tabs could be ground off afterwards if desired. 

I did consider grub screw clamping of both bars but there was a danger of deforming the associated bars.   It was easier and more elegant to design slot clamps into the Fusion model. The clamping slits were cut post CNC machining on my BK3 bandsaw.   (Try cutting straight slots on a BK3 without a decent fence and support bearings.) The parallel nature of the finished model width as mentioned above makes this a simple process against the bandsaw fence.

The two M4 clamping screw holes are drilled prior to the slots being cut.  The holes are drilled 3.3mm through and then M4 through threaded.  After the slots are cut one half of each hole is clearance drilled to M4. 

The flat adjacent to the 5/8″ hole is the last ‘after CNC’ machining operation.  This flat gives the clearance needed to allow the bracket to slide under the Quorn toolholder referencing dial.

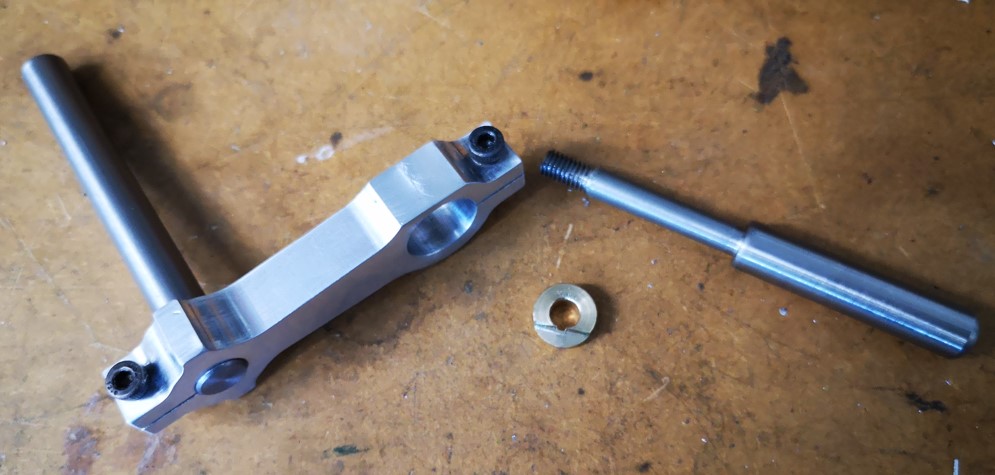
The gliding bar is mounted in the spare hole in the tool holder side wall.   This hole in my Quorn had been drilled 1/4″.   The rod profile was turned with a centre from 10mm silver steel to have the 1/4″ section and then a short section threaded M6.   Note that I also made a brass washer profiled to match the rear face of the through hole in the body.  Like most of the Quorn casting holes this had a step segmented surface aimed at stopping bolt head rotations.

Fusion 360 pictorial view of the assembly
Quorn cutter grinder tool head support components
Quorn cutter grinder tool head support components – this shows the bracket with support bar in place, supporting rod and profiled washer.

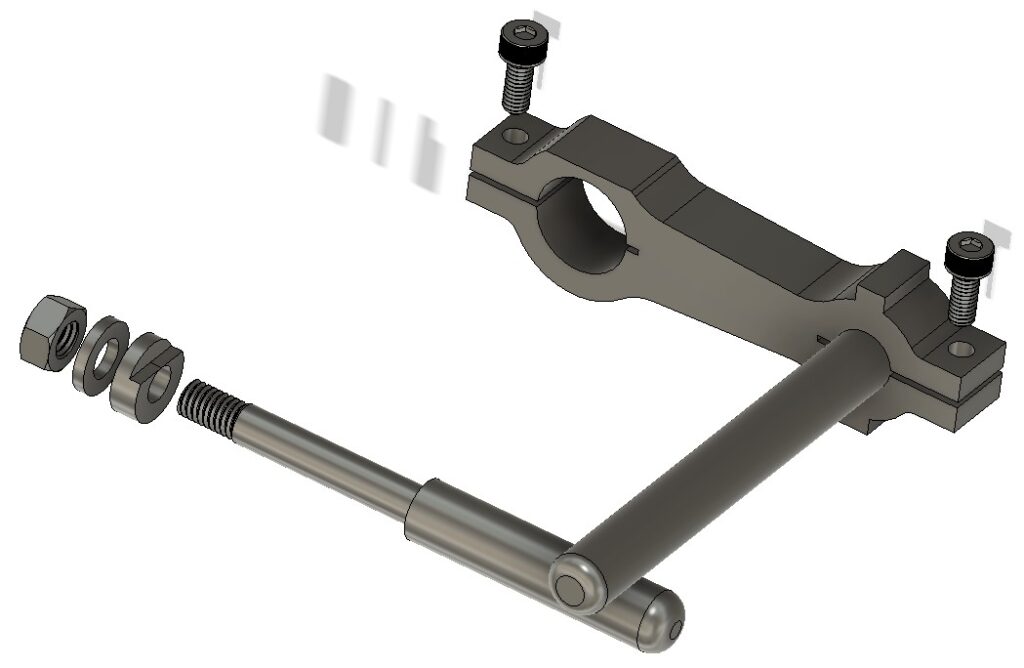
Mounted on the Quorn, the assembly sat nicely parallel, is very solid and stable and does an excellent job of stopping the head drooping.  My frustrations over this aspect of the Quorn are eased for the time being.

If any readers want the Fusion file or dimensioned drawings then add a comment below.

UPDATE : – The bracket should be rigid enough when 3D printed instead of machined from solid. Here is a ZIP file containing  the support bar clamp version v5 as a STEP file.  All the other parts are straightforward lathe operations.

Similar or related subjects : –

A 3D Printed Passive Demagnetiser using Neodymium magnets

I saw a recent post on the HomeMadeTools.net site from Tony Foale about using Neodymium magnets in a rotating holder to act as a demagnetiser. 

Tony made the holder from aluminium but from my point of view with Fusion and 3D printing facilities the idea lent itself to be run as a 3D print.  The finished device can be held in a lathe or drill press chuck using the central boss.  The boss does not have to be rigidly clamped as the magnets will grab and locate the assembly up to the chuck.   The magnets are very strong so be very careful as you bring the object to be demagnetised up to the lower surface or it will also get ‘grabbed’. 

Attached is a ZIP file containing the Fusion 360 file.   This is designed to take 10mm diameter magnets which will be a tight push into the mounting holes.   I used 10mm long magnets but smaller ones will probably work just as well. The magnet mounting holes have a 1mm thickness bottom surface.   The magnets need to be inserted with the alternating orientation as shown.  Tony made a circular ‘keeper’ for the bottom surface from a steel disc.  This reduces the attraction to swarf.   The ZIP file also contains a simple lid to fit over the top side to protect the holes from accumulating magnetic swarf.

Screen shot of the demagnetiser fusion file
Pictorial screenshot view from Fusion 360 of the demagnetiser 3D model

ZIP file download is on the link below and contains the body and lid as a Fusion file and as separate STEP files  – demagnetiser disc body and lid

A closing thought (which I haven’t tried …) but if all the magnets were in the disc the same way round would this act as a magnetiser to save having to stroke the item with a magnet ?

Similar or related subjects : –

Using Raaco section boxes for fastener storage

I am a great lover of the Raaco 18 section storage boxes for my various sizes and ranges of nut and bolt fasteners.   These boxes are not unduly expensive and are very durable with a sliding locking latch (assuming you don’t forget to slide it place – see below). 


To date these boxes have been stowed stacked one of top of the other on the shelf above my office workbench.   Come the need to get a particular size fastener for a job I can bet on the box I need to access being at the bottom of the stack.   This can get frustrating and can also be risky because if I haven’t fastened the lid properly there is an ever present possibility of a lot of fasteners hitting the floor with some associated colourful expletives.

As you have probably gathered from the previous post, this has been woodwork week or at least MDF week if that counts as real woodworking.  After finishing the storage box for my clock bushing gizzmo I still had MDF to spare. With some judicious juggling in Fusion 360, I came up with a design for a slide in storage rack for my Raaco box collection.   In fact there was enough MDF left over to make two of these.   I did have to buy in some 30mm x 2mm angle though. The design allows access to any fastener box without the need to shuffle the stack to get at the one I needed.  Joy of joys.

The storage unit is 300mm high and has MDF sides and back board.  I had to revert to a 1mm sheet of  aluminium for the top and bottom surfaces to get the optimum number of boxes to fit between the workshop shelves.   Each storage slot has an aperture of 250mm x 47mm (excluding the aluminium angle) and is 180mm deep.

The added bonus to the design is that the Raaco fastener slide is a very tactile grab handle to draw the wanted box out of the rack.  The feel of the slide also acts as a warning flag that the slide might not be correctly locked in place.

Yes I know it is all a bit anal.   Making things to make things etc but less frustration means more productivity … well that’s the theory.

Similar or related subjects : –

Bamboo barbeque sticks as dowels

OK so this is nothing radical but worth adding to the armoury.  

I am in the process of making a protective box for my clock bushing tool and the various accessories that are used with it.   I had some 9mm MDF board in stock that looked a potential candidate for this.   The only problem with a 9mm board thickness is that this didn’t leave much margin for error using standard 6mm dowels and I did not want to use screws or nails to hold my box together.

The solution I came up with was to use 3mm bamboo barbeque sticks as dowel substitutes. These are incredibly strong in sub 25mm lengths.

I did cheat however and did not try fit them in blind holes but instead drilled the mounting holes through to the outside surface.   It still looks OK and has resulted in a very strong structure.

Using barbeque sticks as dowels
Image of the side panel of my home made clock bushing tool protective box. This shows the bamboo barbeque stick dowels bonding into the edge of the 9mm MDF components (the ‘dowels’ can be seen as white dots along the top and bottom edge).   The MDF is finished with Yachting Varnish.  You can see what a messy painter I am ….

Similar or related subjects : –

Clock adjuster rod for measuring spring and fusee drive power

 I was presented with a clock that seemed to be low on drive power and it was proving difficult to diagnose where the fault lay. I remembered seeing articles by both William Smith and John Wilding about a device that could give a relative measure of the drive power from the fusee.  There is also a brief mention of this in Donald de Carle’s – Practical Clock Repairing.

This will be difficult to describe but in essence it is an adjustable balancing rod that is mounted on the fusee winding square.  The movement’s centre wheel and second wheel are left in place but the escapement is removed.   The rod has a sliding weight that can be adjusted to counter the drive power from the spring through the fusee chain to the fusee itself.    By winding the fusee one step at a time and resetting and noting the counter weight position it is possible to derive a graph of fusee turns against drive power.  Here is a pictorial view of the device and below that a picture of my version.

A sketch of the principle of the balance rod for fusee drive checking
Image of my version of the balance rod
My version of the balance rod. The winding socket is interchangeable for different fusee square sizes.

William Smith suggested making the mass of the sliding weight equal to 1lb and measuring the weight position in inches from the balance centre to the centre of the weight.   This results in a graph of drive in lbs/inches.

In practice the balance point is a little subjective to set.   You need to move the weight back and forth such that the rod remains horizontally balanced against the drive from the fusee square.  Once a balance point is achieved the distance from the moveable weight centre to the winding axis centre is recorded.

On this particular clock I plotted the results of the each turn of the full wind range of the fusee and the balance distance seemed to be reasonably repeatable and overall fairly flat. This suggested that perhaps there was not an individual fusee positional problem but something that was common mode across the range of the winding.   To me this indicated that the drive transfer through the centre wheel and the second wheel was potentially the issue.

Checking the arbors against the plate pivots did not reveal a great deal of wear but on dismantling and checking more closely one of the centre wheel pivots had a worn curved profile.   I re-made the pivot and re-bushed the plate and reassembled the movement. On re-running the test with the rod I found I had gained an extra 1″ movement of the balance weight along the rod.  This suggested that more power was now being transmitted to the train, that is the train was not presenting such a high resistance to motion and more power was being created to drive the clock.  

This appeared to solve the problem with the clock having a much stronger beat.   This result is indicative of the value of this simple tool.

William Smith also suggests that the balance rod is useful as a temporary drive source.  Suppose you have a clock stripped down and want to quickly check the train.  Without fitting the barrel and fusee chain, the balance rod and balance weight can be mounted on the fusee square to provide quite a few minutes of drive to quickly exercise the train without having to undertake a full movement rebuild.

Similar or related subjects : –

Verified by ExactMetrics