Enclosure finally added to my Tormach PCNC440

Reduction in Sparkly Bits around the House

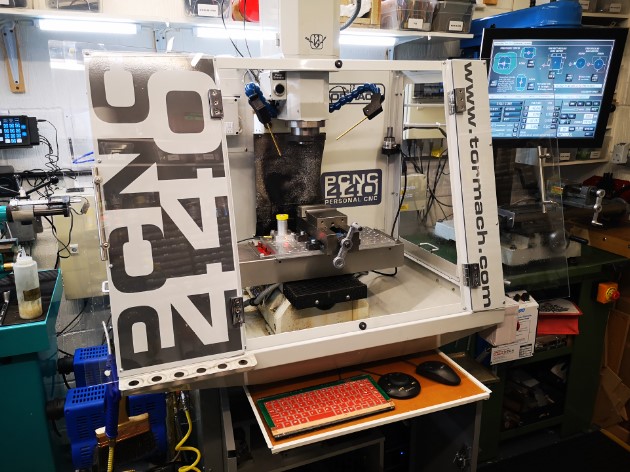
When I bought my Tormach PCNC440 in 2016 I included the enclosure kit in my order.   On receipt I thought that fitting the enclosure would dominate the size of the workshop so I never got round to fitting it.   It has sat in its shipping box since then.  I have consequently shared quite a bit of my swarf (chips) with long suffering family.

After a recent (particularly heavy) CNC run I had a serious covering of swarf in the machine tray and because I had no enclosure round the mill, I had quite a lot distributed further afield (i.e. into the house).   Domestic peace was becoming an issue. Time to do something about it. 

Out came the enclosure kit, cobwebs dusted off and around three hours later I had the enclosure fitted.  I have to say it looks good and does not overpower the workshop as I thought it would.   My wife is impressed and says it looks a more professional machine and ‘if you had it why didn’t you fit it before now’ ? 

My Tormach PCNC440 with its enclosure fitted
The picture above shows the enclosure mounted on my PCNC440 with the monitor in the original position before fitting the extension arm to the ISO bracket. The keyboard tray uses a domestic drawer rail mounted on the top of the standard Tormach cabinet. My recently fitted dual fogbuster system and my Hall Effect based tool height setter (yellow top) are visible.

The fitting did however create some follow up problems.   

My control monitor had up to now been mounted on the side of the 440 on a standard ISO TV mount.  With the enclosure fitted this meant it was ’round the side’ and difficult to get to.   I debated a new long reach ISO but they are expensive.  Plan B was to make something. I rummaged around in my aluminium stock and with the help of Fusion 360 came up with a seriously overengineered extension arm to add to the existing ISO mount. This would allow the monitor to move forward to be in reach at the front of the mill. 

ISO bracket extension on Tormach PCNC440
My seriously over engineered extension bracket to move the ISO mounting of the monitor more to the front of the 440

This bracket became the first CNC job to run after fitting the enclosure.   I am pleased to say it was the cleanest my workshop floor had ever been after running a job.

Having fitted the new bracket and mounted the monitor, all the cables needed extending.  Fortunately I had had the foresight on my original order to include the extension cable kit.   As a result I only had to extend the power supply lead from the monitor 12V ‘brick’ supply.

The second issue was where to mount my ITTP probe as this had formerly mounted on the side of the 440.   With help of some more Fusion design I modelled a corner mount that picked up on the enclosure fastenings.

After that first heavy machining run I noticed for the first time the slight smell of the mist coolant when opening the enclosure doors.   Before the enclosure was fitted the smell must have dispersed into the general workshop air.   With the enclosure fitted the air was concentrated inside the mill and I only got the smell when sticking my head inside.  While it had never been a problem (as far as I can tell …) I thought I should do something about it.

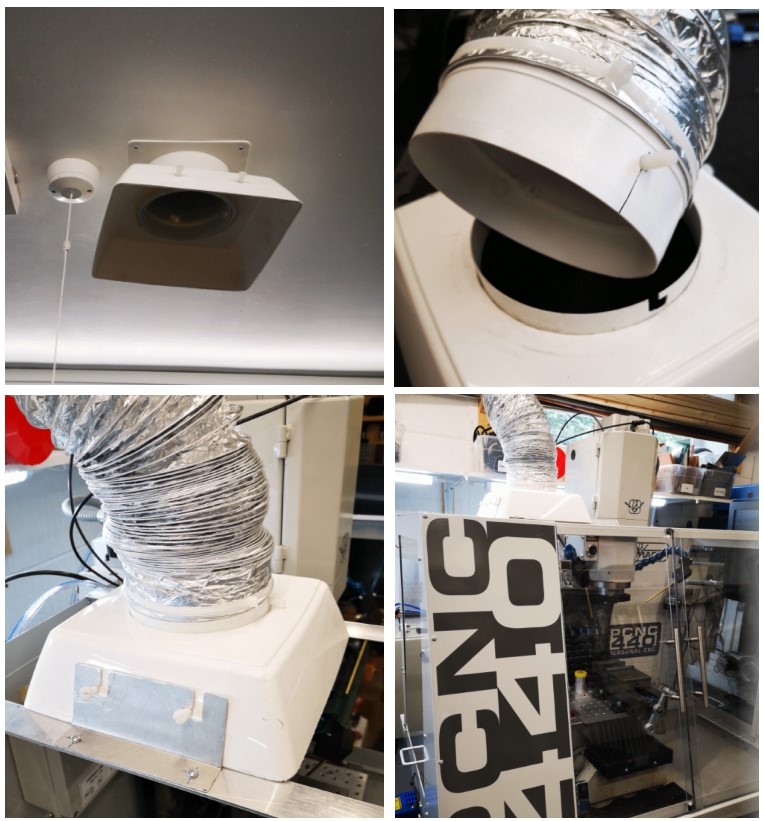
Sometime ago I installed a ceiling extract duct in the workshop.   This vents to the outside world via a custom roof tile. Normally the system sits with a flared cowling (made from a cut down flower pot) on the ceiling entry duct.  The system normally acts as a background trickle extract.   The cunning plan in the design was to use various pipe components to provide bayonet style connection pins (Nylon screws) to allow extension trunking to be used.   A bit like a BNC RF connector if this is familiar to you.   This would allow me to use an add-on length of expanding flexi trunking to bring the extract nearer to any heavy fumy activity such as welding or oil bath hardening.

With the use of further scrap odds and ends of aluminium, I mounted a pair of support bars across the top of the new 440 enclosure. These would fix the ducting over the enclosure during heaving CNC sessions.   Not a total solution but certainly one that will reduce the general smell of XtremeCut 250C when I stick my head in the enclosure.

Workshop extract system
Extract system showing ceiling mounting intake, trunking adapter and mounting on my Tormach PCNC440.  Note the two Nylon screw protrusions are for a bench mounting clamp when used for welding extraction etc and now used on this new use of the system on the mill.

A good day’s activity with all the issues addressed and domestic bliss hopefully restored.

Similar or related subjects : –

Tormach PathPilot G37 Update

I have my Tormach PCNC440 wired into the workshop network and as a result if a new version of PathPilot is issued my PathPilot controller warns me.   This is quite nice as there is no formal emailing warnings of new issues by Tormach.  Anyone whose machine is not Internet connected would need to check periodically with the Tormach site to see if an update was needed.

To continue the story … last week I got a warning of a new version of PathPilot (2.4.0) was available and I duly downloaded.  One of the immediately obvious changes in the new firmware was a G37 tool measurement routine which works in conjunction with a simple Normally Closed tool setter.   From my previous ramblings you will see that I had done a combiner box to allow both probing and toolsetting to share a common input to the Tormach.   In theory I was therefore ready to go ….

From my many years in industry I should know that all that glitters etc … the new routine did not work.   I thought it must be me but in the end I logged a support call with Tormach and sent them my log file.   I also logged the problem on the NYC CNC forum to see if anyone else was having the same issue.   I did get one response saying that he was not having an issue.   The plot thickened and nothing back from Tormach.

A couple of days later the same responder said there was a fix update available from the Tormach site.   It seems the software worked well in G20 Imperial mode but not in G21 Metric mode.   He was running Imperial and I was trying to run in Metric   Software update downloaded and all is well.   It is rather nice.   You tell PathPilot where the tool setter is located and then to run the auto tool measurement you put a G37 command in the GCode after a tool change.   Away the spindle goes to the tool setter location, dunks the tool and updates the Tool Table.   Magic.

Still waiting for Tormach to close off my enquiry and let me know they had fixed the problem and as a result there was a new firmware available.  But it is Christmas and maybe they had other pressing matters.

Similar or related subjects : –

Probe and Toolsetter together on Tormach PCNC440

New Tool Setter Arrives

I recently bought a special offer price tool height setter from Banggood.   On arrival this seemed nicely made and robust and looked like a worthy addition to the armoury.   

The Tormach PathPilot control software has facilities for tool height setting using such a probe.   I also have a Wildhorse Innovations probing tool for edge and centre setting.   Both these devices can be connected to the Tormach PCNC440 external input accessories connector which is  a 5 pin 180 degree DIN.

The input to the Tormach accessory socket is a 2 wire connection.   Sensing and operation of external tools like the probe and tool setter depends on the device having a normally closed connection that goes open circuit when activated (i.e. the probe tip moved or the tool setter pushed down).   The probes are in essence a single pole normally closed switch.

Frustration Sets In

After spending time having to keep swapping these two devices in and out of the accessory connector I figured there must be a better way.

The Tormach does not care if you connect multiple probes at the same time provided they are all in series on an electrical loop to and from the two pins on the interface connector.   Any device when activated will break the loop and create an interrupt to the PathPilot software.   Because you will be in the area of PathPilot software that relates to the function you are measuring, the relevant probe will be the one you are intending to use.

The Solution

What was needed was a simple interface box that allowed the two probes to be connected in electrical series back to the two pins on the DIN connector.   I also wanted flexibility to be able to unplug either of the two probes and not affect the operation of the other.   This meant that on removal of either probe it would need an electrical short circuit across the pins of the connector from which the tool had been removed.

This could be done with a small by-pass switch, that is normally open circuit, connected across the connector.  You would manually close this switch if the probe is removed. 

This is fine so long as you remember to activate the switch when you remove the probe otherwise the sensing loop will see an open circuit and the software will get confused.

My solution was to use sockets for the connections that would automatically provide a short across their contacts when their mating plug is removed.   A good example is an audio style jack plug socket.   These come in various sizes (2.5mm, 3.5mm, 1/4″ etc).  Usually on these sockets the tip of the connector gets shorted to another contact when there is no mating plug in place.

I had some 3.5mm stereo jack plug and sockets to hand (either mono or stereo can be used as it is only a two wire connection) and these were simple to wire for this application.   

wiring two jack sockets for the probes on a tormach

I also ran a modified version of one of my standard 3D printed enclosures to mount them in and fitted a flying lead to a 5 pin DIN to plug into the Tormach interface.   A hot glued magnet onto the bottom of the enclosure allowed flexible mounting of the box somewhere on the Tormach body.  The only fiddly bit was replacing the existing connectors on the two probes with a 3.5mm jack plug.  (Don’t forget to the put the connector shell on the cable before you solder the wires in place ….. ).

finished dual probe input assembly

close up showing the wiring on the two jack sockets

A neat solution and the problem solved.   Both devices plug into the box to perform their various probing functions into PathPilot.  Unplug one of the probes and its mating socket will automatically short out the probe connections when the plug is removed.  The remaining probe plugged into the other socket will continue to function.

Similar or related subjects : –

Verified by ExactMetrics