A Dewpoint Monitor to protect the workshop
I have recently read a number of posts on workshop forums about rust degrading workshop assets. When the temperature of the air reaches close to the dew point then the moisture in the air will condense on the cold surfaces in the workshop and moisture will inevitably lead to rust forming.
You can protect against this to some extent by ensuring that all exposed surfaces are coated with lubricant of some sort such as WD40 and only dry sources of heat are used in the workshop. A better protection solution which was popularised by the clockmaker William Smith, is make a 50/50 mix of linseed oil and thinners and coat this on the objects needing protection. This works well but does not last forever.
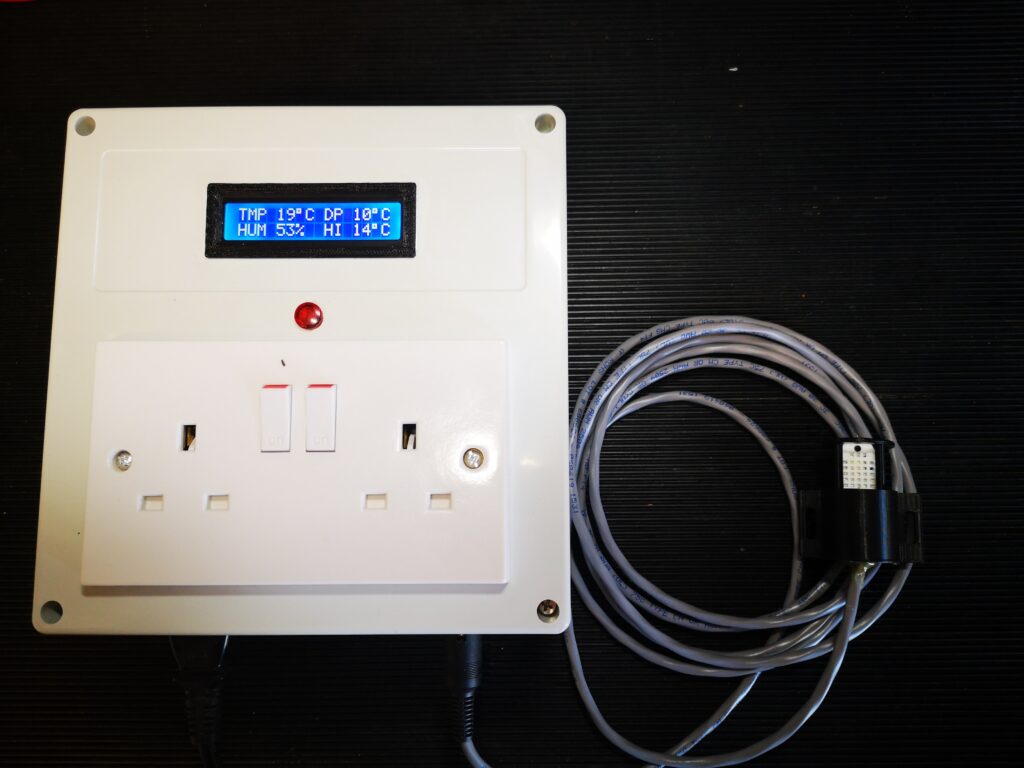
Looking around on the internet there are various Arduino projects to create a dewpoint monitor using the DTH11/DTH22 which are combined temperature and moisture probes. Such devices, with a little bit of maths, can provide an alarm output if the dewpoint reaches close to the air temperature. This could be used to turn on a heater and raise the air temperature and avoid moisture being deposited. I opted to have the sensor remote via a cabled connection.
The dew point calculation I used is the Magnus-Tetens formula (Sonntag90). This provides accurate results (with an uncertainty of 0.35°C) for temperatures ranging from -45°C to 60°C.
The dew point is calculated according to the following formula:
Ts = (bα(T,RH)) / (a – α(T,RH))
where:
Ts is the dew point;
T is the temperature;
RH is the relative humidity of the air;
a and b are coefficients.
The Sonntag90 constant values are : – –
a = 17.62 and b = 243.12°C;
and this is the final formula needed : –
α(T,RH) = ln(RH/100) + aT/(b+T).
I made a prototype using an Arduino Pro Mini as the controller and I used the above equation to calculate the dewpoint from the humidity and temperature readings input to the Arduino from the DTH22 sensor. Once the dewpoint reaches within a defined limit of the temperature, a relay is closed to allow heaters to be turned on. This trip point also causes the LCD display flash to warn that a trip point has been reached.
The working circuit was drawn in Fusion Electrical and a printed circuit board layout was created. Fusion’s Electrical CAM output as Gerber and Epsilon files were converted in FlatCAM to CNC GCode. The CNC files were than posted to my Tormach PCNC440 to mill the copper traces.
I designed the PCB using through hole components to make assembly easier for my more mature eyesight.
The trigger output from the PCB can feed any 5V coil relay that is rated with contacts capable of feeding the AC voltage and current needed for the heaters.
UPDATE 18/12/2021
Due to demand I have ordered a small quantity of offshore manufactured PCBs for the Dewpoint Monitor. If you are interested in one then send me an email as per address below. First come first serve.
UPDATE 1/11/2022
Auto reset code added should the sensor lose connectivity,
New write up is below including the new code
Similar or related subjects : –