3Dconnection SpaceMouse menu changes

It is sometime since I looked at the SpaceMouse programmable menu options for Fusion 360. I only have two programmable buttons on my mine. I don’t think my brain is now capable of retaining any more than two button options. I struggle just remembering the keyboard shortcuts beyond Extrude and Dimension. The left SpaceMouse button I have set to reset the ISO ‘home’ view and the right hand one was set to the ‘change views’ pallet.

I recently upgraded my SpaceMouse driver to 10.8.17 and on checking the Fusion 360 button options I see there is now one for directly triggering the 3D print sub menu. There also seemed to be far more button options which I don’t remember seeing there before. As a result I have now reset my right button to initiate 3D print. The question is will I remember it is there ?

If you are a Fusion 360 user and haven’t got a SpaceMouse you are missing out on a whole new world of Fusion efficiency. It is a joy to use and does not take long to learn to manipulate. You could drop a hint for Christmas …. or you could look on EBay where there are lots for sale. Why people are selling them beats me.

Links to similar or related post are listed below : –

Myford Super 7 Large Bore depth stop

I recently had to turn a number of items on my lathe and wanted them to be consistent in length. These were long items, too long to reference with my home made Morse Taper depth stop.

In desperation I raided my Sherline CNC Rotary Table hardware kit for my coaxial tailstock clamp. This is based on the Myford tailstock winding handle but without the handle. It clamps the lathe bore to the CNC table for cutting items needing indexing such as clock wheels. Wheel cutting is quite a demanding application. There is no tolerance for slippage or you will get to the last tooth and have only half half the material that you expected left to cut … and the box of shame looms.

The clamp is quite simple – the main body is an expanding collet, this mates with an expansion cone and a centre threaded rod. The cone angle is 5 degrees. There is a knob to tighten the assembly and squeeze the cone into the body to expand its arms. The body has four slots that two pins on the cone engage with to stop rotation.

Having finished the particular job in hand I put away the Sherline clamp and thought it would be useful to make a second version of the clamping collet dedicated as a lathe depth stop. I was rummaging in my metal stock for material to make this when the light bulb came on …. why not 3D print it? When the clamp is used as a depth stop there is no rotational stress. It just acts as a stationary reference stop that sits down the lathe bore.

I copied the dimensions from the Sherline version and input this into Fusion. I printed the body, the cone and a knob (with an M8 embedded nut). The centre rod is M8 studding which passes through the collet body and then screws into the cone and then protrudes onwards to set the depth in the lathe bore. You would think that there needs to be a nut to lock the studding to the cone but the cone cannot rotate as it has the two locating pins. Providing the studding is stopped from rotation while the knob is tightened, the depth should be set solidly. A lathe depth stock is rarely an accurate setting tool but just a repeatable reference. The accuracy of the final cut is catered for by the tool position set and the various lathe DROs.

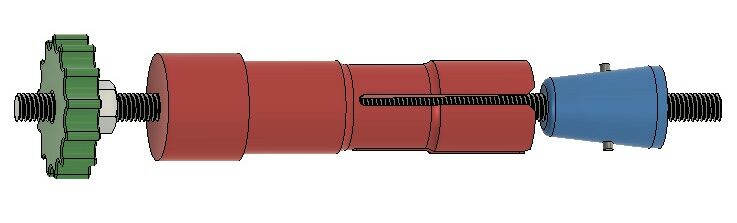
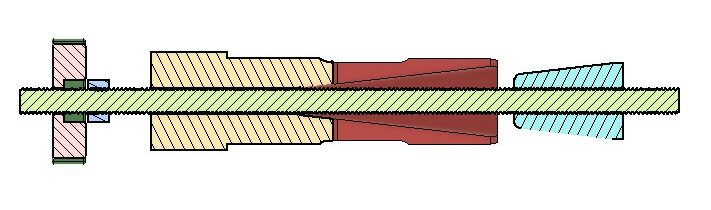
Printing this was a lot easier than cutting it from metal. No messing setting cutting angles etc. Here is the Fusion pictorial view and cross section.

After using it a couple of times I ended up putting a spring and two M8 washers between the body and the knob to maintain a slight pressure on the cone. The spring keeps the locating pins engaged in the slots on the body as the assembly is pushed in place down the spindle bore.

I also added a ‘top hat’ on the end of the M8 rod (not shown above) to give a larger surface area for the work piece to bear against. This would also stop wobble of the threaded rod as the spindle rotates.

Attached below is a ZIP file with the body, cone, top hat and knob STL files. You will need some M8 studding, an M8 nut and some short M3 stubs for the anti rotation pins in the cone. If you add the spring then two M8 washers will be needed. All the threads are modelled in the STL files but will need cleaning up post printing. I printed in PLA+ and had the prints set to four perimeters. I superglued the two M3 studs in place. The tops of the studs should not protrude beyond the unexpanded body surface otherwise they will bind on the inside surface of the spindle bore.

Things now went a little bit off piste …. I had forgotten that the end of the lathe spindle has a threaded section that mounts the bearing pressure collar. The exposed thread is normally protected with a plain collar. The thread is M35 x 1.5, something very easy to model and print via Fusion 360. Below is the relevant exposed thread with the protector collar removed.

Another light bulb came on (getting to be competition to Blackpool you might think). Why not make things very much simpler?

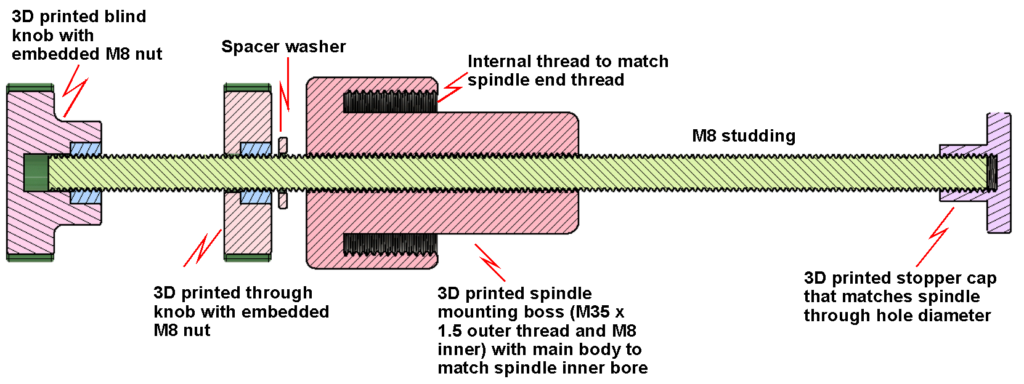
I modelled a boss to screw onto the M35 thread with a central core to fit down the spindle bore (26mm) and with a central M8 tapped hole. I also printed another through hole M8 knob, a M8 top hat and a new blind M8 knob. I now had a much more simple depth stop.

Here is the Fusion image of the boss. This would have been very difficult to cut as one piece in metal but very simple as a 3D print.

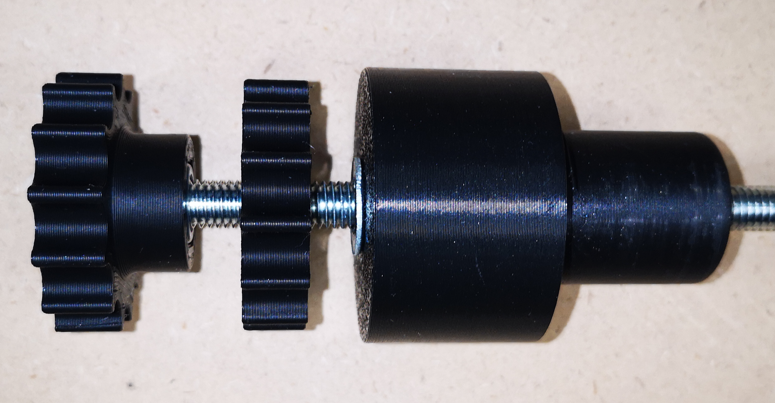
Here is a close up view of the final assembly with the top hat out of shot at the far end of the M8 studding but shown in the second image. The knob on the left grips the end of the studding to allow easy adjustment of the position of the top hat. The inner knob locks the studding in place against the boss. Both knobs have embedded M8 nuts. (Note the bend on studding is a photographic distortion).

Two solutions for a depth stop. The second option is peculiar to the Myford and the first solution more universally adaptable to other lathes. The following download ZIP file contains the STL files for both versions and there is a second ZIP which has the Fusion 360 model for those wanting to tweak. Either version will make a useful addition to the workshop tooling.

Links to similar or related post are listed below : –

Qidi X Smart 3 tweaks

From the title you will have guessed that I could not resist the temptation to buy an X Smart 3 while they were on special offer at GBP299.

The X Smart 3 is a lovely little machine. It prints excellent high quality models at a very fast speed. My testing suggests around a third of the time as on my Qidi ifast but of course it has nothing like the same chamber build volume.

I have had some issues with the X Smart 3, some of which were finger trouble on my part and some that needed recourse to Qidi’s excellent support team.

Attached to the link below is a ZIP file that has the full write up detailing my modifications to the X Smart 3 to add a LAN socket, modify the processor fan operation and to add extension feet to raise the body of the printer to allow more air flow. The ZIP file contains the PDF document and two STL files, one for the extension feet and one for a printed template to aid positioning the hole for the LAN socket.

Note that the LAN connection will not appear on the printer control panel but is visible by the Qidi Slicer application. The IP address allocated will be automatically defined and you will need an application like Fing to discover what this is. The control board will be discovered as a Raspberry board.

Since the above write up I have progress on a HEPA filter housing for the X Smart 3 rear fan. Below is a write up on this and some changes I also made to my i-fast. Note that since posting this write up I moved the rear fan filter housing inside the chamber so that the fan is pulling air through the filter rather than trying to push it through. This worked out nicely with the rectangular shaped filter housing.

I have also made a replacement top cover with a large HEPA so air can get in and out of the chamber to mitigate having to leave the lid off.

Update – Fan Noise

The only remaining frustration with the printer is the power supply fan noise. This is present all the time the printer is running whether under full print load or just on standby. Unlike the ifast the X Smart 3 only has one power supply. It is therefore impossible to get the power supply to switch off when it needs to be on to run things. Contrast the ifast where it goes completely quiet. There are suggestions that there maybe better substitute power supplies that have proportional speed fan control driven by the supply current demand. I debated this but decided there would still be noise even when backed off.

My solution is a bit steam age. I bought in an Alexa compatible AC switch. I now tell Alexa to turn the printer on and off. Much easier than trying to get round the back of the printer to the power switch.

On the subject of Alexa devices, I also bought in a Google/Alexa air quality monitor so I can check the VOC level around the printer. This seems to be quite sensitive and suggests the HEPA filter modifications are working.

Links to similar or related post are listed below : –

Diesel Heater Service and how to do it

My diesel heater has been installed and working for a few years and I have never had a problem with it starting or running until this week. We had a spell of very cold mornings and on switch on it just created clouds of white smoke before the pump finally starting to click.

I have never had the heater apart and I was somewhat concerned about doing this but the internet solved this. I recommend the following site which although relating to an Espar D2 heater, the details are much the same for the Chinese copies. The embedded video is worth watching.

https://sprinterdiscovery.com/heater/

The essence of the service is that if the heater smokes on start up then the gauze filter around the glow plug is clogged.

The strip down is quite simple with the only issue to watch is that the two large gaskets can easily get damaged. The gauze filter was different to the one as shown in the Espar above, more just a simple gauze tube. Getting the filter out is tricky but a pair of narrow nose pliers and some careful poking did the job. The filter showed heavy carbon deposits which were cleared after soaking in WD40 and using a fine wire brush. The main heat exchanger shell was very clean considering the period of use but I did managed to liberate some carbon dust particles from the burner tube head.

The heater assembly went back together easily and it fired up from switch on this morning despite another chilly start.

New gauze and new gaskets are available on EBay.

UPDATE: After a few warmer days I didn’t fire up the heater. When I finally needed it the smoke was back. I believe that the fuel is bleeding past the fuel pump when it is sat dormant. This builds up in the glow plug chamber and gets burned off when the heater is next used. If the heater is used each day there is less of a problem.

In the course of searching for a new pump I came across a UK source of an ‘electronic’ replacement for the pump. This is a stepper motor and metered pump. Because this pump does not need lubricating via the diesel lubricants you can use kero or similar lower cost fuel. With current UK pricing this is 70p saving per litre so the cost of the electronic pump would be quite quickly recovered. I have ordered one of these and will update here with my experiences.

Links to similar or related post are listed below : –

Verified by ExactMetrics