Simple jig that makes DIY easier
In my experience there is only one fixing style that works with plasterboard lined walls. These are shown in the image below and are supplied in various mounting thread sizes. The image below shows the 4mm and 5mm versions. Also shown is an example of how they expand out when you clamp them inside the cavity behind the plasterboard. Note that while intended for dry lined walls, these can also be used on thin walled surface such as a modern ‘hollow’ door (good for bathroom towel hooks). The fasteners are available in various lengths to suit the mounting surface thickness.
In use you drill the appropriate clearance hole for the body (6.8mm for the 4mm version and 8.8mm for the 5mm version) and push the fastener into the hole so it is flush with the outer surface of the plasterboard. You tighten the screw to cause the ‘wings’ to expand in the cavity.
There are a few issues with this. To cause the expansion process to start you have to apply a lot of pressure downwards on the screw head. Once you feel the screw beginning to turn easier you are on the way to crushing the wings against the wall inside surface. The next test is judging when you have reached optimum expansion of the wings. This comes with experience. The screw rotation will go from relatively easy to increased pressure.
When used on plasterboard the two triangular prongs on the fastener are supposed to grab into the plasterboard surface and stop the fastener rotating as you tighten the screw to initiate the wing expansion. My experience is that you need to apply heavy downward pressure on the screw head to stop the prongs just rotating free and cutting a nice circular vee groove in the plasterboard surface. This is slightly less likely to happen if you are fitting one to a hardboard surface such as a hollow door as the hardboard will give greater resistance to the rotation.
This tightening process can be helped if you put a washer under the screw head with some grease. This eases the possibility of the whole fixing rotating.
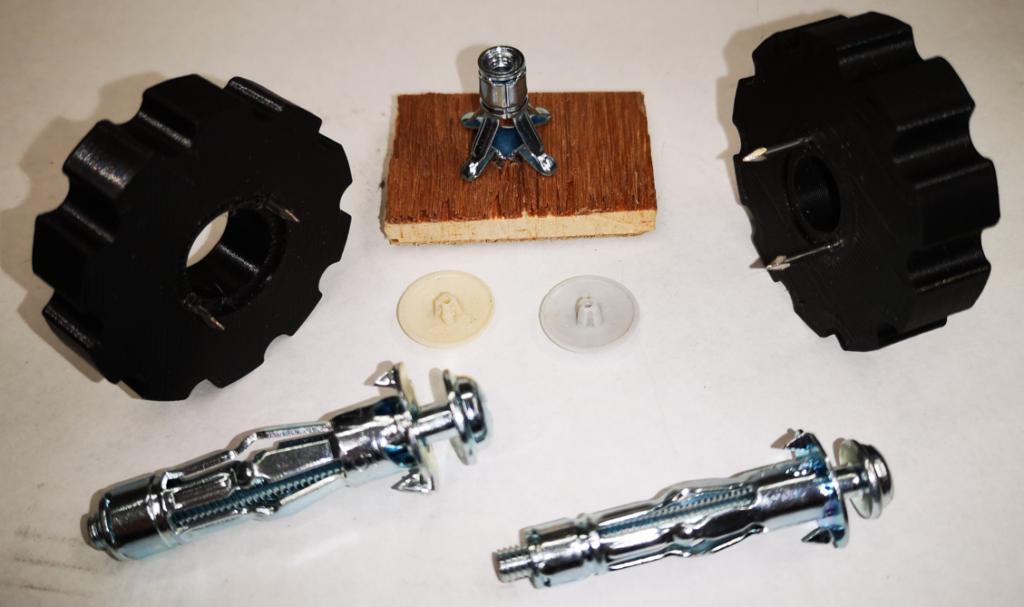
You can buy a tool for mounting these fixings. My version is a 3D printed double pronged restraining jig. So far I have created two sizes, one for 4mm and one for 5mm threads. It is simply a disc with two 1.6mm panel pins embedded in it that mate with the notches in the fitting. The tool is offered up over the fastener with the pins in the V grooves and then pushed home into the plasterboard. The pins embed deeper in the wall surface than the prongs on the fastener and stop it rotating.

A couple of other comments. Once you have the fastening in place on the wall the screw thread will likely be longer than you will need to hold the object being fastened to the wall. You can therefore substitute a shorter screw as needed so long as it is long enough to mate with the fastener thread. You can also change the screw head style. When fitting curtain battens I use a number of these fittings along the batten length and replace the dome head screws with countersink heads into which I fix the commercially available small plastic star head covers (see below).
Here is an image of the fasteners, the two jigs sizes I use, a view from the rear of how a fastener expands in the cavity and the small coloured plastic covers that can be used to cover countersink screws.

Depending on the technique that has been used to fix the plasterboard, you can sometimes have a reduced depth of cavity for the fixing. This can be overcome by drilling the mounting hole for the fastening not just through the plasterboard but as deep as need to match the fixing’s length into the solid wall behind. This allows you to get the fastener in place and the expansion of the wings will not be inhibited. Clearly this is not so easy with a steel lintel behind the plasterboard …..
The STL files for the two sizes can be downloaded on the link below. I used PLA with a 4 perimeter print and 0.25mm layer depth. Once printed, clean out the two panel pin mounting holes with a 1.6mm drill. Cut the panel pins to around 6-8mm length and push home into the drilled holes. The small counterbore on the print surface will match the fastener flange but not to full depth so there is a pressure exerted from the jig as you push it against the wall.
Links to similar or related post are listed below : –
- Error Code A9 on Odealis Gas Boiler
- Power banks that go to sleep with low current drain
- GyroCut versatile scalpel replacement
- Dry lining wall fastener fixing aid
- Simple Vice tommy bar modification
- Soldering Iron bit storage on Lytool soldering station
- Water Softener goes AWOL
- Noga External Deburrer and Cut Screws
- Technoline Wireless Weather Station problem
- Using Raaco section boxes for fastener storage


