

Low Quiescent Standby Current Power Switch
After finishing a recent project I had a heap of resistors that had been used as select on test parts and now needed sorting and storing correctly. I found a design on the web for a simple Arduino based autoranging resistance meter. I prototyped the measurement circuitry for this and it worked fine. I wanted the power to the device to be from a battery source and to have this turned on via a push button switch and to auto time the ON period and return to standby.
My immediate thought was to use the ICM7555 CMOS equivalent of the ubiquitus 555 as a monostable but although manufactured in CMOS technology it does have a relatively high standby current. Some web research led me to the Texas Instruments TPL5110 which can be used as a monstable triggered from a push button. The device has an incredibly low standby current of a few uA. To use the TPL5110 as a monostable is quite simple. The EN pin is tied to ground instead of to supply. The resulting section of circuitry is simple and is shown below.
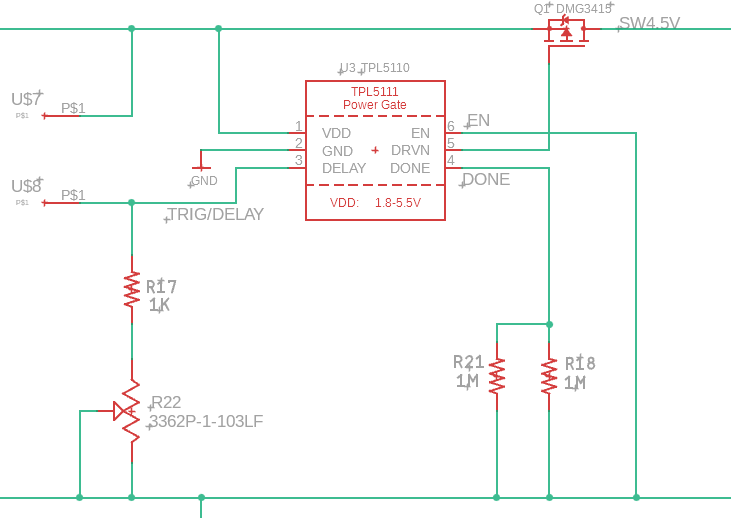
The push button sits across the U$7 (supply rail) and U$8 (trigger) terminals and the ON period of the monostable operation is adjusted by the R22 trimpot. A 10 second ON period needs around 10K. Ignore the use of parallel resistors (R21 and R18) as this was to allow my PCB layout to use either a through hole part or SMD part. The switching FET for the supply is a commonly available P channel part. The particular part chosen (DMG3416) has a very low ON resistance. Note that the TPL5110 cannot be used over 5V.
The result is very legant and simple. The standby current was so low I struggled to measure it.
Note that Adafruit has a ready made module that uses the TPL5110 but this is configured with EN permantly connected to the incoming supply. In this mode the device is intended as a timing reference to turn projects ON and OFF at regular intervals in association with feedback from an associated microcontroller (via the DONE pin). If you look at the Adafruit PCB layout you will see that you will need some delicate hacking to get at the EN pin as this is linked to the incoming supply under the TPL5110.
More will follow on the completed Resistance Meter project which has an OLED display and 3D printed enclosure.
Links to similar or related post are listed below : –