Spreadsheet for setting a lathe compound slide angle

Oh No …… Not Another Spreadsheet …..

In the course of making miniature taper reamers to bore injector cones I initially struggled to set the compound slide angle sufficiently accurately.  DAG Brown’s book details using geometry to set the angle and once I grasped this concept things improved.  This is shown below and uses the Sine Rule.

The application method involves using a dial gauge set to zero when touched off on the workpiece. The cross slide readout is also zeroed at this position (this can be on a DRO if fitted or the Vernier scale). The compound is then moved a known distance along the workpiece before measuring the displacement needed on the cross slide to bring the dial gauge back to zero.   Here is a picture.  This is not rocket science and has been detailed on many other sources.
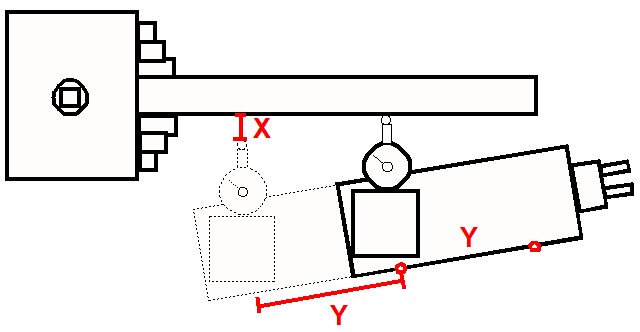
setting the compound angle using Sine Law
Graphical view of the setting technique.

By making the Y distance as large as possible, the resolution of the angular setting will be improved.   The distance for Y is best chosen to sit symmetrically either side of the ‘closed’ position of the compound. By standardising on a fixed Y distance the process can be made more repeatable for day to day use.  Angles can be committed to a lookup table and hence my idea to create a spreadsheet as detailed below.

On my Myford Super 7 I decided that a distance of 50mm for Y gave me a reasonable travel distance (+/- 25mm on the closed position).   This could be accurately measured using the compound Vernier scale dial (my Myford is a metric version).   

To speed up the measurement process I scribed a 50mm spaced start and finish mark together with a datum mark on the side of the compound.   The datum mark is on the protractor ring. These ‘scratchings’ are shown below.  (The extra cap head screw and pin are the Geo Thomas ‘Red Book’ compound lock mods).

These markings remove the need to tediously count revolutions of the Vernier scale when making an angular measurement.   I simply set the Vernier ring to zero at one mark and then keep winding the compound until the second mark is reached.  I then check once again on the Vernier ring scale. The movement distance is then finely adjusted to zero by referencing to the Vernier ring scale zero.  If you have a DRO on the compound this process becomes more flexible.

To mount the dial gauge I used my 3D printed gauge holder in the tool post.

With all the setup tasks decided, the spreadsheet was created.  I chose to have 0.5 degree steps through to 69.5 degrees (it could be extended beyond this).  I also added two standalone look up  calculations. One to allow a single angle to be spontaneously calculated and one to back check a measured X distance to find its associated resulting angle.  The latter would allow set up errors to be quantified to allow a knowledgeable ‘tap’ of the compound in the right direction.

The spreadsheet can use any units for Y as the table will automatically reflect this change.  Here is a screenshot of the table based on my chosen value for Y of 50mm.

The spreadsheet .XLSX file can be downloaded from this link.

Accurately setting the compound slide angle

Similar or related subjects : –

Quorn grinder and locomotive injectors

I picked up a Mk1 Quorn Grinder, that is to say I bought one second hand.. not used one as part of my (lack of) exercise regime … it is very heavy.   It did not have a drive belt nor any tooling but otherwise is in good condition and very well made.  I believe the construction was done by the now departed Derek Collier of Bristol and I am very pleased to become the custodian of this fine piece of workmanship.

The belt was easily sourced through the ever helpful Tony at lathes.co.uk and a 5mm x 600mm belt arrived by post a couple of days later.   The Quorn motor now spins the grinding cone so some small progress.

Hemmingway Kits offer a Mk3 version of their Quorn kit and I bought just the drawings from them as a reference document to partner the original Professor DH Chaddock book that came with my machine.  One of the key differences of the MK3 is the decision to use a 25mm diameter ER collet chuck as the work holding mechanism.   This replaces the original 1″ diameter tooling jig.   Clearly for a new build this diameter is easy to plan for and to source a mating 25mm ER collet extension.  Not so easy is a retrospective replacement for the 1″ original jig.   After some help from John Saunders at NYC CNC I sourced a 1″ diameter ER extension from Maritool in the US.  Maritool offer both ER25 and ER32 sizes in various lengths.   Buying direct from the US means paying a similar price for the shipping as for the collet. (Time to call in some favours from relations living in the US ?) Until this turns up I will be spending time trying to work out how to use the Quorn. 

The second background activity here is trying to make an injector for my 5″ Poly V live steam locomotive.   Building a Quorn from scratch and also making an injector seem to be rights of passage activities for any home workshop.  Clearly I have copped out on the former and I admit to struggling with the latter.

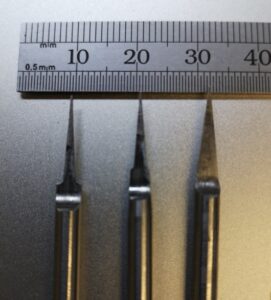
I am working from DAG Brown’s book and so far I have made the injector body parts and I have made the 6/9/13 degree D bit reamers.   The reamers were hardened and tempered today using my Prometheus oven.   The accuracy of the oven controller makes this process much easier than hit and miss heating with a gas torch.   Partial red green colour blindness does not sit well while trying to watch temperature colour changes.  Here are the completed reamers before heat treatment.

6/9/13 included angle D bit reamers for injector cone angles
6/9/13 included angle D bit reamers for injector cone reaming

I use Ground Flat Stock’s ATP-641 to protect the silver steel from scaling during heat treatment.  This works very well.   ATP-641 is a water based grey sludge that you dunk the object in and allow to dry in air.  It is essential that you thoroughly degrease the parts first as being water based the sludge ‘runs back’ from grease and does not cover the object as a result.   It is also important to make sure the sludge is thoroughly dry before putting the objects into the oven.  It does chip off easily so care is needed. I usually heat silver steel objects to 500 degrees and hold for an hour and then increase to 800 degrees and hold for another hour (depending on the mass of the object).    Once quenched the grey sludge protective shell just cracks away leaving a dull grey but clean surface on the object.  ATP-641 is excellent to use and helps takes the human variables out of the process.

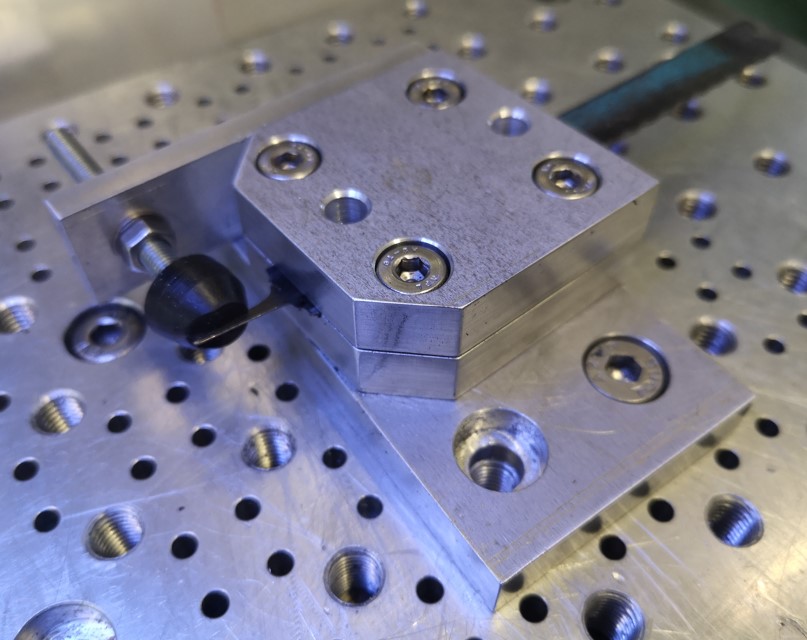
Back to the D bit reamers … there have been a series of articles on injectors in the last four Model Engineer magazines.   In one of these articles it was mentioned that reamers could be made from hacksaw blades.   Always keen for an easy life I made a jig for doing this which would hold the hacksaw blade to allow it to be ground to size using a Dremel grinding bit (#457).   This concept worked incredibly well BUT the thickness of the hacksaw blade makes this method only suitable for 32oz injectors and above.  Below this size the blade interferes with the miniature holes in the cone jets.  D bits therefore rule for the smaller versions.  Here is the hacksaw jig with an added antivibration rubber button.  The top two blocks clamp the blade and these rotate on the lower base plate to set the angle.   The blade is flipped over in the clamp to allow grinding on each side.  The grinding is always along the X axis of the mill.

Jig for grinding a hacksaw blade to make a taper reamer for making live steam injector cones,
Jig for grinding a hacksaw blade to make a taper reamer for making live steam injector cones,  The jig sits on my CNC mill tooling plate to correctly set the X axis of the grinding motion.

Lots of links in the text today and I have no allegiance with any of the entities mentioned.  Updates of progress and a full write up will no doubt follow …

Similar or related subjects : –

Haimer Taster and vacuum table retrospective thoughts

Today while in the workshop running a CNC metalwork job and then following this with running a quick PCB artwork, the following came to mind.

These days since I bought the ITTP Hallmark probe I rarely use my Haimer Taster to do my referencing.  It still has its uses but less and less so.   A good example is when remounting the CNC vice on the tooling table. I use the Haimer to give me a running check on the vice jaw axis tracking.  Beyond that the ITTP in conjunction with PathPilot probing routines meet all my referencing needs to a level of accuracy that suits.

The other thing that stuck me is how automated my process for milling printed circuit board prototypes has become.   Fusion 360 Electrical module becomes more familiar to me with each passing project. It exports my PCB designs as Gerber files to import into FlatCAM.   After a few clicks in FlatCAM I have a GCode file for drilling and routing.   The PCB blank is gripped on my small vacuum table ready for milling and the ITTP probe references the spindle.   My recent use of kitchen anti-slip material as the sacrificial layer between PCB and vacuum table top surface has made the grip on the vacuum table so much easier to achieve.  The overall PCB process, whether single or double sided, has become quick, easy and repeatable.   Once the board is milled I can get a reasonable looking tinned finish using a hand soldering iron and copious amounts of flux.

Techniques almost subconsciously evolve and sometimes you need to step back and see how far you have come along the road.  The alternative view might be that this ‘lazy man’ has just become even more lazy.

Similar or related subjects : –

Shopping list spreadsheet that has other uses

This one is way off beam …. an enquiry for help appeared on the Model Engineering Workshop forum for a simple shopping list when buying groceries etc.   

Excel has a facility to create a special version of a spreadsheet called a pivot table.   In short this is a table that contains columns and lines but each column has a header that is automated to allow sorting of the table by that particular column.   Not only does the column sort the full table but you can refine the data to just show and sort lines of interest.   It is easy to use, no macro skills needed just click and sort. I love pivot tables …. well lets be honest I love Excel.  So many possible uses for lines and columns.

The spreadsheet is on my download page and is stored as a ZIP file.

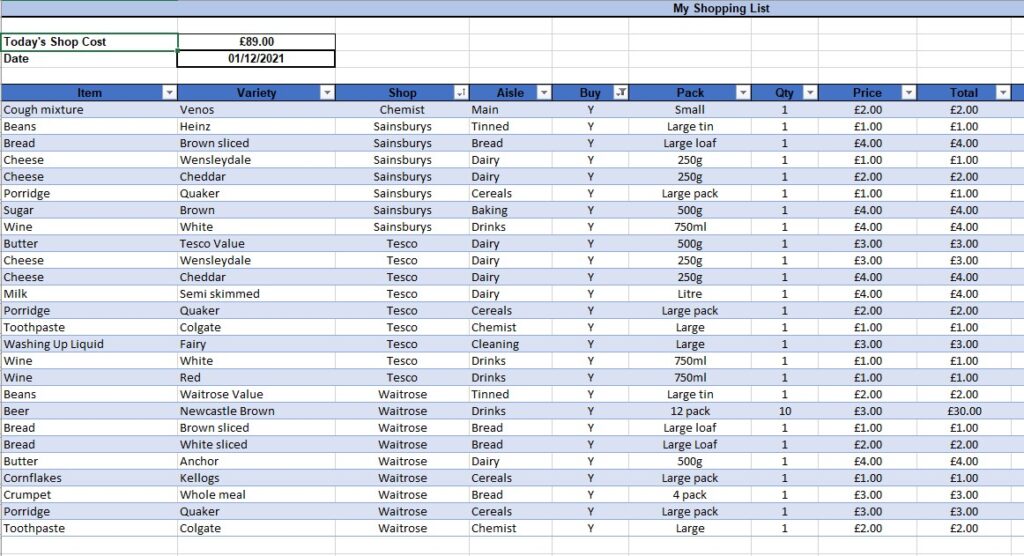
The table allows you to have multiple entries for the same produce from different stores and for each store there is a location in the store and a price for the item in that store.   So you can have different sorts of bread from different stores and all at different prices.   To go shopping you put a ‘Y’ in the Buy column.  Here is a screenshot (with random pricing I entered to try it out).

Once you have the ‘Y’ on the items of interest you get a price for the total shop.   You can then click on the Buy column header down arrow and a dialogue box comes up that asks how you want to sort.  By selecting just the Y entries you get a unique list for today’s shop.   Once you have the Ys only, you can then sub sort by store and by aisle or location in the store.  Once you have something that suits your expedition, print the active area by highlighting and using Print Selection and off you go with a prompt of what you should be looking for as you walk round each store.

There are no macros, no complex formula and anyone can use it.

OK it is a bit over the top for shopping but as the years pass we tend to forget what we went to the shops for in the first place.   We also tend not to see the price creep from week to week. Maybe it will help someone ?

More importantly the pivot table could be modified to become a workshop asset register.  Change the headings to Item, Manufacturer, Source, Location, Price Paid (the price you paid or the price you told your wife you paid ?) etc and you begin to look organised.   The grim reaper arrives and your family now have a listing of what you had hidden away, where precisely and at what value. They are now a step ahead and they are less likely to get ripped off by the workshop clearance bandits.   Think about it, it could be time well spent.

Similar or related subjects : –

Verified by ExactMetrics