I have had two IT related issues of late. Both involve devices on the house networks that have ‘locked up’ and needed a hard bounce – a complete mains power down, wait and switch on again. One of these was in our house in France and one at home.
The one in France was a lock up of the broadband router. Clearly once this is down all comms stop and we do have various monitoring systems in place that are important. Searching online came up with a GSM based mains switched outlet. This simply plugs into the a wall socket and the device to be controlled plugs into it. You need to fit a PAYG SIM into the device and then you talk to it with your standard mobile using SMS messages from anywhere there is a mobile phone signal. As the SMS usage will be very low, a GBP10 SIM will last for ages but it is important to remember that if a PAYG SIM is not used for 3 months it automatically gets cancelled. Fortunately the device does acknowledge back via SMS each command received so it is possible to maintain SIM activity remotely. The device has a number of facilities such as temperature measurement and activity scheduling. This has now sorted the French Connection and I can bounce the router anytime it misbehaves. Here is the Amazon reference.
The home issue was on a device on the home wired network which was important to keep running. Very occasionally and usually at an inconvenient moment it would lock up and the only way to reset it was a hard bounce. The device is a pain to get at to do this and if we were away from the house even more so. Fortunately the WiFi router at home is reliable so all I needed was a WiFi equivalent of the GSM device mentioned above to give the offending device a controlled hard bounce. Amazon offer one such device which was easy to set up and works a treat. For those interested it accepts speech commands via Alexa etc
I have had my Sindoh 3D printer for quite a while and it is a lovely machine to use in conjunction with Fusion 360. I have printed all manner of items for the workshop, for projects and for friends and family.
For some time it has been a problem to print objects central on the bed. While they would print OK, they are reluctant to come away from the bed surface and then having removed them from the bed, the raft would be very reluctant to leave the printed object. I have got round this by offsetting the print position in X and Y on the table. If I have a large object to print that overlaps the problem area I sprinkle talcum powder on the bed surface to ease freeing the object from the bed but this does not help the raft removal.
The print bed is an aluminium sheet that slides in and out of the machine. This has a PTFE style laminated coating sheet held in place by adhesive. If I inspect the centre of the plate I can see the clear outline of bubbles under the lamination sheet. These have got worse as time has gone by. I imagine the bubbles create a finite air gap that upsets the temperature stability of the plate in the damaged area.
The situation had reached a frustrating peak today and lead to me totally removed the laminating sheet to leave bare aluminium. The printer could not cope with bare ally and the PLA would not stick. Some other laminating medium was going to be needed.
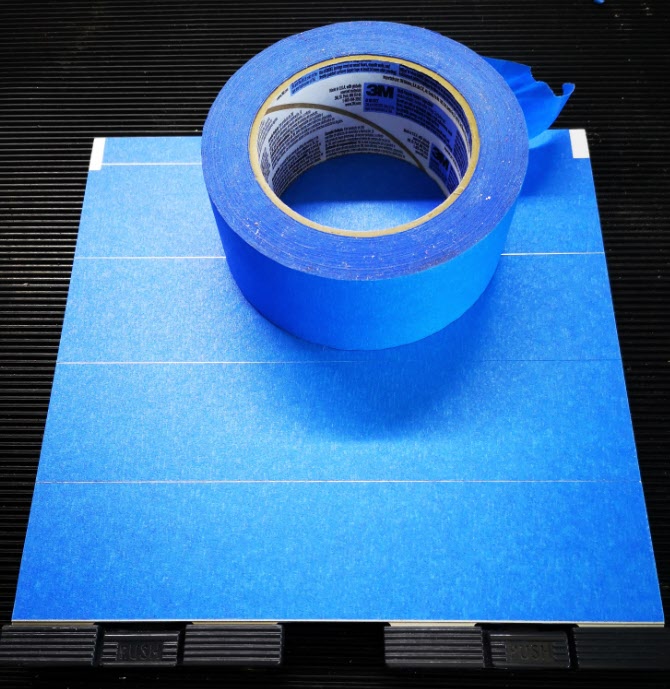
I had seen discussion regarding the use of what we in the UK call Masking Tape as a laminating medium. I use 3M Blue Multipurpose Builders Masking Tape for Super Glue mounting of stock on the milling machine. Having this to hand, I thought it worth a try. The tape is 48mm wide so I had to fix a number of strips across the plate to cover it completely and then trim the edges. As you can see below, I didn’t quite get them parallel and butted to each other I was keen to run a test print.
Maybe I was lucky but the job came off the tape easily and the raft pulled off straightaway with no damage to the print. The tape hasn’t bubbled or coming off in any way so it looks good.
3M Blue Builders Tape on my Sindoh print bed
I am not sure how long the tape is going to last but I have got a full reel to keep swapping it out.
Update : 17/6/2021
I have been using the blue tape bed coating for over a year now with no problems other than an occasional replacement when it gets torn.
The other thing worth noting is that if your bed clips break there is an excellent replacement print model to download here
One of my favourite additions to the workshop has been a laser centring tool for use on my Tormach PCNC milling machine. The tool consists of a low cost laser diode mounted on a 3D printed disc and with a 19mm steel shaft. The tool is held in the Tormach spindle power drawbar. The laser is angled inwards towards the spindle axis at approximately 20 degrees. The 3D print has facilities for a battery supply and ON/OFF switch such that when the laser disc is pulled into the power tool bar collet it switches on the diode.
In use, as the spindle is raised or lowered, the rotating diode creates a circle of light on the milling table which can be used to locate and centre the spindle on features of the item being machined. This might be to locate the centre of a hole or the centre of a block depending on need.
I recently had the need to use my four jaw centring chuck on my Myford lathe. Usually I duck and dive to avoid having to use the 4 jaw as I find it frustrating to set up. This recent bout of frustration lead me to wonder if I could adapt my laser centring tool for use on the lathe such that it would give me a guide ring of light to show where the material was sitting relative to chuck centre.
On the milling version the laser rotates and the job stays fixed. On a lathe version this would be similar. The chuck would be stationary and the laser would rotate in the tailstock.
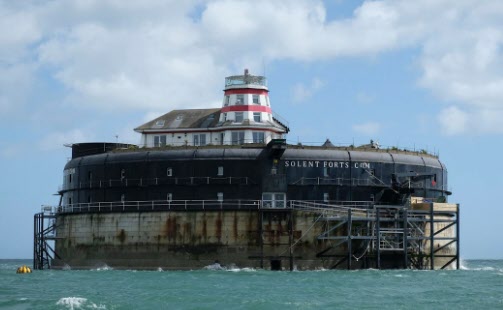
My wife has the knack of finding some interesting and diverse places to visit for birthday treats. We have just returned from an overnight stay at No Man’s Fort which sits in the Solent between Portsmouth and the Isle of Wight.
The Fort along with three others were constructed in the late 1800s to protect Portsmouth from the French fleet. Like our modern day government projects they overran their construction target date and budget and by the time they were finished so were the French navy. There is plenty to read about them on the Net.
The reason for this mention is the resulting respect and admiration I now have for the engineers that put these fortifications in place. You arrive by shuttle boat at the landing stage faced with a circular wall of stone blocks that are precisely cut and interfaced together and show no sign of cracking or movement. The whole construction has no deep pile foundations but simply sits on the sea bed. They had no laser positioning equipment, no JCB equivalents, no CAD. Yet here these structures sit after 150 years in the most hostile of environments and look non the worse for wear. Impressive.
If you get the chance to visit any of the Solent Forts either for afternoon tea or an overnight stay you should go and you will not fail to be impressed.
Back from after a few weeks in France and back in the workshop.
Every now and then there is a project that is on the go and you can’t sit down and focus on it. It is a sort of mechanical procrastination. A reluctance to put the first pencil mark on the paper. You then suddenly find all sorts of other things that you kid yourself are more important / higher priority and you get distracted. You know that job will still be there but maybe tomorrow, not today. You suddenly develop a clear conscience about doing something else while you do some background thinking ….
This particular day started off by cleaning down the accumulated swarf (chips) in the 440 tray. Really important job. This led to a check behind the various 440 slideway bellows to see that all was well with the oiling mechanism on the slideways and the ballscrews. X and Y were fine but Z was dry. Not good news.
The 440 is supplied with a manual oiler as standard. This is a reservoir of oil and a pump/plunger which you pull out and release to initiate a slow pressure to the oil distribution pipes.
View of the manual oiler mounted on the Tormach 440
I checked the plunger and it didn’t feel like it was applying much pressure. This is not the first time I have experienced this problem. If I pumped a few times it felt better so something should have been happening at the oiling points on the Z. I disconnected each of these where I could and sure enough if I pumped hard enough some oil dribbled out but not with much pressure. Something probably not right with the plunger ?
Squeezing round the back of the mill I removed the top of the reservoir (4 retaining screws), disconnected the oil pipe union and lifted the plunger clear. The reservoir can be left in place sitting on the mounting bracket.
There is a large end cap at the union end of the plunger cylinder which I removed and sure enough I could see a mangled O ring. To get the plunger out you have to be a bit brutal. You pull the T handle plunger back out of its housing against its spring using the handle as shown above and then grip the shaft with pliers so you can then twist the handle off. What you don’t do then is suddenly release the pliers grip or the plunger will go into low Earth orbit under the pressure of its spring …
Having disassembled the plunger it was obvious that the O ring had failed quite badly. Tormach support do not offer spares as the oiler is a third party item. They do not know what size the O ring should be. Checking in my box of miscellaneous O rings it looked like a 9mm ID, 3mm thickness part would do the trick. Smearing the O ring with DC4 silicon grease allowed easy re-assembly into the piston bore and then back onto the 440. I now had lots of pressure and oil was apparent trickling down the Z slideways and ball screws. Job done. No pumping needed, just one pull out of the piston handle was generating a slow release of oil to the key areas.
The job I should have been doing was still sat on the bench glaring at me but psychologically I was doing something more important.
Next problem was the Fogbuster air activation valve. Under CNC control this reliably switched on but sometimes would not switch off when commanded to. There are various forum discussions on this problem and many contributors just replace the solenoid valve with a different version. Forum chat also recommended that electrical transient snubbers are fitted across various inductive loads in the Tormach control unit. I had some of these in my stock box (Tormach offer a kit for this). They are simply a series resistor and capacitor in an epoxy block. They are fitted across any inductive device to suppress switching transients. I dived into the control box and fitted one across the controller relay coil that switches the Fogbuster ON and OFF and another one across the outlet from the control box feeding the Fogbuster solenoid coil. See picture below.
Snubber across Fogbuster activation relay coil. There is a second snubber fitted to the lower LHS contact which activates the air solenoid. The other end of this snubber goes to the any ‘100’ connection which is mains neutral.
The problem seemed to be improved but still occasionally the solenoid did not switch OFF.
The Fogbuster solenoid has a clear housing over the activation coil connections and there is a LED inside this that comes on when the Fogbuster is switched on.
Fogbuster solenoid assembly showing the connection clear housing which plugs into the solenoid coil which in turn sits over the activating plunger assembly. There is a screw in the LHS to release the electrical connection and the nut on the top releases the coil to reveal the plunger housing.
This connection housing plugs into the coil and the mechanics of the solenoid body and is released with a screw in the end. Toggling the coolant ON and OFF via the PathPilot user interface I could see the LED responding correctly to the ON and OFF commands but occasionally the solenoid was not closing. It was therefore not an electrical problem but mechanical.
On top of the solenoid housing is a single large nut which when released allows the solenoid coil to be lifted off. This leaves two countersink screws which hold the mechanical plunger housing in place and if these are removed the plunger can be gently removed. Inside the valve is very simple. A central hole allows the air to pass through and when the solenoid is de-energised a spring forces the solenoid plunger to seal this hole. I gave everything a thorough blast with compressed air and re-assembled it. Care is needed re-assembling as there is a tiny O ring seal on the plunger cover. The solenoid now responds correctly to the PathPilot commands.
Another tick. Job done. Warm glow.
That other job is still sat on the bench glaring at me ….