Improving and mounting a low cost chuck from Sanou for wheel cutting

I am still building up to automated wheel cutting on the Tormach.   

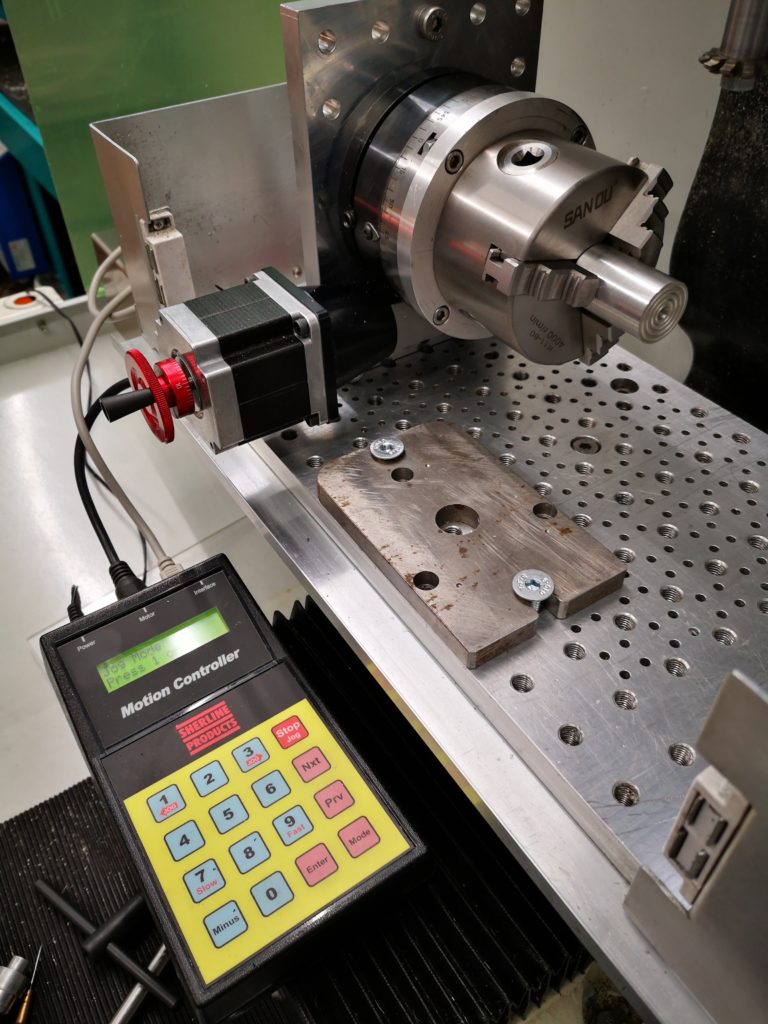
I have mounted the Sherline CNC rotary table on my tooling plate and the table now needs a chuck or collet mounting plate fitting.   This will grip the super glue arbors that I use for holding the wheel blanks while cutting.  

I decided a chuck would be the best option and bought in a low cost 80mm three jaw chuck made by Sanou.   These are available from a number of outlets on EBay.   It is supplied with internal and external jaws and a chuck key.  

It arrived very quickly and felt horrible.   Turning the chuck key was really gritty and jumpy.    Rather than sending it back I decided it would be worthwhile stripping it down to see what was going on.  

I have never attempted stripping down a chuck before and to my surprise it was relatively simple.  I first removed the three jaws, then the three rear cover retaining screws, the three adjuster retaining pins and finally the three adjusters.   In theory then the spiral plate should drop out.  But it didn’t and it took some serious tapping with a soft tool to remove it.  

Having got all the bits apart and in front of me I began to deburr all the sharp edges that I could find.  What seemed particularly important was to clean up the spiral plate internal diameter as this seemed to be the tightest fit.   A flat diamond coated file together with a triangular one were the best tools to use. Once all this was done I put all the parts in the ultrasonic cleaner with hot water and detergent.   There was a surprising amount of grit in the bottom of the tank once cleaning was finished.  

Re-assembly was the reverse with everything being coated with moly grease before assembly.   It was now a completely different chuck.   Beautifully smooth.

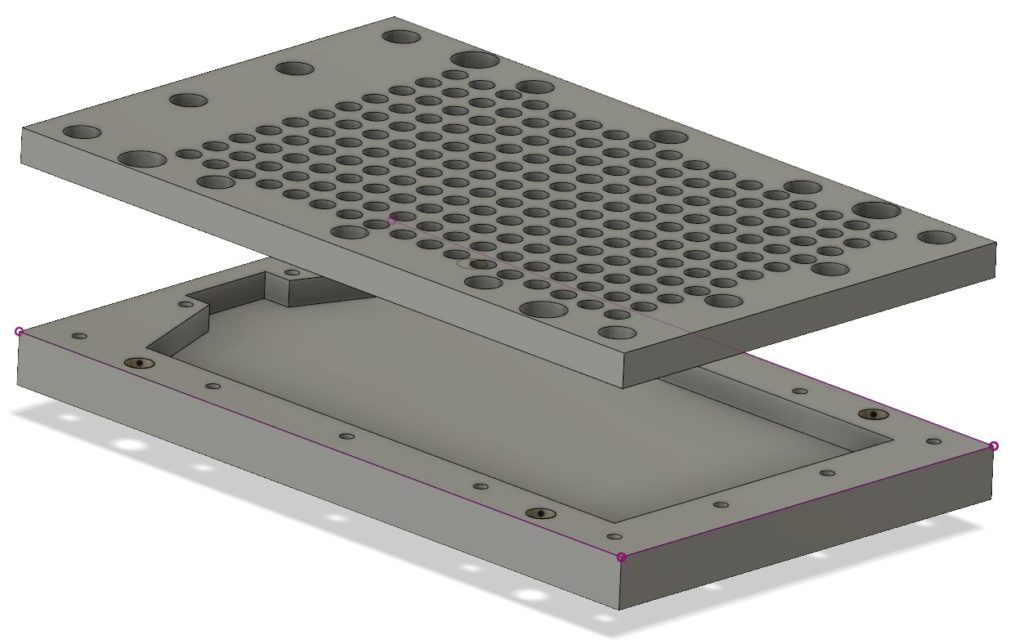
The next problem was mounting the chuck on the CNC table.   I first made a mounting plate with three M6 clearance and counterbored holes on the PCD mounting holes for the chuck (66mm) and four M5 clearance and counterbored mounting holes to match the cross slots on the CNC table (96mm).   I also put a 16mm clearance hole in the centre of the disc to match the chuck bore. 
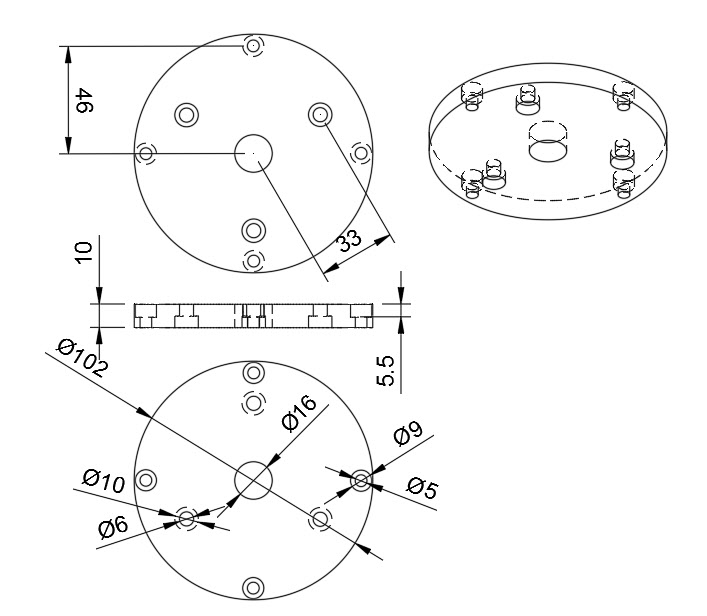
Next problem was how to centre the chuck on the rotary table.    Fortunately the rotary table has a central, tight fit 11mm (0.25″) shouldered hole leading to a UNC 3/8″-16 screw thread.  This is the mounting for use on Sherline products.   I cut the UNC thread on the end of a piece of 11mm silver steel and screwed this in place at the centre of the table.   This was perpendicular to the table face.   

I then fitted the chuck to the backing plate and lowered the chuck and plate assembly over the 11mm rod and loosely tightened the jaws.   This allowed the chuck to just rotate so that the four table slots could be aligned with the four holes in the mounting plate.   These four screws were also loosely tightened against the T slot nuts and then the chuck pushed firmly down and the jaws closed tightly.   The four table mounting screws were then tightened.    The chuck should now be centrally placed and tightly in position.   

Sherline CNC table mounted on the Tormach tooling plate with the Sanou chuck on its mounting plate and with a super glue arbor in the chuck. The controller for the Sherline table is shown which was designed by Bryan Mumford who also designed the Microset Clock Timer.  The weird plate on the Tormach tooling plate is a lump of scrap steel for my dial gauge magnetic base to attach to.  You can just see a cutter in the Tormach slitting saw arbor at the top right.

The 11mm silver steel centralising rod could be unscrewed and removed.  I put a piece of 20mm silver steel in the chuck jaws and checked the run out as being +/-0.05mm which to me didn’t seem bad and more than adequate for the task intended.  

A new experience and a good end result.

Still got the GCode to sort out to automate the process … and finish off the USB expansion unit to increment the motion controller.

Update : –

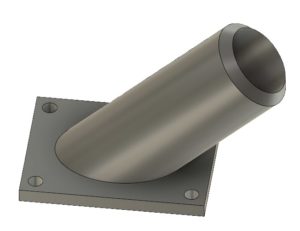
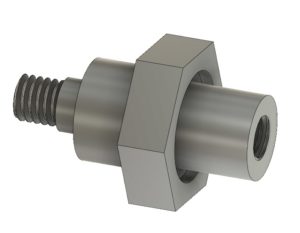
I found that just a straight 11mm rod with a 3/8″- 16 UNC thread on the end was not reliable in sitting square to the CNC table surface.   This resulted in the chuck running eccentrically.   I modified the centring rod to have a collar fitted (16mm diameter to clear the chuck central hole) which was silver soldered in place and then trued up on the lathe.   This modification allows the chuck to be fitted and centred easily and quickly each time.  Here is the Fusion 360 model.


Chuck centring rod (11mm diameter silver steel) with a 3/8″-16 UNC thread to fit into the Sherline CNC Rotary table central mounting hole and with a collar to pull up against the rotary table face to keep the rod true. The M6 hole on the rod end is for a cap head screw held in place with Loctite. This allows easy release of the rod from the rotary table once the chuck is in place.

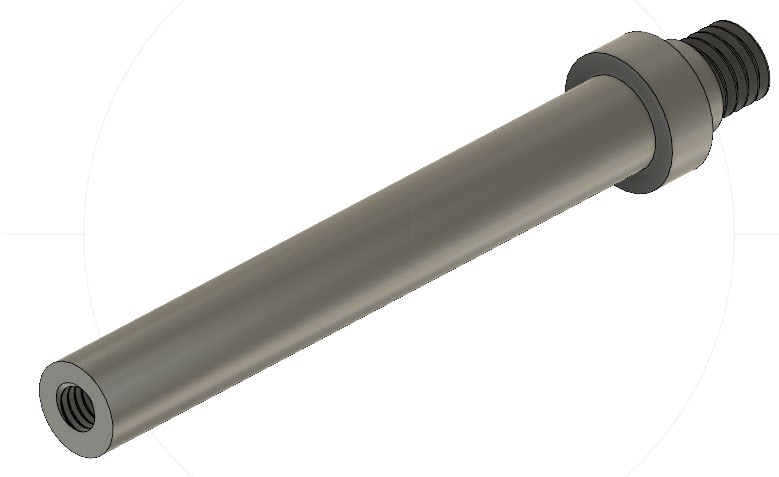
I also added a M6 threaded hole in the end of the rod to allow the fitting of a cap head screw. This is Loctited in place and is used to release the rod from the rotary table central threaded hole once the chuck is in place.   An alternative would be to mill a hex head on the end of the rod but I took the lazy way out.  

Similar or related subjects : –

Clock Wheel Cutting Adaptation of a Tormach Saw Mandrel

I am slowly building up to being able to cut wheels on the Tormach PCNC440 with two possible methods.

The first is using Gearwheel Designer which is mentioned elsewhere on my blog.   

The second route is  more conventional using a PP Thornton or similar cycloidal tooth cutter and a dividing device on a rotary table.  This later method is how wheels are traditionally cut in a lathe and there is a lot of information available on this.

In order to use the cycloidal cutters I need some form of arbor to mount the cutter in the Tormach spindle.   I could simply turn a piece of steel bar to suit and mount this in a ER collet in the spindle.   The downside of this simple approach is that every time the arbor was fitted into a collet the cutter would be at a different height from the table.   I really wanted something a bit more repeatable as the centre line of the rotary table will always be the same so why not the cutter centering.

When I ordered the Tormach PCNC440 I also ordered the Tormach small rotary saw arbor (which to date I have never used).   Pondering this last night I sketched up an adapter in Fusion 360 to allow an involute cutter to be fastened to the end of the saw arbor.   

This is shown below. 
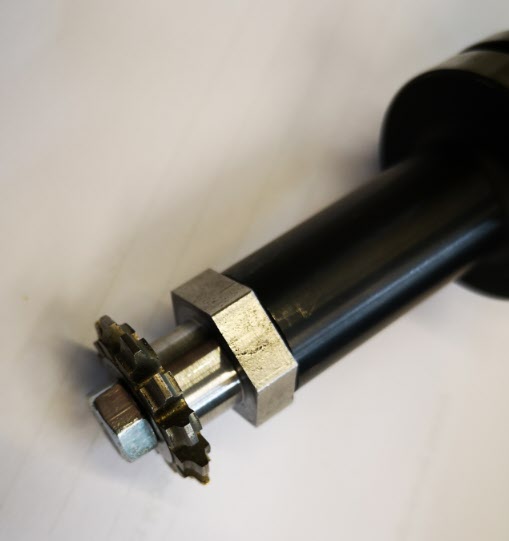
It is made from a piece of 19mm AF hexagonal steel bar with the hexagonal flats going to be used as a tightening it in place in the Tormach arbor. My Myford Super 7 when used with a 3 jaw self centering chuck is not bad on concentricity but for really accurate centering I swap the chuck for a collet face plate instead.    This job was going to need both.

First operation was to turn the hex bar end that would screw into the arbor.  This was done in the lathe chuck.   It was a simple turn to a diameter and drill and tap the end with M6 to match the arbor mounting.   The only pain was the arbor has a slightly protruding lip so I had to undercut the mounting face for this.   Rather than trying to be clever I did it by hand using a graver.

While the hex stock was still in the lathe I roughly turned down the other end of the adapter to the primary diameter and slightly oversize for the cycloidal cutter bore diameter and then cut off the stock so far.

It would be important to get the cutter mounting running as square as possible so I swapped the lathe chuck for the collet plate and mounted the arbor end of the adapter in the collet. I carefully turned the shoulder for the cycloidal cutter diameter and then reduced the remaining length ready to cut a M6 thread.

Here are a couple of images of the finished adapter.

Tormach TTS saw collet with my adapter and a typical clock wheel cutter
Assembled cutter on Tormach TTS collet

I am pleased to say the idea went almost to plan and it runs very true in the Tormach spindle.

I was a bit over enthusiastic with the graver but this is of no consequence.

With hindsight the shank between the cutter and the hex section ought to be longer as this will restrict the diameter of the wheel that can be cut before the blank catches the hex section peaks.

One step closer to trying this method. The next experiment is to work on a sub routine in GCode to move the cutter back and forth while cutting and with the ability to easily program the number of cuts.

Similar or related subjects : –

A Lazy Cable Clamp using 3D Printing

This is nothing magic but worth a mention.   Being fundamentally lazy I don’t like to assemble and solder electronic multi-way connectors.   There is never enough room to work on the contacts and the cables never lay up how you would like them to.  This could have course be a function of my eyesight ..

I am currently working on boxing and installing the Tormach USB Expansion Board which has a USB connector interface.   I wanted the cable to pass through some form of gland into the box but didn’t want to cut a standard USB cable and remake the connector at one end of the other.   

After some head scratching I came up with the following simple cable gland/cable grip.  It is nothing revolutionary but made life easy and the parts only took 20 minutes to design in Fusion 360 and then 3D print on the Sindoh 3DWOX.

It has two identical semicircular halves that hold the cable and there is a ring that pushes over these on the outside of the box.   A small flange holds these in place on the inside of the box. The hole in the box and the ring inside diameter are both 16mm to allow the USB connector largest dimension to pass through.   This is also one of the standard cut rings on a cone cut hole drill which makes cutting the hole in the box very straightforward.

The component parts (two halves and the retaining ring)
Inside view of the gland showing the retaining shoulder on the two halves
Outside view of the cable gland showing the retaining ring

Not rocket science but you never know it might come in useful and the dimensions can be tweaked to suit other cables and connectors. Similar or related subjects : –

A Mini Vacuum Clamping Table for PCB Engraving

You know only too well how I keep on going on about FlatCam and milling printed circuit boards on the Tormach PCNC440.

You will also have read about my preoccupation with trying to hold the PCB material flat to avoid variations in milling depth.

I have got it to a reasonably repeatable process using mechanical clamping but you know when a perfectionist starts something it has to be as good as possible …. step forward the Vacuum Clamping Table.

The thinking for this followed on from the Rosebud Grate experiments on my live steam locomotive.   The grate consisted of a matrix of larger holes on the underside of the grate leading to a small bore hole on the top side of the grate.   The theory as I understand it was that the reduction in size creates a Venturi type effect and boosts the air stream into the fire.   I wondered therefore if I reversed the air flow i.e. sucked the air from the large hole into the small hole whether this would be beneficial in providing a boost of the suction.   It is a bit tenuous I must admit and I can’t point to lots of science to back this up, but certainly worth a play.

First stop was Fusion 360 and a two part plate was designed.   This consisted of a top and bottom part.   The bottom part is 15mm cast aluminium with a milled trough and the top plate is 10mm cast aluminium with 6.8mm holes (no science – this is tapping size for M8 that was already in a Tormach collet) on the top side that reduce down to 1.3mm holes (ditto also already in a collet) as breakthrough holes on the bottom surface.   Around the edges are M6 screw holes to clamp the two plates together and also M8 mounting holes to fasten the plate to the tooling plate on the Tormach. I didn’t quite think the suction connection fully.   After I had worked out the total area of the 1.3mm holes I realised that to accommodate this I needed a 16mm diameter hole for the air inlet.  This was not going to be possible to mount on the 25mm overall edge of the plate.   The solution was to 3D print a connecting pipe and mount this on the top surface.   This adapts to the vacuum cleaner pipe being used as the suction source.    The 3D printed adapter did not provide a good seal to the top plate so I had to fit a rubber gasket on it.  The parts were all put together as shown below.

Finished vacuum plate on test in the bench vice
Close up view of the 6.8mm blind holes leading to 1.3mm through holes

To my amazement it seems to work !

There does not seem to be leakage on the joint between the two plates and the vacuum pipe adapter with the rubber gasket seems to seal alright.   If I put a large piece of PCB material over all the holes it is very difficult to move it.  Single sided board is naturally bowed in the manufacturing lamination process and I can see it visibly jump flat when I turn on the vacuum.  If the PCB is smaller than the total area of suction holes it does not seem to matter about covering over the ‘non-used’ holes to maintain the grip.

Proof will be when I try to run a board.   

The milling process will not have major sideways pressure as the depth of milling is quite small so it should be fine. Clearly I can’t go drilling the component mounting holes in the PCB material with this holding technique but I can spot drill them to say 1mm depth and then finish them by hand having got a guide hole to start me off.

But all this will have to wait as the X axis limit switch has come apart on the Tormach and a spare has been ordered and is on its way.

UPDATE Feb 2021 – Flatcam and milling pcbs 2021 pdf download

Similar or related subjects : –

A Bit off Piste – An eventful flight to Toulouse

This has nothing to do with model engineering but thought you might find it amusing/interesting.

Following my wife having spotted some low cost tickets to Toulouse from London Gatwick, we decided to make a quick trip to France to check out that all at our house was OK. The flight bookings were with a well known budget airline that has orange corporate colours. 

We checked in OK and the flight pulled away from the stand dead on time but 5 minutes later we were back where we started from.   As the Captain said ‘one of his shortest flights’.   Apparently a critical sensor in the port engine had gone AWOL.  Technicians were called and we sat for 2 hours on the plane while they analysed and fixed the problem.

Off we went once again but having missed our takeoff slot we were now at the back of the taxi queue.  Finally we were sat at the end of the runway and the brakes were released …. only for pandemonium to break out in the cabin.   The crew started rushing round and shouting to stay in our seats.   The take off was aborted and we sat mid runway.    Within minutes the plane was surrounded by all manner of fire appliances. 

Apparently a passenger’s lithium power tank had burst into flames.  I guess his or her laptop or phone’s battery had died while we were waiting for the sensor to be fixed and while topping up from the power tank the charging current surge had upset things.   The crew had been quick to put the offending article in a fire proof box.

After blocking the runway for 6 minutes, we were escorted off the runway by the fire crew vehicles to a quiet area of the airfield.  A team of fireman boarded the plane and took away the offending article. 

While 6 minutes does not seem long there would have been a lot of landings and takeoffs blocked.  Had we been airborne when the smoke appeared we could have been sliding down escape slides and the weather outside would not have made that much fun.

Because there had been an incident the airline procedure required that the crew had to be changed so they could be debriefed.   We were therefore now faced the delay while a new crew was found.   Further to this an offer was made that anyone wanting to leave the flight could do so (they didn’t ask for ‘any passengers of a nervous or superstitious disposition’).   A number of passengers decided this was the best option.  This meant a baggage crew had to be found to find their bags in the hold.   So we had a baggage crew and a flight crew to wait for.

When the new crew arrived they had to search the cabin to match bags to passengers to ensure nothing owned by the departing passengers had been left behind (suspicious or otherwise).

After a total delay of 5 hours (still sitting in our allocated seats), we finally got airborne for Toulouse.

I won’t extend your boredom by telling you about the hire car shambles on our arrival.

We think we might think twice about flying to Toulouse another time but I have to say all credit to the flight crew, the technicians and the fire services for their swift and professional actions.

Postscript : – better to travel hopefully ….. we then had a 3 hour delay on the way home.   Weather at Gatwick delayed the flight out to Toulouse.  Think we will stick to the ferry next time.

Similar or related subjects : –

Verified by ExactMetrics