

I picked up a Mk1 Quorn Grinder, that is to say I bought one second hand.. not used one as part of my (lack of) exercise regime … it is very heavy. It did not have a drive belt nor any tooling but otherwise is in good condition and very well made. I believe the construction was done by the now departed Derek Collier of Bristol and I am very pleased to become the custodian of this fine piece of workmanship.
The belt was easily sourced through the ever helpful Tony at lathes.co.uk and a 5mm x 600mm belt arrived by post a couple of days later. The Quorn motor now spins the grinding cone so some small progress.
Hemmingway Kits offer a Mk3 version of their Quorn kit and I bought just the drawings from them as a reference document to partner the original Professor DH Chaddock book that came with my machine. One of the key differences of the MK3 is the decision to use a 25mm diameter ER collet chuck as the work holding mechanism. This replaces the original 1″ diameter tooling jig. Clearly for a new build this diameter is easy to plan for and to source a mating 25mm ER collet extension. Not so easy is a retrospective replacement for the 1″ original jig. After some help from John Saunders at NYC CNC I sourced a 1″ diameter ER extension from Maritool in the US. Maritool offer both ER25 and ER32 sizes in various lengths. Buying direct from the US means paying a similar price for the shipping as for the collet. (Time to call in some favours from relations living in the US ?) Until this turns up I will be spending time trying to work out how to use the Quorn.
The second background activity here is trying to make an injector for my 5″ Poly V live steam locomotive. Building a Quorn from scratch and also making an injector seem to be rights of passage activities for any home workshop. Clearly I have copped out on the former and I admit to struggling with the latter.
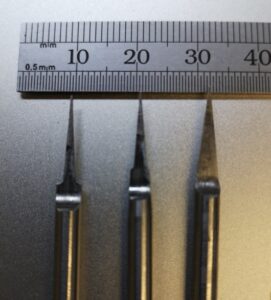
I am working from DAG Brown’s book and so far I have made the injector body parts and I have made the 6/9/13 degree D bit reamers. The reamers were hardened and tempered today using my Prometheus oven. The accuracy of the oven controller makes this process much easier than hit and miss heating with a gas torch. Partial red green colour blindness does not sit well while trying to watch temperature colour changes. Here are the completed reamers before heat treatment.
I use Ground Flat Stock’s ATP-641 to protect the silver steel from scaling during heat treatment. This works very well. ATP-641 is a water based grey sludge that you dunk the object in and allow to dry in air. It is essential that you thoroughly degrease the parts first as being water based the sludge ‘runs back’ from grease and does not cover the object as a result. It is also important to make sure the sludge is thoroughly dry before putting the objects into the oven. It does chip off easily so care is needed. I usually heat silver steel objects to 500 degrees and hold for an hour and then increase to 800 degrees and hold for another hour (depending on the mass of the object). Once quenched the grey sludge protective shell just cracks away leaving a dull grey but clean surface on the object. ATP-641 is excellent to use and helps takes the human variables out of the process.
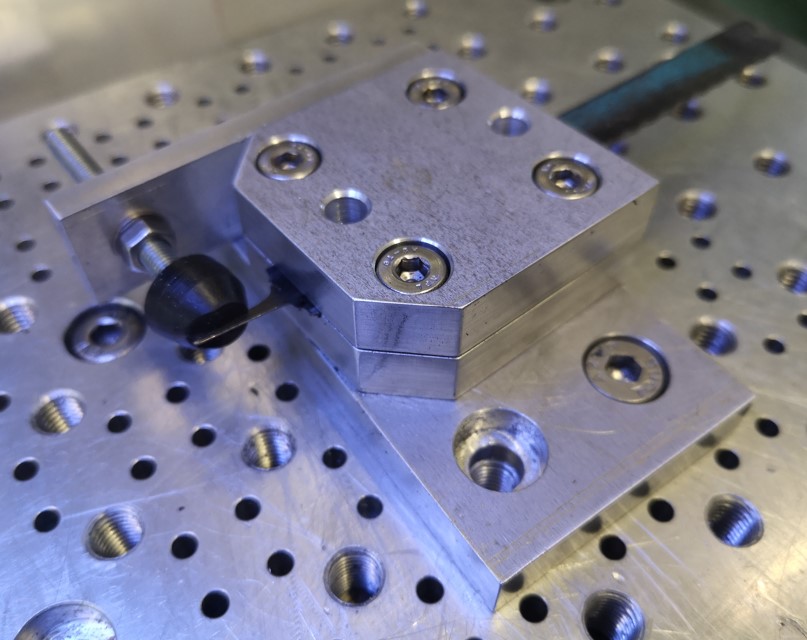
Back to the D bit reamers … there have been a series of articles on injectors in the last four Model Engineer magazines. In one of these articles it was mentioned that reamers could be made from hacksaw blades. Always keen for an easy life I made a jig for doing this which would hold the hacksaw blade to allow it to be ground to size using a Dremel grinding bit (#457). This concept worked incredibly well BUT the thickness of the hacksaw blade makes this method only suitable for 32oz injectors and above. Below this size the blade interferes with the miniature holes in the cone jets. D bits therefore rule for the smaller versions. Here is the hacksaw jig with an added antivibration rubber button. The top two blocks clamp the blade and these rotate on the lower base plate to set the angle. The blade is flipped over in the clamp to allow grinding on each side. The grinding is always along the X axis of the mill.
Lots of links in the text today and I have no allegiance with any of the entities mentioned. Updates of progress and a full write up will no doubt follow …
Similar or related subjects : –