Joining PLA filament

A simple but easy way

I found a simple solution to joining PLA on a YouTube video that seems to work and does not need any after cleaning. It appealed to my lazy approach to find simple solutions to problems.

Buy some 1/16″ bore / 1/8″ outside diameter (1.6mm x 3.2mm) silicon tubing from Amazon. This is sold in 10 feet lengths. Note it must be silicon so it does not melt with heat.

Cut off a 1″ / 25mm length of the tubing. Cut the ends of the filament square. Insert the ends of the filament into the tube so they butt into each other. It helps to stretch the tubing so when it is released it puts pressure on the two filament ends.

Use a soldering iron or similar hot device, heat the tube in the area of the join for a minute or so. Once it has melted, roll the warm joint gently between your fingers and then leave to cool. Once cool slide the tubing off the filament or if mid reel then slit it and remove it.

You will have a joint that is hardly visible and which does not need any further processing such as rubbing down.

Links to similar or related post are listed below : –

3D Thin Wall Printing Experiences

Probably An Inconclusive Ramble

Some while ago I was asked to 3D print the component parts of a 1200mm wingspan glider. The design STL files are available as a paid download from the SoarKraft website.

The first problem this created was that my Sindoh 3DWOX had insufficient Z height for the 200mm high print sections. This was a thinly disguised excuse to upgrade my 3D printer to a Qidi ifast. This has proved to be a good decision and I am very impressed by the Qidi and the quality of the print results that it generally produces.

I now need to qualify that statement because I have struggled (and also learned a lot) trying to print thin wall prints for the glider parts.

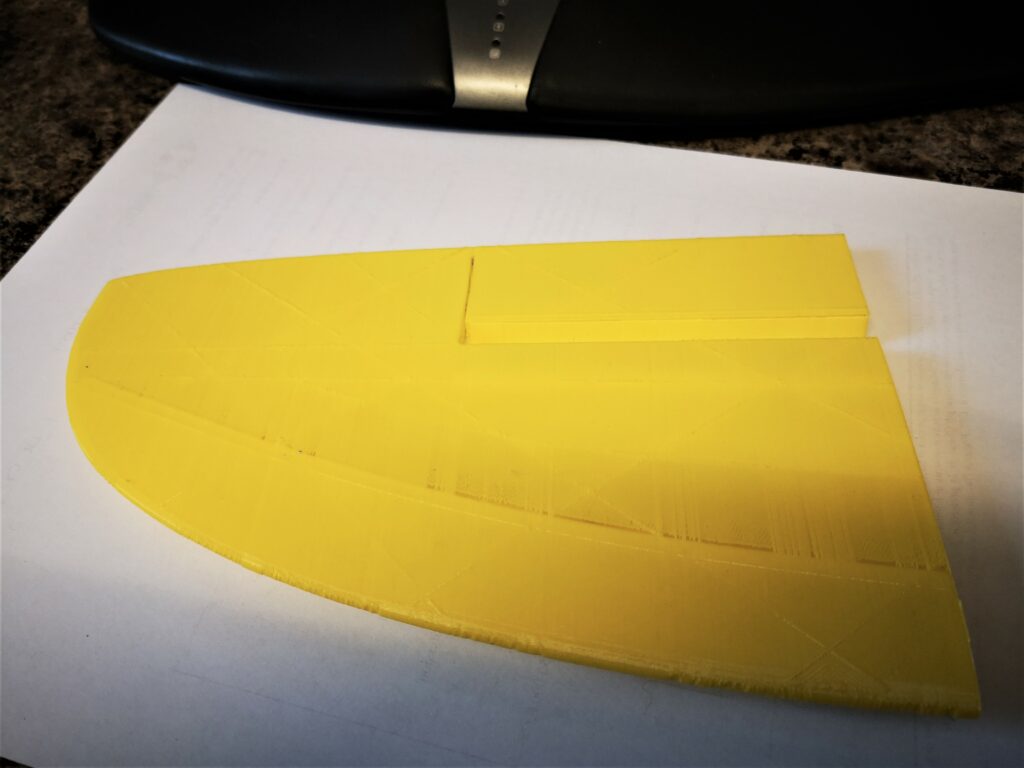
The Qidi comes with a slicer that is a skinned version of Cura. I struggled to get good thin wall results. The main problem being transparency effects in the printed surfaces immediately following internal bulkheads within the wing design. I mentally envisaged this as the extruder being unable to start pumping filament fast enough following the bulkhead transition. You can see this along the inner curved line on the image below. There are very fine threads of PLA bridging the gaps.

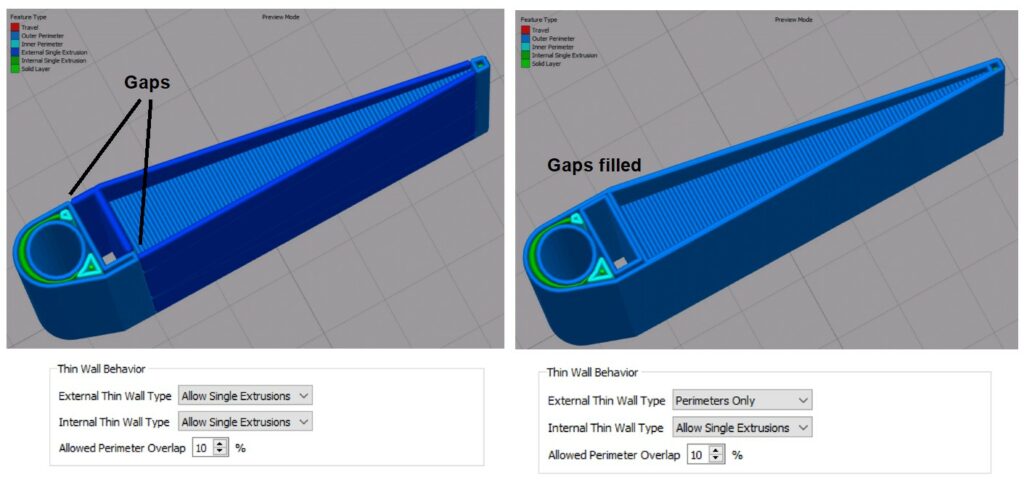
I am also a subscriber to Simplify3D. Their website has a help article on Thin Wall printing and a recommendation that the Thin Wall Behaviour can be improved under the Advanced/Thin Wall Behaviour by selecting Allow Single Wall Extrusions for both internal and external walls. Playing with these options led to good prints that met the SoarKraft recommended weight. I need to do more investigation on the other options in the two Thin Wall drop down boxes but here is an image of two examples.

I asked Qidi if there was a similar fix in their slicer. They sent me a revised config file that did fix the problem but led to a significant increase in weight on the finished print.

The problem has also been beneficial in making me realise how important the slicer simulation was as a tool (as can be seen above). It allows you to see what is likely to happen with each change to the configuration print settings. Obvious but not always investigated.

The other discovery was that neither slicer (Qidi or S3D) are able to import STEP files which does seem a bit strange. STEP files are more accurate than STL files and STEPs are easier to modify in CAD programmes.

Sorry this is not a radical post but does show that 3D printing is not just ‘click and go’. The other comment is that there are so many options to change in a slicer config that I don’t think I will every get to grips with their individual impact on the print.

Links to similar or related post are listed below : –

3D Printed Mark Presling Clamping System

A PLA version of Preso’s versatile clamping system

Sometimes I think I am way out of touch when I suddenly find a new interesting YouTube maker site that had gone completely under my radar. Mark Presling is based in Australia and has some interesting projects and ideas on his YouTube vlog. My thanks go to Peter in Croatia for pointing me in Mark’s direction.

Mark’s latest post (Jan ’23) focussed on a work hold down clamping system using a variant of a ClickSpring eccentric screw and block concept. This looked quite interesting and was timely with my experiments with the Gack clamping idea.

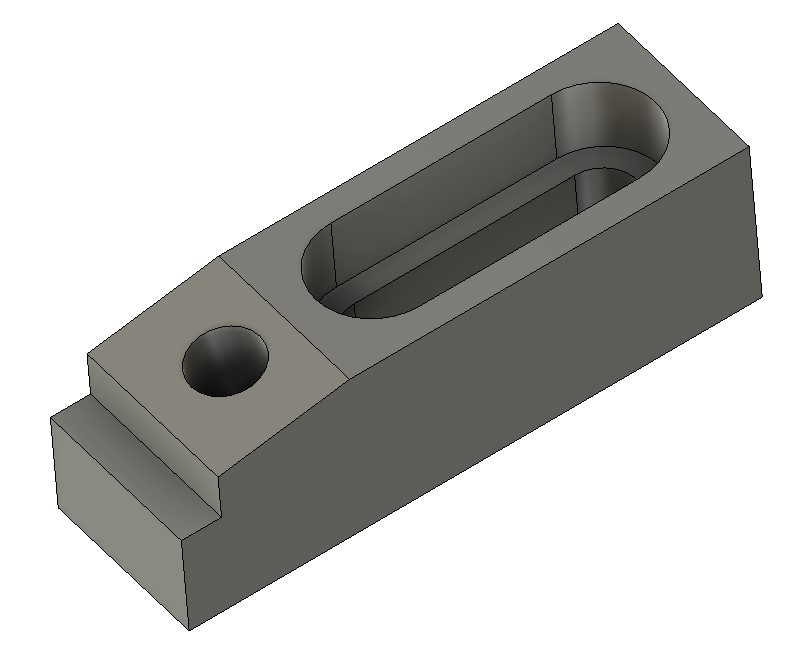
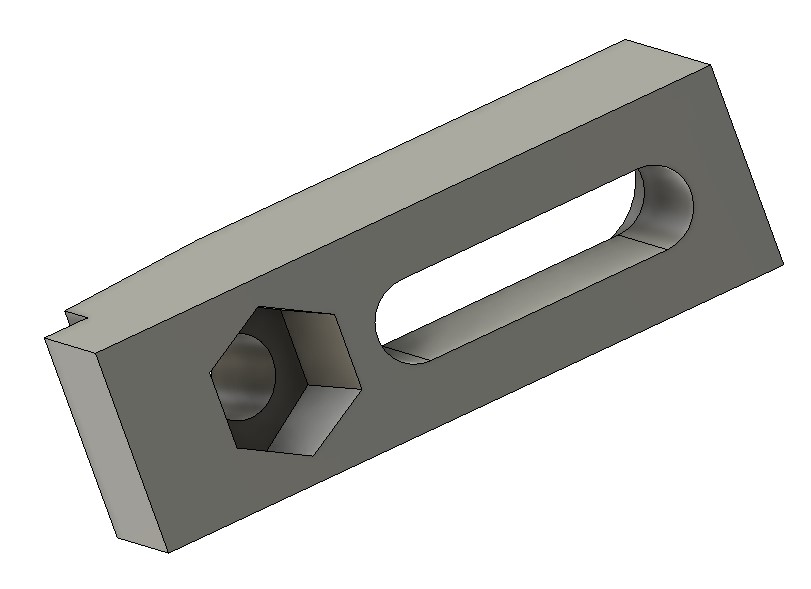
I’m still in France, slightly idle but with Fusion 360 as ever close to hand. Mark’s post does not precisely detail the dimensions but I got a rough feel for proportions and modelled my interpretation of his clamp idea in Fusion. To give the eccentric screw clamp holding strength I embedded a M8 nut. The brass clamping block would remain the same as in Mark’s design and for clarity is not shown on the images below.

I sent some graphics and a STEP file off to Mark for his thoughts and we both agreed that a PLA or PETG version would work and probably be a simple low cost source for hold downs on many CNC router tables. Mark mentioned this in Part 2 of his video post.

Variants could be quickly made for different geometries to suit the work in progress. Like my Gack 3D print, the clamps would not stand up to serious full on metal CNC grunt milling but router table based profiling would be fine. The advantage a 3D printed clamp is that cutter dings when hitting the plastic would not do any damage to the tool. (I realise that none of us ever do that anyway ….).

In the ZIP file below there is a STEP and STL file of my interpretation of the clamp and also the Fusion 360 file for those wanting to play further.

I won’t be able to print the idea myself until I get home. I think it will need a vertical print to avoid the need for support material.

Links to similar or related post are listed below : –

Updated Qidi i-fast driver for Simplify3D v5

Great Support from Qidi

Simplify3D has just released version 5 of their 3D printing slicer program. Simplify3D is a subscription program and is unlike Cura and Prusa which are both free. There is a special price for the upgrade if you are updating to the new version. I had been running the previous version of S3D and fully expected to be able to upgrade and use the same driver file (.fff) for my Qidi i-fast. Not so …. despite S3D saying my printer was compatible etc etc.

I sent a message to Qidi support and next day had a reply giving details of edits to the start and finish GCode routines. They also sent me a new .fff file that had been issued by S3D so clearly others had contact S3D with the the same problem. To be clear I am not saying S3D are not responsive. I just expected that they would check out these issues before issuing a major upgrade. Five Stars to Qidi though who as always are red hot on support.

Attached below the upgrade details as received in a ZIP file. Note that I am currently travelling so I have not had chance to check out the changes …. proceed with caution !

Links to similar or related post are listed below : –

Qidi i-fast dual extruder 3D printer update

Experiences so far with the Qidi

I’ve had the Qidi i-fast 3D printer for few days now and the printing results have been excellent with all manner of geometry. It is particularly good on thin wall models. I am getting more adept at filament management (loading and unloading) which is different to the Sindoh as there is not a cassette system on the Qidi.

The Qidi slicer is a skinned version of Cura and has a significantly larger number of settings to tweak than the Sindoh. That having been said the Qidi has a number of preset configs for different print types and qualities. So far I have not needed to change any of the small print settings on these.

There are some differences to my old Sindoh. When I post a file to the Qidi from Fusion, a memory stick needs to be in the Qidi for the file to post to. On the Sindoh the file would post to the machine memory and be stored internally. This change is not a problem and does mean that there is a listing of previous prints on the memory stick for repeat prints.

The printing plate on the bed is magnetically held in place and works well. Providing the bed plate is removed and allowed to cool down, the prints just ‘pop off’.

The Perspex top cover is held in place by magnets. It has no tactile means of gripping it when you try to lift it off. I have printed two handles and fitted these to the lid to overcome this. See below.

Filament reels can be mounted in a number of ways. There is a suspension bar at the rear of the printer that the reels can be hung on (see above image) or there are two brackets supplied to support two supplied filament boxes to be mounted on the rear of the printer. There is also a extra buy option of a Dryer Box that can also be hung from the suspension bar. The Dryer Box is quite useful for protecting pre-dried filament from absorbing moisture. Beware that the inner hole on the filament reel needs to be 52mm or more to fit inside the Dryer Box.

None of these mounting options worked for my restricted depth of bench space. Instead I use either the Dryer Box or one of the standard filament boxes sat on the bench alongside the printer. For this location I bought in some 4mm OD/2mm ID PTFE tubing as a longer guide tube for the filament. This works well.

The only minor frustration is the abundance of long thin PLA strings that result from the printer warm up preamble. They seem to get everywhere. The Sindoh used to manage this better with a small waste box and nozzle wiper.

Overall a lovely machine which should meet my needs for a long time to come.

Links to similar or related post are listed below : –

Verified by ExactMetrics