I am still building up to automated wheel cutting on the Tormach.
I have mounted the Sherline CNC rotary table on my tooling plate and the table now needs a chuck or collet mounting plate fitting. This will grip the super glue arbors that I use for holding the wheel blanks while cutting.
I decided a chuck would be the best option and bought in a low cost 80mm three jaw chuck made by Sanou. These are available from a number of outlets on EBay. It is supplied with internal and external jaws and a chuck key.
It arrived very quickly and felt horrible. Turning the chuck key was really gritty and jumpy. Rather than sending it back I decided it would be worthwhile stripping it down to see what was going on.
I have never attempted stripping down a chuck before and to my surprise it was relatively simple. I first removed the three jaws, then the three rear cover retaining screws, the three adjuster retaining pins and finally the three adjusters. In theory then the spiral plate should drop out. But it didn’t and it took some serious tapping with a soft tool to remove it.
Having got all the bits apart and in front of me I began to deburr all the sharp edges that I could find. What seemed particularly important was to clean up the spiral plate internal diameter as this seemed to be the tightest fit. A flat diamond coated file together with a triangular one were the best tools to use. Once all this was done I put all the parts in the ultrasonic cleaner with hot water and detergent. There was a surprising amount of grit in the bottom of the tank once cleaning was finished.
Re-assembly was the reverse with everything being coated with moly grease before assembly. It was now a completely different chuck. Beautifully smooth.
The next problem was mounting the chuck on the CNC table. I first made a mounting plate with three M6 clearance and counterbored holes on the PCD mounting holes for the chuck (66mm) and four M5 clearance and counterbored mounting holes to match the cross slots on the CNC table (96mm). I also put a 16mm clearance hole in the centre of the disc to match the chuck bore. Next problem was how to centre the chuck on the rotary table. Fortunately the rotary table has a central, tight fit 11mm (0.25″) shouldered hole leading to a UNC 3/8″-16 screw thread. This is the mounting for use on Sherline products. I cut the UNC thread on the end of a piece of 11mm silver steel and screwed this in place at the centre of the table. This was perpendicular to the table face.
I then fitted the chuck to the backing plate and lowered the chuck and plate assembly over the 11mm rod and loosely tightened the jaws. This allowed the chuck to just rotate so that the four table slots could be aligned with the four holes in the mounting plate. These four screws were also loosely tightened against the T slot nuts and then the chuck pushed firmly down and the jaws closed tightly. The four table mounting screws were then tightened. The chuck should now be centrally placed and tightly in position.
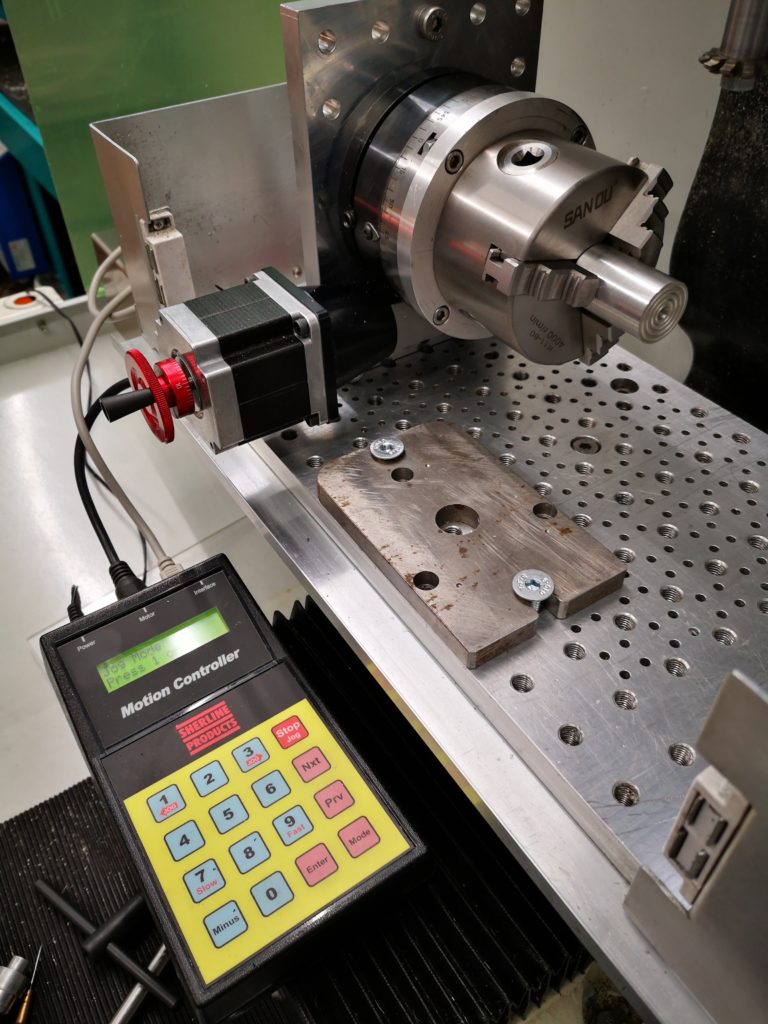
Sherline CNC table mounted on the Tormach tooling plate with the Sanou chuck on its mounting plate and with a super glue arbor in the chuck. The controller for the Sherline table is shown which was designed by Bryan Mumford who also designed the Microset Clock Timer. The weird plate on the Tormach tooling plate is a lump of scrap steel for my dial gauge magnetic base to attach to. You can just see a cutter in the Tormach slitting saw arbor at the top right.
The 11mm silver steel centralising rod could be unscrewed and removed. I put a piece of 20mm silver steel in the chuck jaws and checked the run out as being +/-0.05mm which to me didn’t seem bad and more than adequate for the task intended.
A new experience and a good end result.
Still got the GCode to sort out to automate the process … and finish off the USB expansion unit to increment the motion controller.
Update : –
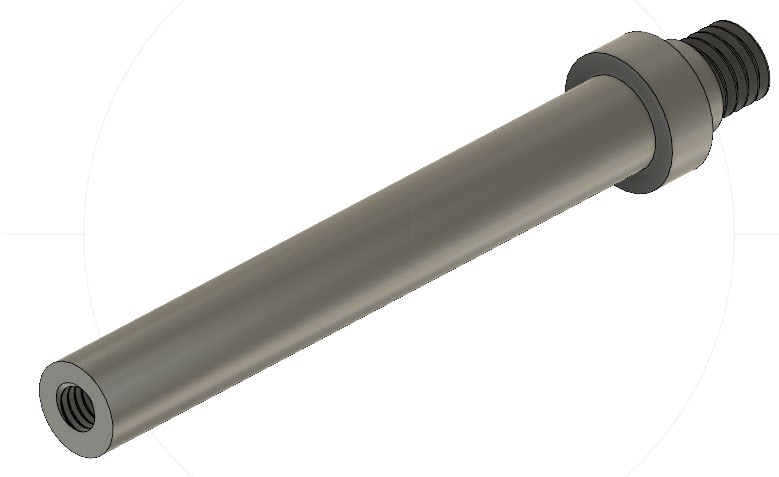
I found that just a straight 11mm rod with a 3/8″- 16 UNC thread on the end was not reliable in sitting square to the CNC table surface. This resulted in the chuck running eccentrically. I modified the centring rod to have a collar fitted (16mm diameter to clear the chuck central hole) which was silver soldered in place and then trued up on the lathe. This modification allows the chuck to be fitted and centred easily and quickly each time. Here is the Fusion 360 model.
Chuck centring rod (11mm diameter silver steel) with a 3/8″-16 UNC thread to fit into the Sherline CNC Rotary table central mounting hole and with a collar to pull up against the rotary table face to keep the rod true. The M6 hole on the rod end is for a cap head screw held in place with Loctite. This allows easy release of the rod from the rotary table once the chuck is in place.
I also added a M6 threaded hole in the end of the rod to allow the fitting of a cap head screw. This is Loctited in place and is used to release the rod from the rotary table central threaded hole once the chuck is in place. An alternative would be to mill a hex head on the end of the rod but I took the lazy way out.
It has been one of those things that has been nagging for some time….
I have had a couple of frights while severely destroying metal which were brought about by the rear Y bellows on the Tormach having got filled with swarf (chips). The machine had tried to do a severe Y movement to the rear of the machine and the bellows began to try to crush the swarf (chips) that had accumulated in its grooves. While it may not do any fundamental damage it does sound awful and does give rise to a transient expectation of an underwear change.
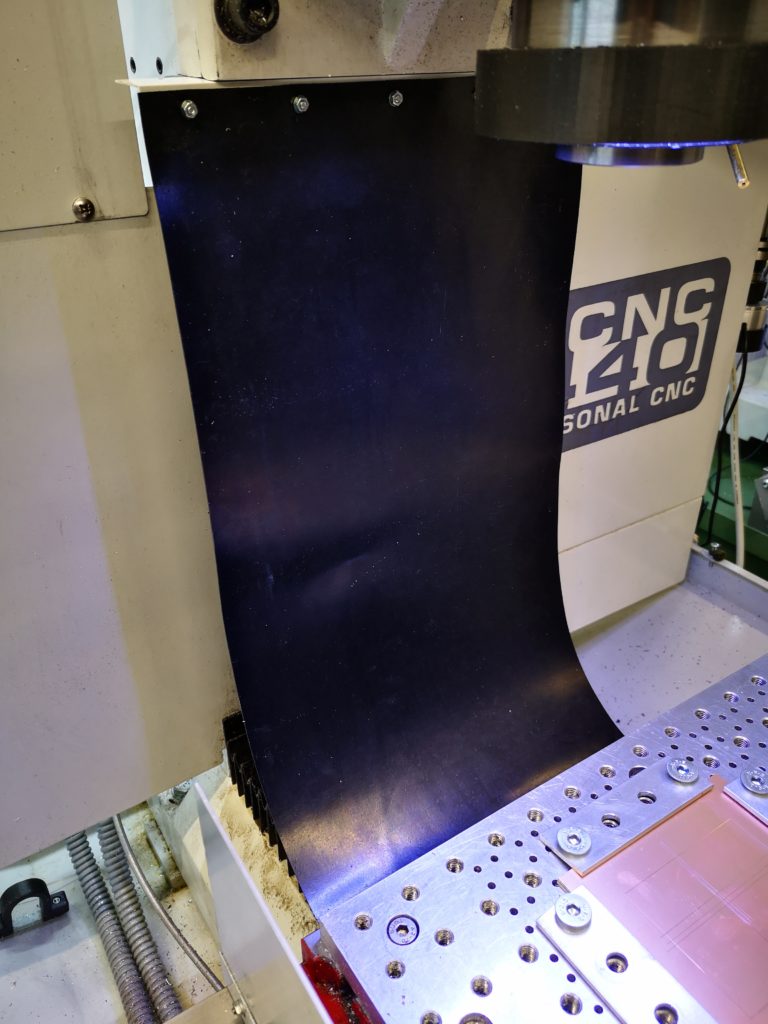
Some time ago I had ordered in some 1mm Nitrile rubber sheet to solve this problem and it had been sat gathering dust waiting a “non busy” day. Today was that day. Time to sort this out.
The Nitrile sheet I had ordered in from EBay was 500mm square. When cut down the middle it would nicely span the bellows. I also had some asymmetric profile plastic angle section measuring 30mm x 20mm x 1mm which had been brought back from the Brico in France. (For me the French Bricos are a regular source of material as their range of aluminium, steel and plastic sections far outshines our UK DIY stores).
The Method
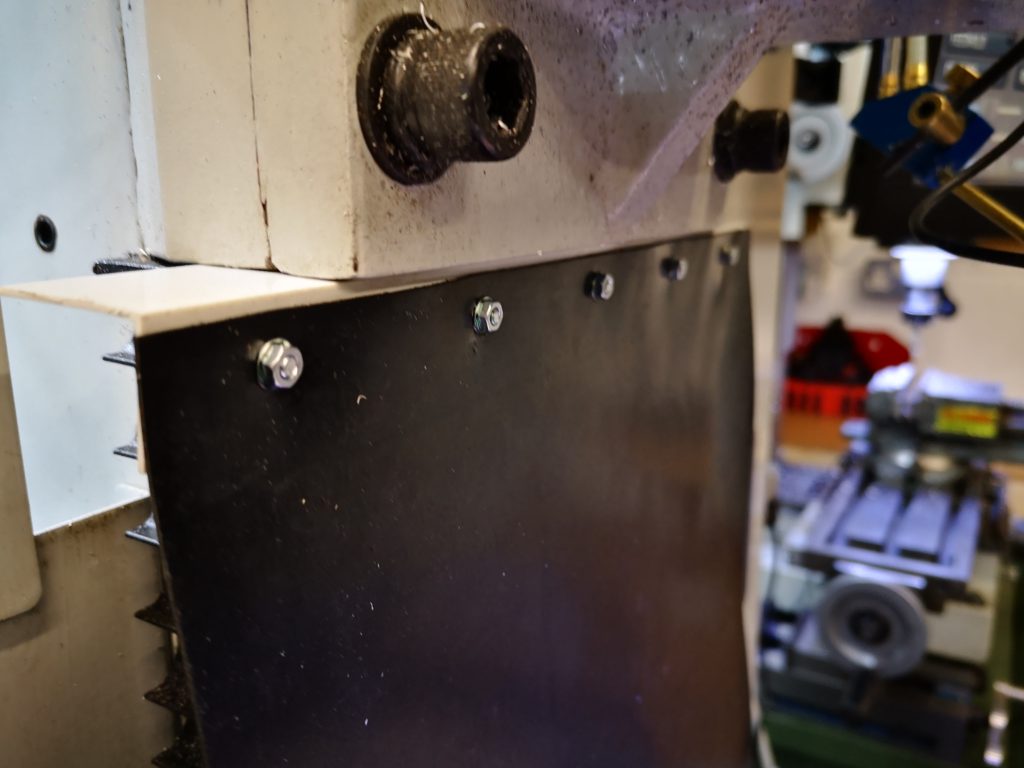
I cut two lengths of the plastic angle at 250mm long to match the Nitrile, one for the top of the Z axis bellows and one for the table end of the Y bellows. On the shorter arm of the each piece of plastic angle I put 5 x 3mm clearance holes and marked these though onto the rubber sheet. I cut the matching holes in the Nitrile sheet using a rotary punch. I put a slight countersink on the back of the holes in the plastic to reduce protrusion down into the bellows.
The Z axis mounting consists simply of two M5 clearance holes 120mm apart on the wider arm of the plastic angle. I made these holes elongated to make adjustment of the mounting easier.
The Y axis was not so straightforward in that the two M5 bellows mounting holes into the table are set below the level of the slideway. These are spaced at 210mm. The plastic angle had to be hacked out to allow for this but this was simple to do on my Gabro notcher as the 1mm plastic is quite soft. Once again I made the two M5 clearance mounting holes in the plastic angle elongated for ease of adjustment.
The two pieces of plastic angle were fastened to the Nitrile using M3 x 5 countersink screws with a washer and nut facing out from the bellows. Rather than tighten these down hard and distort the rubber I soft tightened after adding some Loctite.
Fitting the angle to the machine is a bit fiddly as I was working blind. With hindsight the mounting holes should have been slots rather than elongated holes. This would allow the plastic angle to be slid into place without taking the bellows screws out.
The 500mm length on the Nitrile seems just about right as it does not bulk up too much at extreme table positions. A little longer perhaps but no shorter. The 250mm width gives plenty of overlap across the bellows to keep them clear of swarf/chips.
I am pleased with the result and I am sure long term my underwear will also benefit. Below is a guidance sketch of the plastic angle details and a few finished shots of the Nitrile in place on the Tormach PCNC440.
Plastic angle dimensions for the Z and Y axis bellows Nitrile cover mountingFull image with Nitrile sheet in placeZ Axis bellows protector sheet top mounting on Tormach PCNC440Y Axis bellows protector sheet table end mounting on Tormach PCNC440
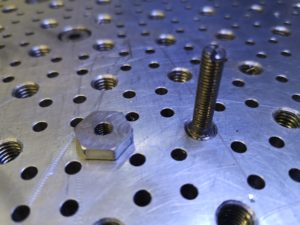
Each of my CNC mills has a home designed and produced tooling plate. Both have a 25mm pitch matrix of tapped mounting holes and a further submatrix of 3.7mm tooling pin holes. Why 3.7mm ? So I can turn down 4mm silver steel for the tooling pins to create a retaining shoulder.
My small CNC plate has M5 tapped holes and the Tormach 440 has M8 tapped holes. What struct me was that I has starting to create dual sets of hold down tooling, some with M5 and some with M8 mounting holes. Not a good idea. (Entertaining and therapeutic though it might be to have ‘tooling days’).
Clearly a mounting with M8 holes was not much use with tooling having M5 mounting holes but the other way round would work if I had M8 to M5 adaptors.
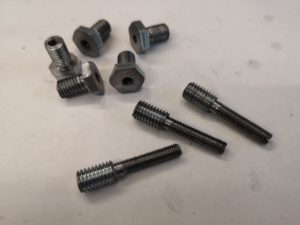
As a result I have spent the day creating adaptors which you could call male and female. Both are made from M8 hex head tensile screws with the female ones retaining the M8 head and the male ones utilising the cut off portion of thread. I had to undercut the thread ends behind the heads so the female adaptors would sit flush. Having undercut I then skimmed all the tops of the hex heads to be same depth.
All the turning was done with the ER25 collet chuck instead of the 3 jaw which is normally fitted to the Myford. The male adaptor versions were a pain to turn down to M5 diameter and had to be done incrementally as the M8 threaded end could not be heavily gripped in the collet.
The female versions are quite useful if a job is being run on the Tormach that needs suspending above the table so it can machined to full stock depth.
Nothing revolutionary or original but a day well spent.
A picture explains : –
Male and female M8 to M5 adaptors
M8 to M5 adaptors in place on the Tormach tooling plate
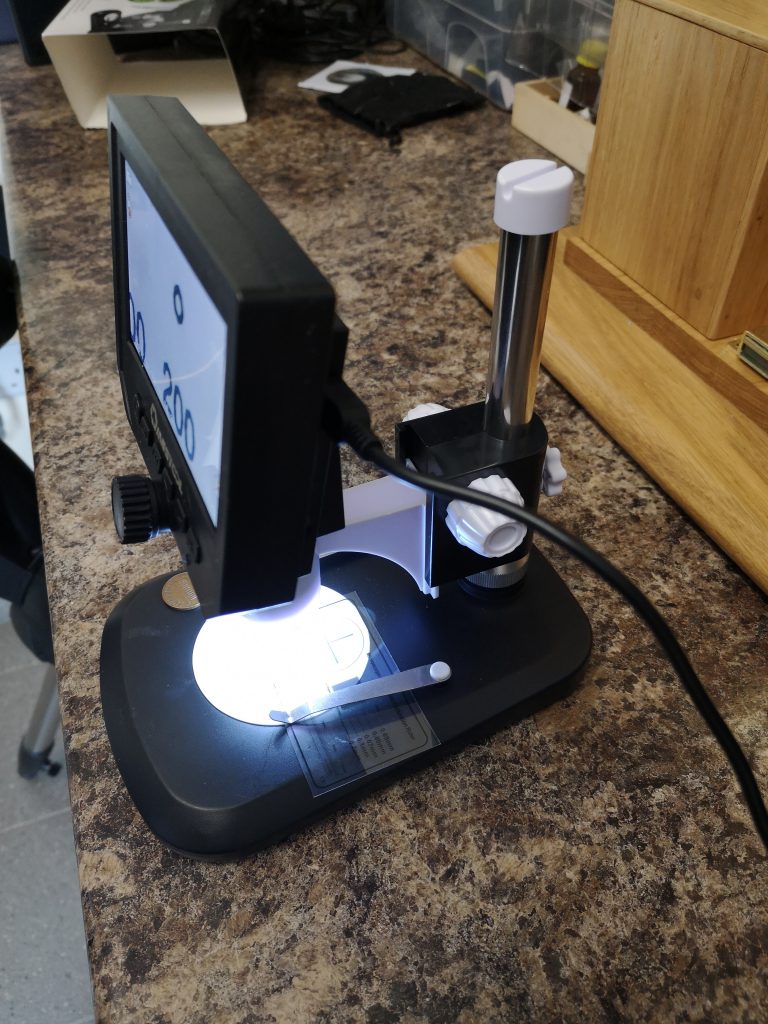
I had previously posted about the low cost HD microscope that I had bought to see if was any good. For the price I was impressed by the microscope but not by the stand that came with it. It only needed to be breathed on to wobble and the fixing was poor.
While browsing Amazon I spotted a more conventional looking stand for sale. This was sold as being aluminium but when it arrived this morning this was a bit creative being mostly plastic. However the microscope fits into the cup holder mounting and it makes a dramatic difference to the stability and therefore the usability of the microscope. You can preset the height with a knob on the rear and then there is a rack knob to move the scope up and down. You can focus using the microscope control or on the stand rack knob.
It is now a stable device to use and for the price of the microscope and the stand it is a useful addition to the tools available. The stand comes with a calibration sheet to allow you get a feel for the magnification factor. The picture below is displaying a 200um circle.


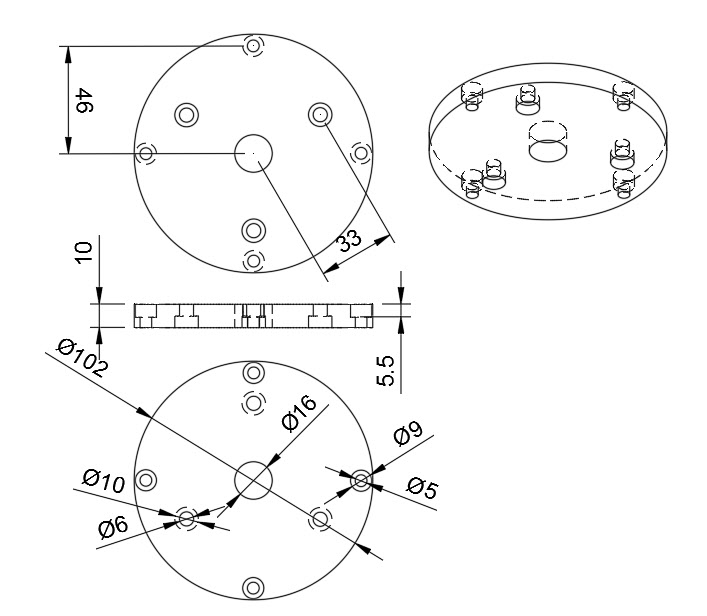 Next problem was how to centre the chuck on the rotary table. Fortunately the rotary table has a central, tight fit 11mm (0.25″) shouldered hole leading to a UNC 3/8″-16 screw thread. This is the mounting for use on Sherline products. I cut the UNC thread on the end of a piece of 11mm silver steel and screwed this in place at the centre of the table. This was perpendicular to the table face.