With a secondary use for checking how bad your arthritis has become.
While working in a remote and physically difficult location I had a need to check an arbor diameter and judge its concentricity. I could get a caliper on the arbor in one axis only so something better would be needed.
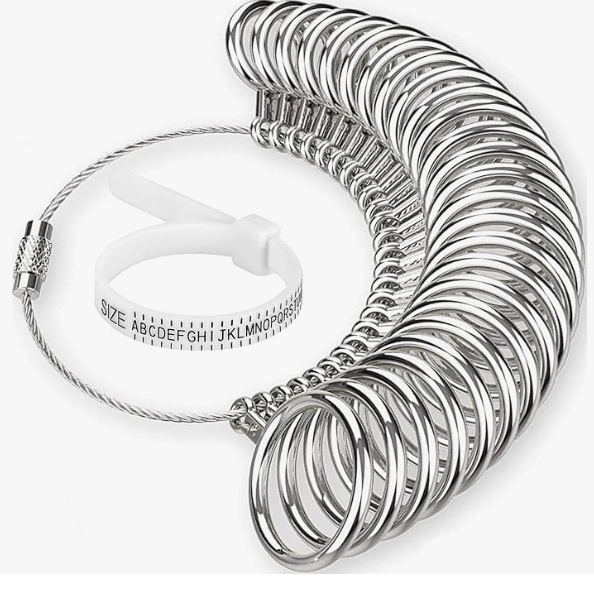
My simple solution was a set of ring sizers as used by jewellers to measure fingers for fitting a ring. These are readily available from multiple sources on Amazon. They come with a sizing chart and are remarkably accurate albeit in weird step sizes.
Sizing the arbor using these rings allowed me to zero in on the best fit. Adding some thin paper around the arbor to pack out the residual gapping allowed me to get a very good feel for how concentric the arbor was.
Not exactly serious engineering practice but needs must.
Links to similar or related post are listed below : –
In the workshop I have a large ‘conventional’ vacuum cleaner with a long hose and cable. It gets used for not just cleaning away the workshop mess but also as the vacuum source for my homemade vacuum table.
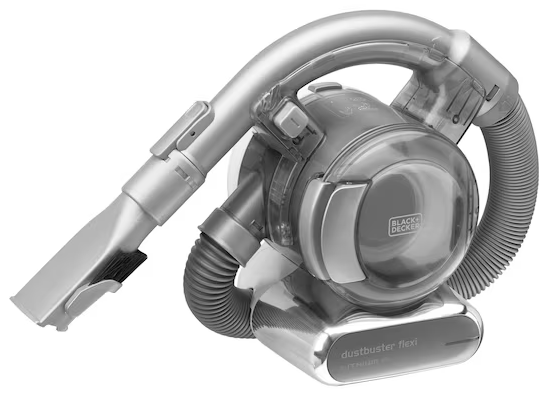
When you have a ‘small mess’ that you can’t be bothered to drag out the large vacuum, undo the hose and cable for what will be a two minute session, it is nice to have a quick alternative. I have settled on the Black & Decker PD1820L cordless 18V.
It has a short flexible hose which does not have to be deployed as it clicks into the body of the device. It has a couple of attachments, a brush style and a narrow ‘get into tight spots’ option. The charging plate is simple to seat the device into. All in all it is a handy convenient device that probably gets more use than its big brother.
The dust chamber has a grilled plastic pre-filter with a secondary hepa style replaceable filter insert. The general complaint is that the hepa filters need constant replacement as they do clog quickly. I have just two of these filters.
When one gets clogged I knock out the majority of the dust particles over the rubbish bin before soaking it a container (a large yoghurt pot) which has a couple of teaspoons of dishwasher powder that has been diluted in hot water. Leave to soak for a day or so and then rinse and dry on a radiator or similar. Using this method you only need to buy the one spare filter and just keep cycling the pair round.
I use a similar method for cleaning the spa filters in France. The only thing different there is that I use a ‘green’ Eco Ver dishwasher tablets. If you use a normal tablets there tends to be a residue in the filters that leads to foaming in the spa.
Links to similar or related post are listed below : –
I had a request for help with a CCTV system where the owner wanted to add a remote camera to an outbuilding with no cable route possible. This should have been a JSN job (Just Say No) but I’m always up for a (steep learning curve) challenge. After some investigation (back of a napkin sketch and a quick Google search) I opted for a 5GHz WiFi bridge and thought the job was going to be easy. JSN jobs are like that but you have to be conscious that they come configured with inbuilt mission creep.
The WiFi link was a 24V power over ethernet (PoE) system. The existing three cameras were 48V PoE and the additional camera was to be the same.
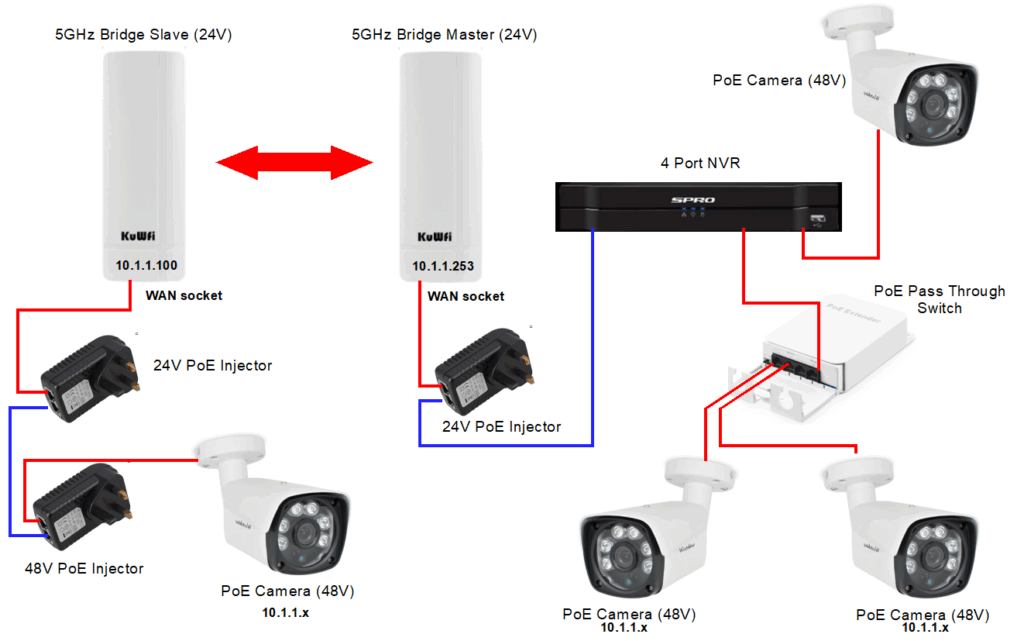
Here is the final configuration. The red lines are PoE and the blue lines are just basic CAT5 unpowered connections.
The NVR is a SPRO four port device with 48V PoE on all ports. To save cabling the owner had used a PoE pass through switch so two cameras could share the same cable running back to the NVR. The existing third camera was a direct feed from the NVR. I was quite impressed with the pass through device. It has the capacity to allow four cameras to share the same PoE NVR connection.
Back to the plot … Adding the fourth remote camera using a bridge would have been simple if the bridge was 48V PoE powered but it was 24V PoE. The remote location therefore needed two PoE inserters – a 24V one for the bridge and 48V for the camera. The LAN ports on the two inserters just need connecting together to complete the link. The NVR ‘sees’ the remote location as a locally connected camera.
Something to note. The bridge (KuWfi) as delivered has two IP addresses configured, 10.1.1.253 for the Master location and 10.1.1.100 for the Slave location. All the cameras are allocated 10.1.1.x IP addresses on the NVR. The NVR also has an internet connection for remote Smartphone viewing.
KuWfi provide an application to configure the two bridge units. I spent a long time trying to work out how to get this to respond to either device. In the end a light bulb moment reminded me that a previous Chinese sourced product had the same issues. I had traced this to a Chrome related problem (which I never solved) and found the Application would only work using Edge. The same happened this time. Using Edge got me into both units without a problem. Note that you have to set your host interrogating computer to be on the 10.1.1.x domain.
There is a signal strength graphic on the Slave GUI which is very useful. You can connect your computer LAN port to either the Master or Slave 24V injector LAN port and request either of the two addresses (10.1.1.100 or 10.1.1.253) from either end of the link
Just think how much simpler it would have been if the bridge also ran from 48V …. maybe someone produces a 48V to 24V PoE step down converter ? Or maybe I should just stick to the things that I pretend to know more about … and JSN.
Links to similar or related post are listed below : –
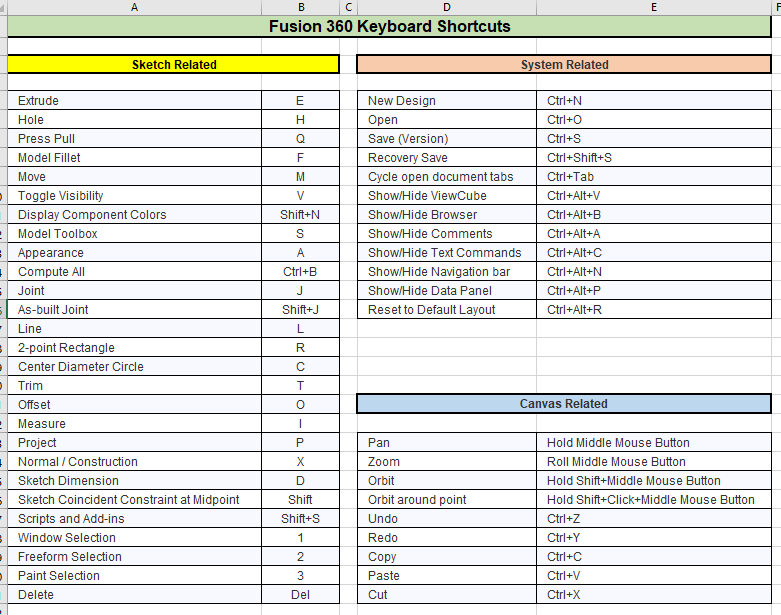
Fusion 360 Shortcuts Lookup table and keyboard overlay
In an idle moment I have updated my collection of spreadsheets to include the Fusion 360 shortcuts listing. The workbook tab also includes an edited version of the Fusion keyboard overlay.
You can download this and other eclectic tabs as part of my Engineering Spreadsheets workbook.
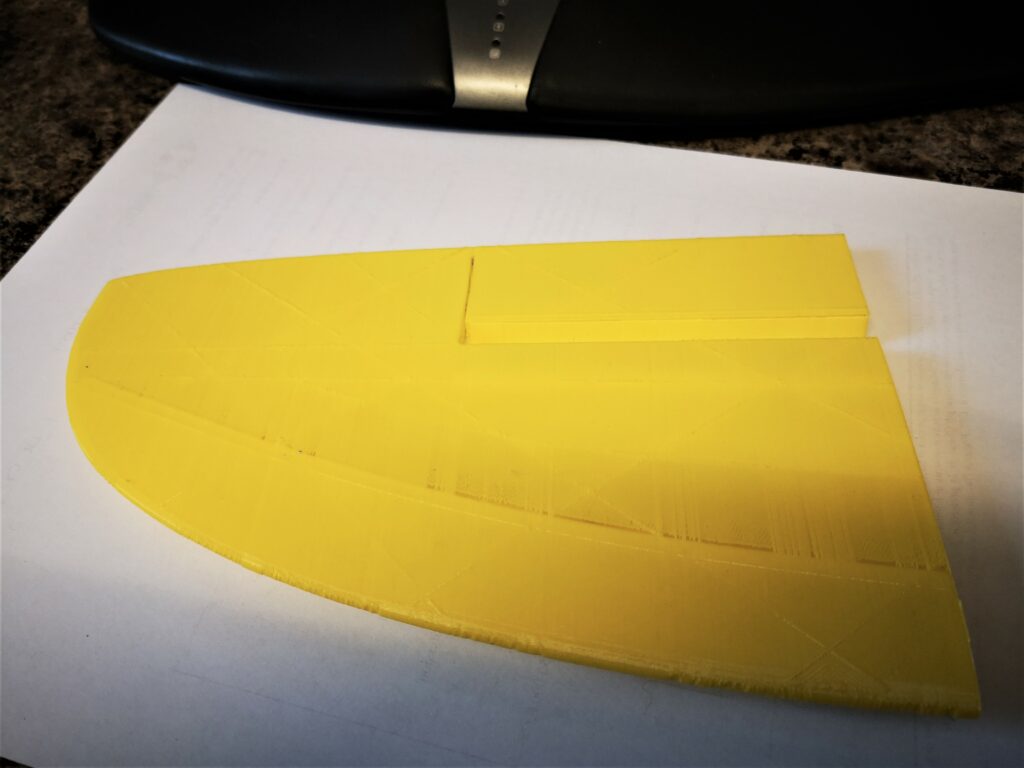
Some while ago I was asked to 3D print the component parts of a 1200mm wingspan glider. The design STL files are available as a paid download from the SoarKraft website.
The first problem this created was that my Sindoh 3DWOX had insufficient Z height for the 200mm high print sections. This was a thinly disguised excuse to upgrade my 3D printer to a Qidi ifast. This has proved to be a good decision and I am very impressed by the Qidi and the quality of the print results that it generally produces.
I now need to qualify that statement because I have struggled (and also learned a lot) trying to print thin wall prints for the glider parts.
The Qidi comes with a slicer that is a skinned version of Cura. I struggled to get good thin wall results. The main problem being transparency effects in the printed surfaces immediately following internal bulkheads within the wing design. I mentally envisaged this as the extruder being unable to start pumping filament fast enough following the bulkhead transition. You can see this along the inner curved line on the image below. There are very fine threads of PLA bridging the gaps.
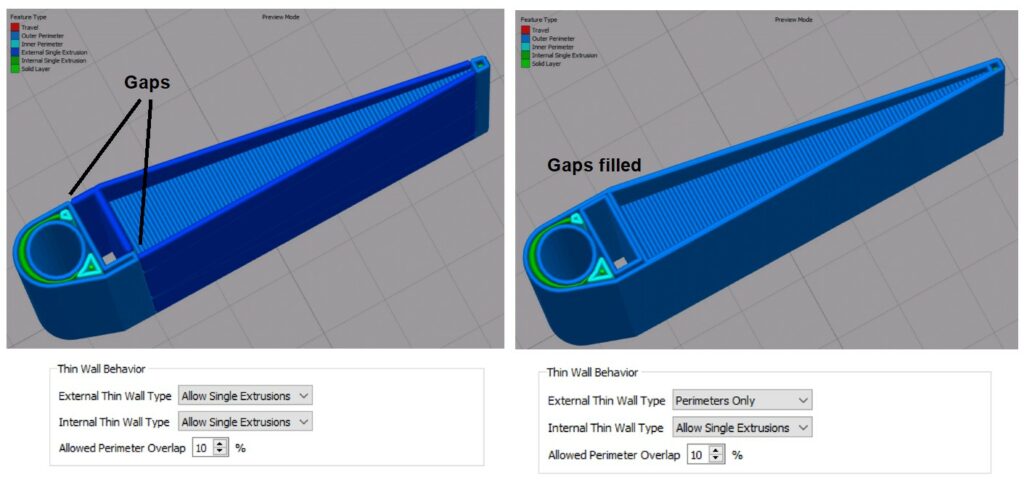
I am also a subscriber to Simplify3D. Their website has a help article on Thin Wall printing and a recommendation that the Thin Wall Behaviour can be improved under the Advanced/Thin Wall Behaviour by selecting Allow Single Wall Extrusions for both internal and external walls. Playing with these options led to good prints that met the SoarKraft recommended weight. I need to do more investigation on the other options in the two Thin Wall drop down boxes but here is an image of two examples.
I asked Qidi if there was a similar fix in their slicer. They sent me a revised config file that did fix the problem but led to a significant increase in weight on the finished print.
The problem has also been beneficial in making me realise how important the slicer simulation was as a tool (as can be seen above). It allows you to see what is likely to happen with each change to the configuration print settings. Obvious but not always investigated.
The other discovery was that neither slicer (Qidi or S3D) are able to import STEP files which does seem a bit strange. STEP files are more accurate than STL files and STEPs are easier to modify in CAD programmes.
Sorry this is not a radical post but does show that 3D printing is not just ‘click and go’. The other comment is that there are so many options to change in a slicer config that I don’t think I will every get to grips with their individual impact on the print.
Links to similar or related post are listed below : –