Notepad ++ for GCode Editing

A really useful plugin to give a colour highlighted listing

I am a great lover of Notepad ++ as a text editor. It has so many useful facilities and I particularly like it for checking Arduino code when frustration has set in ( …. so quite regularly …). The default inbuilt colour highlighting makes errors stand out as obvious clangs.

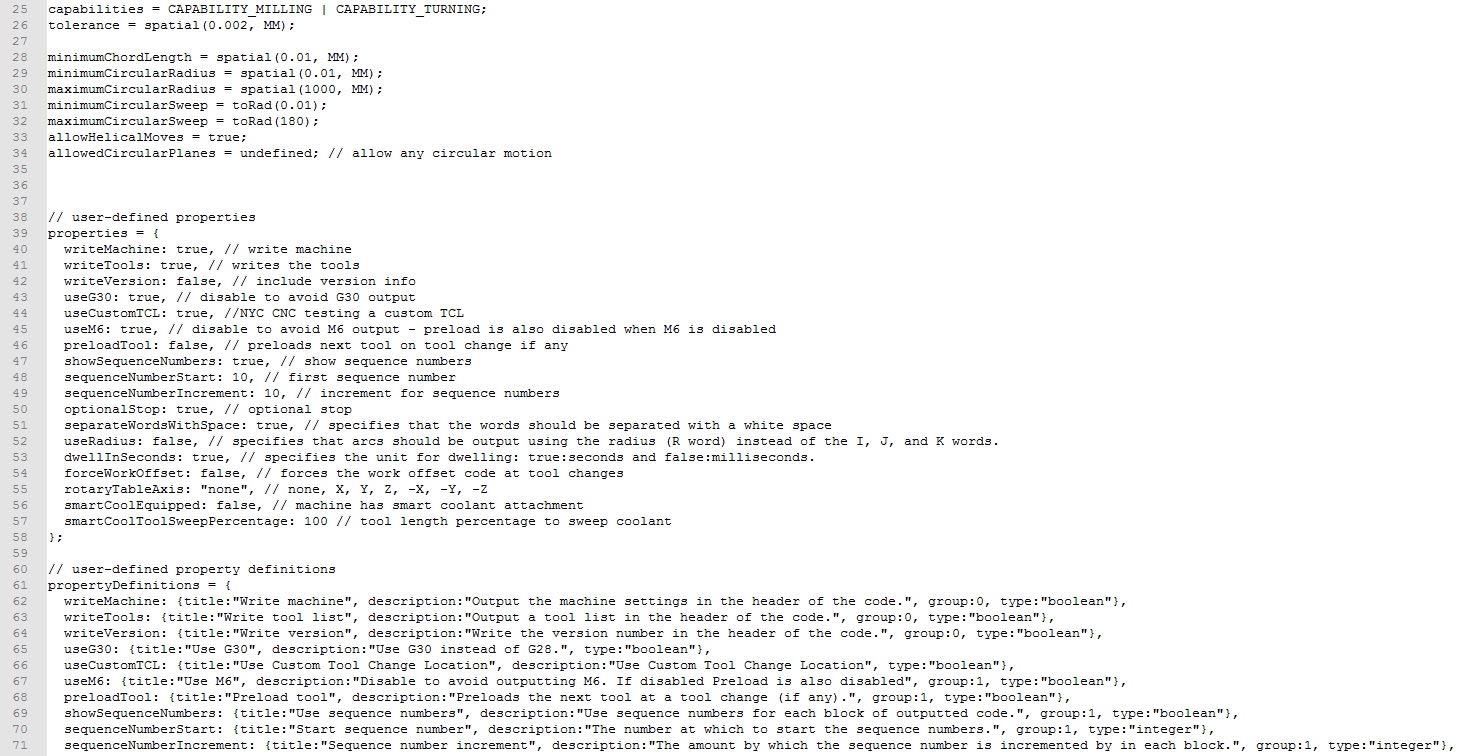
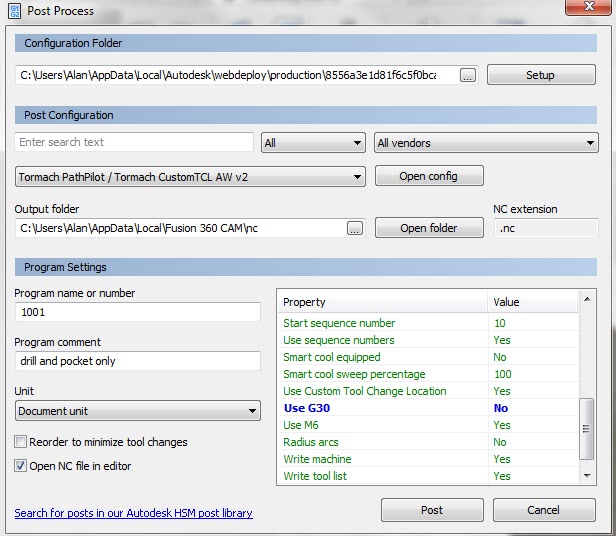
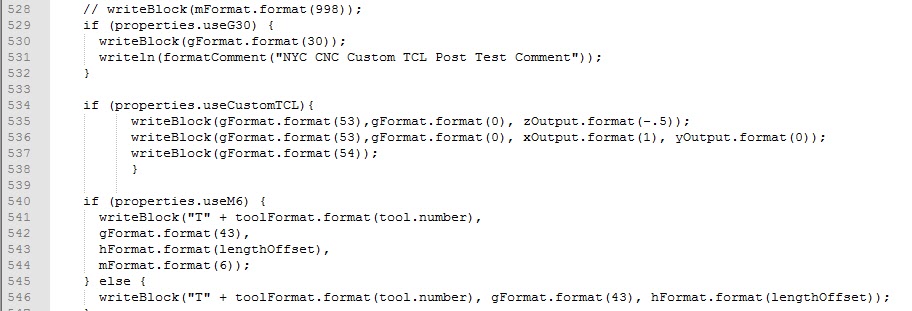
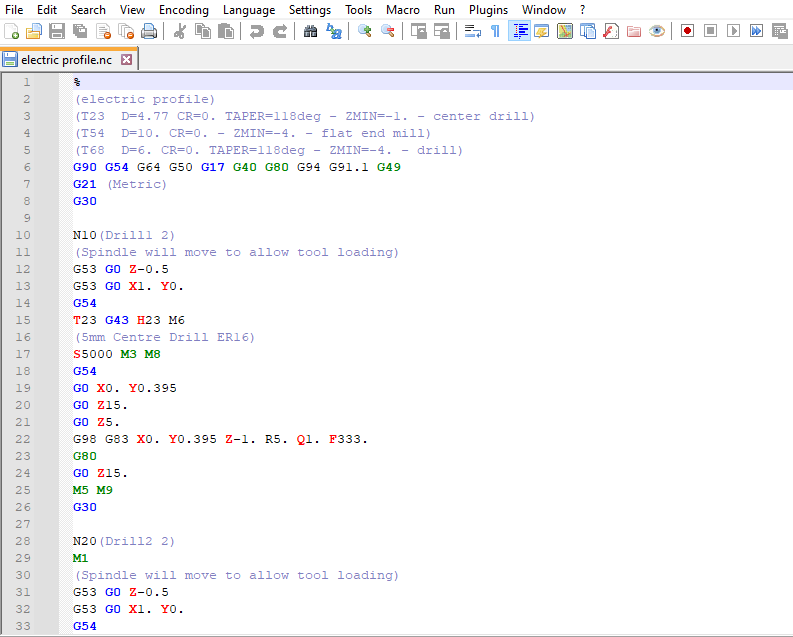
By chance I stumbled across a XML file plugin for Notepad ++ that is dedicated to its use when editing CAD/CAM GCode produced by design programs such as Fusion 360. Normally I would use GWizard Editor by CNC Workshop for editing such code as this also gives a graphical representation of the tool paths being created. The Notepad ++ plugin does not give the graphical image but there is an additional comment on the download post suggesting that this might also be available. See the following link to the post for the download and for further details.

https://zero-divide.net/?shell_id=151&article_id=4809_notepad-absolutely-free-g-code-editor-with-code-highlighting

Here is an example screenshot of the resulting code listing as created with the plugin.

Links to similar or related post are listed below : –

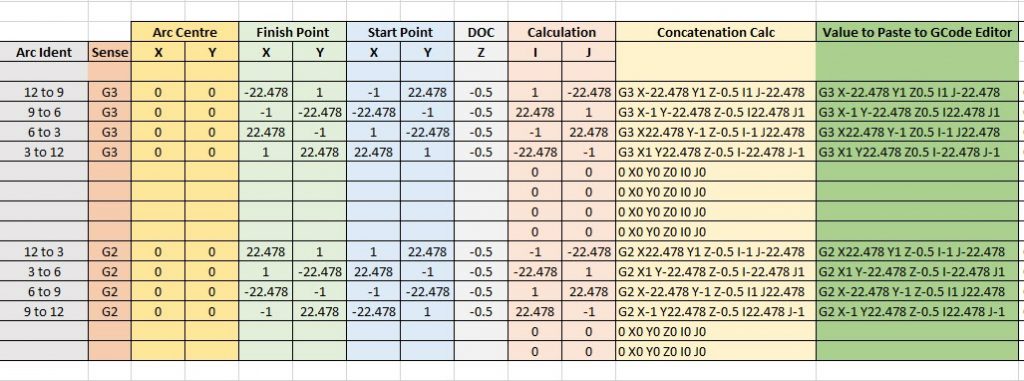
Arc and Circle I and J code calculator for GCode cutting paths

I & J Arc Code Calculator (with updated spreadsheet)

I had a need to hard code a circular PCB cut out CNC code that would cut four arcs around a milled PCB and leave four breakout tabs to retain the board in place in the blank until the job was finished.

To create I & J codes you need to know the start point, end point and radius of the arc.   The end point becomes the X and Y.  The  delta X and Y location relative to the radius centre point X and Y becomes the I and J values.   You can also add a depth of cut value for Z as part of the block.  Note that the Arc is assumed to run anticlockwise when using a G3 code running from start point to finish point.   Use G2 if you want a clockwise motion.   The principle is the same with both rotations.

You end up with a block code of the format G3 (G2) Xa Yb Zc Id Je where a,b,c,d,e are the coordinate values.  I found that working with positive and negative values when trying to find the I and J values relative to the centre was hurting my brain.   A spreadsheet was needed …..

Screen shot of I and J calculator spreadsheet
Screen shot of I and J calculator spreadsheet for G2 and G3 coding with examples based on CW and ACW arcs around quarters of a circle with small gaps between each arc.


You can download the sheet as a ZIP file from the link below.

Arc and Circle Calculation Sheet for GCode

Similar or related subjects : –

Tormach Post Processor G53 Edits for Tool Change

The Tormach PCNC440 is a lovely machine and is more than big enough for my present needs.   The one problem I had encountered was when coming to a tool change on a CNC job sometimes there was not enough Z height to get the TTS collet out of the spindle.   This was particularly difficult when using larger diameter drill bits in a chuck style holder.

Once in program there did not seem to be any option to break the run and do a G30 or similar.   What I really needed was a move of the spindle upwards and outwards to get it clear of the job and allow TTS access.

Reading up in Peter Smid’s excellent CNC Programming Handbook I could see that care was going to be needed to ensure that any movement was first of all a Z action and then X and Y to avoid the danger of crashing the tool into the job or its fixtures.

I had some discussion with John Saunders at NYC CNC and John was working on a video around this subject.  He helped enormously.

The end result is to use G53 machine coordinates to first do a Z and then and X and Y to move the tool up and to the side for tool change access.

This involves edits to the post processor in three places.   The first two edits (Lines 44 and 66) are there to give an option for this movement in the drop down selection box.  (The line 24 edit is an earlier modification to allow Mill Turning – see separate post).

tormach, post processor, G53
Line 24, 44, 66 edits

g53 tool change edit to post processor
Change that appears in the Property selection box where the Custom Tool Change option now appears

The third edit gives the instructions for this as a G53 Z move than a X and Y move (Lines 543-538).   Note that I later found that I had to add a G54 after the G53 movements as some CAM actions did not include a G54 as part of a tool change.

custom tool change edit
Line 534 to 538 edits

I later on decided it would be nice to include this G53 movement at program end so this is a fourth edit (Lines 1404 – 1405) and not forgetting the change for Mill Turning edit (Line 25) there are five changes in total.

cnc g53 tool change edit
Line 1404 to 1405 edits

That concludes the changes.   I recommend that you spend time watching John’s videos on Post Processor edits on NYC CNC.

If you can’t read the edits then drop me an email and I can send you a full listing.

Note that these are changes to the Tormach standard post processor code and if you are tempted to do this you should do a ‘Save As’ on the original code and only edit the newly created and saved file so you have a fall back position.  Likewise I accept no responsibility in documenting this and putting you up to potential mischief messing with your machine and causing damage.

Similar or related subjects : –

Verified by ExactMetrics