A game of tag anyone ?
I have installed a network of low cost wireless sensor tags to monitor our homes here in the UK and also in France. These are really useful little devices that measure temperature, humidity and motion such as a door opening.
They store their readings and can be interrogated via the Internet to see a profile history. They also have limit alarm trip options that push messages to email to let you know if anything untoward is happening. The product website is here.

As examples of their use, here in the UK we have one fitted inside our freezer to check that the temperature is within limits. Should the freezer fail or the door be left slightly ajar we get a message.
In France we have one installed inside the spa pump cabinet to check the temperature over winter to check that the pipework does not see freezing temperatures. This works in conjunction with a greenhouse tubular heater that is also in the spa cabinet wired to a frost stat set to 5C degrees. If the temperature drops the pipes are protected by the heater coming on. If the AC mains fail the heater will not come on and the sensor tag warns us to ask the neighbours to visit and check the electric distribution panel as we do experience frequent power outages.
Under normal circumstances the tag internal CR2032 battery will give a reasonable battery life approaching 12 months. These are not normal circumstances however and due to COVID we have been unable to visit for over 12 months. As a result all the tags at our house in France have dead batteries. Their use inside freezers and outside in the cold degrades the battery life achieved. This got me thinking about fitting a larger battery pack to the tags in France to help longer battery life monitoring while we are absent.
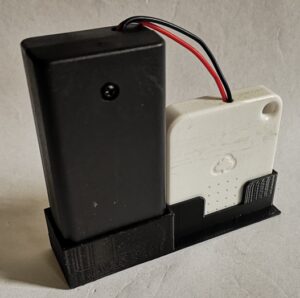
My solution is not elegant but functional. I have wired an external battery pack containing two AA batteries to the tags. The battery box is a commercial item and is available in packs of five on EBay. They come fitted with an ON/OFF switch and more than enough cable to connect to the battery contacts inside the tag.
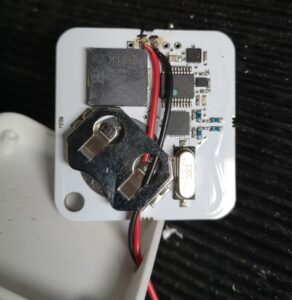
The tag case can be sprung open with a fine screwdriver or wood chisel and the PCB removed. The dead battery can be slid out of the PCB battery holder. There are a string of five module probing lands at the foot of the PCB and after some checking I discovered that two of these are connected to the battery holder contacts. The external battery pack wires can be fed into the case via a 3mm hole in the top edge. The wires then pass through the old battery holder down to the bottom of the board and are soldered in place. The tag is re-assembled, batteries fitted and switched on. The tag will bleep if all is well.
This electrical modification works but it is physically a bit gangly and scruffy. A few minutes on Fusion 360 produced a simple 3D printed holder to contain the battery pack and the tag. This has a slot so the temperature sensor is not obscured and a sprinkling of holes to allow physical mounting as appropriate.

In theory this modification should dramatically improve the operational life of the tags between battery changes but time will tell whether it is borne out in practice.
Similar or related subjects : –
- A poor man’s ring gauge set
- Error Code A9 on Odealis Gas Boiler
- Power banks that go to sleep with low current drain
- GyroCut versatile scalpel replacement
- Dry lining wall fastener fixing aid
- Simple Vice tommy bar modification
- Soldering Iron bit storage on Lytool soldering station
- Water Softener goes AWOL
- Noga External Deburrer and Cut Screws
- Technoline Wireless Weather Station problem