OK this is a silly one I know but follows on from my theme of just how valuable a 3D printer is to own and how it makes you think outside of the conventional box when solving simple problems.
French markets always have a stall selling brightly coloured table clothes in various materials. These rarely have a prepared hole in them for your sun umbrella to slot through as you sit quaffing and nibbling in the sunshine. If they already have a hole it usually doubles the price. If you make a hole yourself then it will fray and degrade.
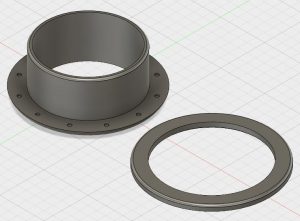
Up steps “Fusion Man” and in five minutes you have a design for a locating boss and ring to sandwich protect the hole in the material and keep the cloth fixed on the table. Design done and its off to the Sindoh 3DWOX to print it.
Lay the table cloth on the table where it will be used and ensure it sits square all round. Crawl under the table and with a Sharpie pen or similar, draw the shape of the hole on the back of the table cloth.
Remove the cloth from the table and flip it over. Place the printed ring over the marked circle and remark the circle position to the ring ID. Cut out the marked ring circle but make the cut about 3 or 4 mm smaller all round. (Nail scissors are ideal for cutting curves). Test fit the boss. Because the hole in the cloth is slightly smaller than the boss diameter, the material will naturally turn up the vertical face of the boss. Check it is not causing wrinkles in the cloth when on the table.
Put hot glue around the boss at the horizontal/vertical interface and then push the boss through the cloth to let the glue hold it in place.
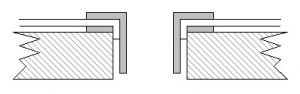
Apply glue to the locating ring and push this in place over the boss to sandwich the material between the ring and the boss. Here is a greatly exaggerated cross section.
Job done. Siesta time.
Similar or related subjects : –
- Hybrid 3D brass threaded insert tool
- Tap shank adapter for 4mm AF hex drivers
- Qidi Slicer auto support error on my part
- Error Code A9 on Odealis Gas Boiler
- Qidi X Smart 3 revised fan installation
- Qidi X Smart 3 tweaks
- Qidi X Smart 3 special weekend pricing
- Stop losing Qidi ifast 3D prints down the chamber front gap
- Fitting a Bento air filter to a Qidi ifast 3D printer
- 3D Printed Brass Threaded Insert Soldering Iron Stand