Micro USB with 5 core cable

Lots of activity to be documented and posted but let’s start off with a short note.  Not earth shattering but might help someone somewhere.

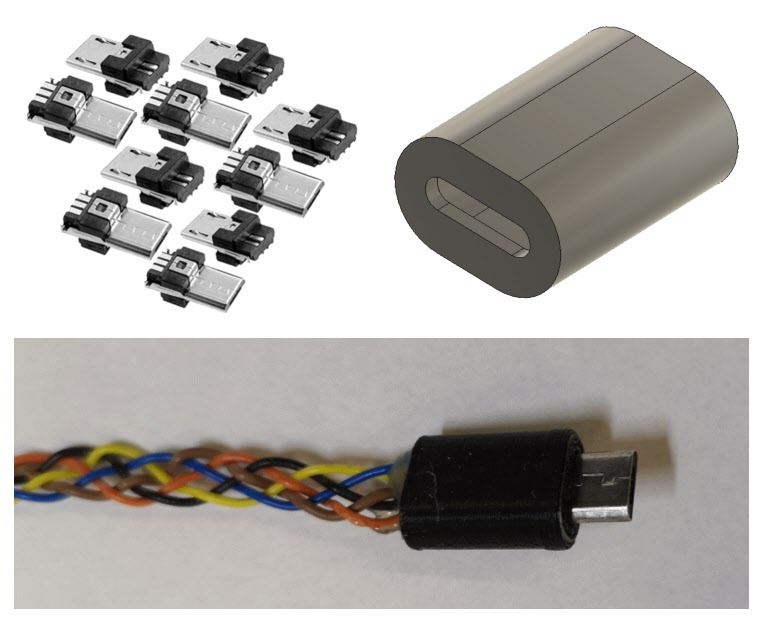
I had the bright idea of using Micro USBs as a connecting medium on a couple of projects.  This was driven by the need for a 5 wire connection.   The design was finished and I dug out the Micro USB to Micro USB cable that had been bought in for the project and connected things together.   All the LEDs went out on my project circuit board.  Gloom.

After buzzing the cable through I found that on a standard Micro USB cable the Sense pin is linked to the Ground pin.   There are not 5 independent and isolated cores as you would expect.  Just four. What to do ?

By chance I had some Micro USB connector ends with solder tabs but no shells.   I did not have any flexible small diameter cable with 5 cores.  After some discussions with my other half she offered to plait 5 independent cables together for me as a cable form.   These were soldered to the Micro USB ends.  Two small end caps were quickly designed in Fusion 360 and took 10 minutes to print on the 3D printer. Job complete and project back up and running.

custom micro usb with 5 core cable
Custom Micro USB 5 core cable components showing solder terminal end connectors, 3D printed shell and plaited 5 core cable courtesy of my wife.

Similar or related subjects : –

Activity Update – FlatCAM, Arduino and Social Distancing

While I have been quiet for the last month or so there has been some intensive work by Dave and myself on FlatCAM.   We are in the throes of doing a formal document to help others get to grips with the process and techniques for milling circuit boards.

I need to also put my hand up and admit going over to yet another dark side by experimenting with Arduino technology.  This came about as a follow on to the work on silencing my Bill Smith Gravity Arm Gearless Clock.   With the help of another colleague we have replaced the discrete timer logic board with an Arduino.  I have learned quite a bit in the process and more details will follow.

Finally like many others round the world, myself and my wife are socially distancing ourselves at the moment but every cloud has a silver lining and this does mean I am spending even more time in the workshop doing ‘stuff’.   It has also been a good time to look at the workshop and make plans to tidy, organise and structure things better.  Some of the accumulated odds and ends are getting sifted and sorted and binned as appropriate.

Similar or related subjects : –

New Microscope

Technology Upgrade

Quite some time ago I mentioned a really low cost simple microscope that I think John Saunders had recommended from Amazon.   The device has served me well even though it was quite basic.

I recently had a job to do where I needed to see and measure a very small part I was making.   The simple microscope was struggling to cope or at least I was struggling to cope with it. Looking on the net to see what the current technology could offer I spotted a device on Amazon that looked interesting.

KKMoon Microscope from Amazon


https://www.amazon.co.uk/gp/product/B07VL44TJT/ref=ppx_yo_dt_b_asin_title_o01_s00?ie=UTF8&psc=1

It was a bit more expensive but nowhere near a ‘proper’ professional optical product. Having taken delivery it is very impressive. 

It can act as a simple standalone viewer using the built in screen or can be externally connected via HDMI to a monitor or (and this is the impressive bit) it can be connected to a PC via a superb application that has so many bells and whistles it will take me ages to understand all the functions.  The sensor is a 16 Megapixel Sony CMOS 1/2.3″ HD device and video output can be 4K/2k/1080P.  Magnification is up to x300.

So I am well pleased with the investment and  it will certainly earn its keep.

Similar or related subjects : –

Remote WiFi and GSM Switches

I have had two IT related issues of late.   Both involve devices on the house networks that have ‘locked up’ and needed a hard bounce – a complete mains power down, wait and switch on again. One of these was in our house in France and one at home.   

The one in France was a lock up of the broadband router.   Clearly once this is down all comms stop and we do have various monitoring systems in place that are important.  Searching online came up with a GSM based mains switched outlet.   This simply plugs into the a wall socket and the device to be controlled plugs into it.   You need to fit a PAYG SIM into the device and then you talk to it with your standard mobile using SMS messages from anywhere there is a mobile phone signal.   As the SMS usage will be very low, a GBP10 SIM will last for ages but it is important to remember that if a PAYG SIM is not used for 3 months it automatically gets cancelled.   Fortunately the device does acknowledge back via SMS each command received so it is possible to maintain SIM activity remotely.  The device has a number of facilities such as temperature measurement and activity scheduling.  This has now sorted the French Connection and I can bounce the router anytime it misbehaves.  Here is the Amazon reference.

https://www.amazon.co.uk/gp/product/B00PKGL7YC/ref=ppx_yo_dt_b_asin_title_o00_s00?ie=UTF8&psc=1

The home issue was on a device on the home wired network which was important to keep running.   Very occasionally and usually at an inconvenient moment it would lock up and the only way to reset it was a hard bounce.   The device is a pain to get at to do this and if we were away from the house even more so.  Fortunately the WiFi router at home is reliable so all I needed was a WiFi equivalent of the GSM device mentioned above to give the offending device a controlled hard bounce.   Amazon offer one such device which was easy to set up and works a treat.  For those interested it accepts speech commands via Alexa etc

https://www.amazon.co.uk/gp/product/B07KXBQKXX/ref=ppx_yo_dt_b_asin_title_o01_s00?ie=UTF8&psc=1

Hopefully now we will have remote control of these two weak links in our communication backbone.

Similar or related subjects : –

Replacing the Sindoh 3D Printer Bed Lamination Sheet

I have had my Sindoh 3D printer for quite a while and it is a lovely machine to use in conjunction with Fusion 360.   I have printed all manner of items for the workshop, for projects and for friends and family.

For some time it has been a problem to print objects central on the bed.   While they would print OK, they are reluctant to come away from the bed surface and then having removed them from the bed, the raft would be very reluctant to leave the printed object.   I have got round this by offsetting the print position in X and Y on the table.   If I have a large object to print that overlaps the problem area I sprinkle talcum powder on the bed surface to ease freeing the object from the bed but this does not help the raft removal.

The print bed is an aluminium sheet that slides in and out of the machine.  This has a PTFE style laminated coating sheet held in place by adhesive. If I inspect the centre of the plate I can see the clear outline of bubbles under the lamination sheet.   These have got worse as time has gone by.  I imagine the bubbles create a finite air gap that upsets the temperature stability of the plate in the damaged area.

The situation had reached a frustrating peak today and lead to me totally removed the laminating sheet to leave bare aluminium.   The printer could not cope with bare ally and the PLA would not stick.  Some other laminating medium was going to be needed.

I had seen discussion regarding the use of what we in the UK call Masking Tape as a laminating medium.   I use 3M Blue Multipurpose Builders Masking Tape for Super Glue mounting of stock on the milling machine.   Having this to hand, I thought it worth a try. The tape is 48mm wide so I had to fix a number of strips across the plate to cover it completely and then trim the edges.  As you can see below, I didn’t quite get them parallel and butted to each other I was keen to run a test print.

Maybe I was lucky but the job came off the tape easily and the raft pulled off straightaway with no damage to the print.   The tape hasn’t bubbled or coming  off in any way so it looks good.

builders tape on Sindoh 3D printer bedplate
3M Blue Builders Tape on my Sindoh print bed

I am not sure how long the tape is going to last but I have got a full reel to keep swapping it out.

Update :  17/6/2021

I have been using the blue tape bed coating for over a year now with no problems other than an occasional replacement when it gets torn.

The other thing worth noting is that if your bed clips break there is an excellent replacement print model to download here

https://www.thingiverse.com/thing:4487138

Similar or related subjects : –

Verified by ExactMetrics