A Potential JSN Job with a Hidden Benefit
Since publishing details of the blade guide modifications on the Burgess BK3 bandsaw I have received a lot of interest and also a request for a replacement motor shaft pulley and a replacement blade drive pulley.
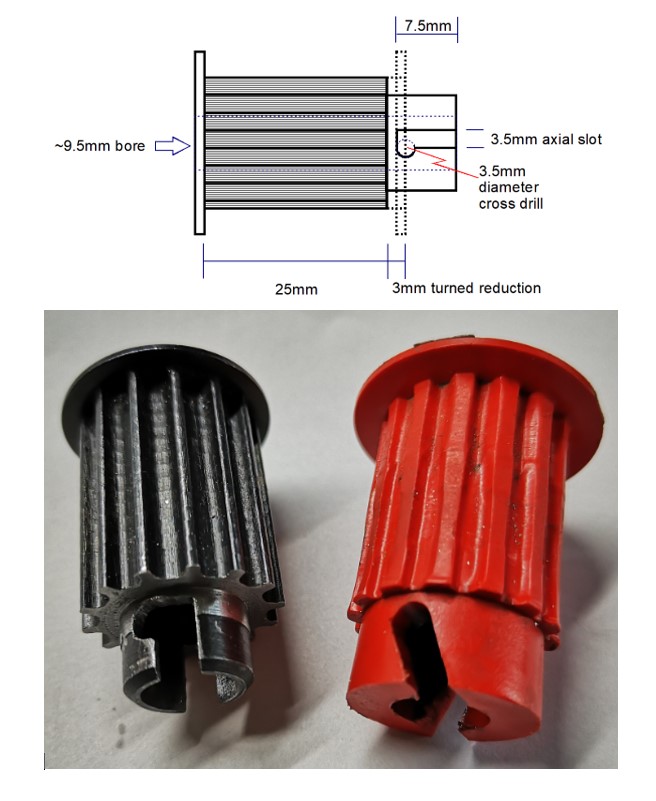
After dismantling my machine to check the dimensional details I discovered that the red plastic motor shaft drive pulley on my BK3 was severely worn to the extent of the teeth looking very distorted. (See image below). It would appear I need a new pulley also.
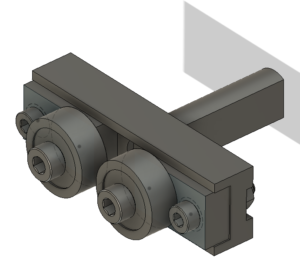
For those not familiar with the BK3 genre, the red drive wheel is a sliding fit on the motor shaft and has a helical slot in the end which locates into a cross pin through the motor shaft. The gear wheel is forced tight into the slot by virtue of the direction of rotation during cutting. Reading the handbook for the BK3 it seems that this pulley is designed to slide off to allow it to be swopped with an eccentric pulley mechanism when the BK3 is used as a fret saw.
The drive belt on the BK3 is 9mm wide and 5mm pitch (with 102 teeth). The red pulley has teeth extending axially over 25mm. This is to allow the one pulley on the motor shaft to drive two different pulley diameters on the blade drive pulley with only a change in belt length. This gives two blade speeds of 106m/min and 396m/min. My BK3 never had the second pulley combination when I bought it second hand. The BK3 is a well thought out machine and despite its vintage is very popular and commands relatively high prices on EBay etc.
Back to the plot.
My first instinct was to 3D print a replacement red pulley and this was successfully done using the Fusion 360 gear wheel design script. Rather than trying to model the helical slot I opted for a simpler solution of a pair of diametrically opposite ‘L’ slots. This worked well as a concept when trialled on the 3D printed version.
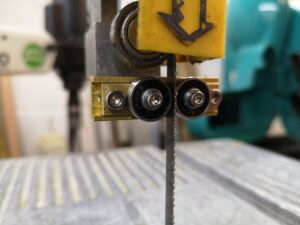
Rather than ship a PLA version to the client I opted to modify a standard off the shelf 14 tooth x 25mm wide x 5mm pitch pulley. These are available from Bearing Boys (14-5M-25). The one slight problem is that the boss on the pulley needs to be drilled out to 9.5mm to match the BK3 motor shaft. This does not leave a lot of meat on the boss. To get the best possible strength from such a modification I opted for a steel pulley rather than aluminium.
First operation is to drill out the centre bore of the pulley. The motor shaft appears to be 3/8″ (0.375″ or 9.5mm ish). I incrementally drilled the centre bore upwards from 5.5mm to 9.5mm but the pulley was still reluctant to slide onto the motor shaft. Not having an adjustable reamer I ended up using a letter ‘V’ drill to get a closer fit and then a light skim with a boring bar. After the shaft had been cleaned this combination gave a nice sliding fit
The red plastic pulley had a tooth width of 25mm. The teeth on the bought in steel pulley are wider (~28mm). The red pulley only has the single outside belt retaining collar. On this basis I gripped the boss end of the pulley in a collet and turned back the teeth width by 3mm. Note there is one slight problem. The belt retaining collars are not an integral part of the steel pulley casting but a thin dished additional fitment. The result is that at some point in the turning this fitment starts to rotate independently of the pulley body and I had to use the Dremel to cut this residual ring free before I could continue.
Having reduced the teeth width to 25mm, the ‘L’ slots need to be cut. I cross drilled the pulley boss with a 3.5mm hole. I then rotated the pulley in the mill jaws by a few degrees and then cut a diametric 3.5mm slot axially down to the same level as the 3.5mm hole and then hand filed the break through from the slot into the hole to create a retaining notch. The pulley bore was then cleared of any induced burrs.
The pulley now pushes onto the shaft and with a twist anticlockwise, the shaft cross pin locates into the ‘L’ slot notch.
So far so good. Next job is to recreate the large drive wheel pulley.
Similar or related subjects : –
- Small handheld vacuum cleaner
- Eccentric Engineering Turnado freehand turning tool
- Rotring 300 2mm clutch pencil modification
- Kindling Cracker – a safer option
- SINO SDS2MS DRO repair
- A useful Amazon sourced small item storage system
- 3D Printed Threads Modelled in Fusion 360
- Three axis stepper controller PCB in stock
- Myford Super 7 Large Bore depth stop
- Tangential Lathe Toolholder for Myford Super 7